採掘
採掘は鉱石を採取するためのゲームメカニクスで、鉱石は鋳造や鍛冶で高度なツールと武器をクラフトするなどの様々な用途に使われます。鉱物を集めて金属に加工することも、そのまま宝石としてとっておくこともできます。
必要な素材
採掘を始めるには2種類の特別な道具、ツルハシと試掘ツルハシが必要です。鉱石を入れられる10スロットの採掘バッグも選択肢として挙げられます。ツルハシは実際に石や鉱石を採取するために必要ですが、試掘用ツルハシは石や鉱石を見つけるために使用するもので、それだけでは鉱石を採取することはできません。
To begin mining, a player needs two specialized tools, the pickaxe and the prospecting pick. An optional item is a mining bag, which has 10 available inventory slots and holds ores. While the pickaxe is needed to actually harvest stone and ores, the prospecting pick is used to find them, but cannot harvest ores on it's own, as blocks broken by the propick do not drop anything.
採掘より前の金属の鉱石を入手する
ここに難問があります。採掘に必要な道具は金属を鋳造して作らなければなりませんが、金属の道具を作るために必要な材料は、金属の道具を使わなければ採取できないのです! 採掘せずにツルハシを作れるだけの製錬できる鉱石の塊(卑金属5ユニット分)を集めるには、2つの方法があります。
Herein lies the conundrum. The tools required for mining must be made from metal by casting, but the materials that players require to create metal tools can only be harvested when using metal tools! There are two methods available to collect enough smeltable ore nuggets (5 units of base metal) to create a pickaxe without mining.
採集
ワールドの地表に出現する鉱石を含んだ小さな石は、ゲーム序盤における金属の塊の良い供給源です。地表の鉱床を回収するには、素手や何らかのアイテムで小石を破壊し、製錬できる鉱石の塊に変えます。この地表の小さな鉱床は、地下の大きな鉱脈を指し示しています。後で採掘するために、マップにウェイポイントを記録しておきましょう。鉱石の塊は遺跡の収集品の容器に入っていることもあります。
Small stones containing ores appear on the surface of the world and are a good early game source of metal nuggets. To gather surface deposits, break the ore containing stones with an empty hand or any item to convert the stones into smeltable ore nuggets and collect in your inventory. These small surface deposits are an indicator of larger underground ore deposits. (Be sure to add a waypoint to mark the location for later mining operations.) Sometimes nuggets can be found in loot vessels located in ruins.
パンニング
銅の塊はパンニングでも入手することができます。詳しくはパンニングのガイドをご覧ください。
Copper nuggets can also be obtained by panning. See the panning guide for more information.
採掘で金属鉱石を入手する
実際の採掘作業については、詳しい説明は必要ありません。ツルハシで岩ブロックを壊すと、岩や小石、石の塊に含まれる鉱石などがドロップします。採掘で難しいのは、採掘する鉱石を見つけることです。バージョン1.9では、特定の鉱石は特定の岩の中にしかスポーンしません。ある種類の岩にどのような鉱石が出現するかは、ブロックに対してShift + Hを押すと開かれるハンドブックに記載されています。天然の鉱床や鉱石の生成については、鉱石の鉱床のページをご覧ください。
When rock blocks are broken using a pickaxe, rock, small stones or ores contained in chunks of stone will be dropped. The challenge is in finding the ore-containing rocks. As of game version 1.9, certain ore types only spawn in certain rock types. To determine which ores can occur in a rock type, examine a block, hold Shift+H, and the handbook will provide information about what ores can appear in that rock type. For more information about natural deposits and ore generation, see the Ore Deposits page.
場所を選ぶ
採掘する場所を選ぶには、「探索」と「試掘」という2つの方法があります。この2つは互いに相反するものではなく、組み合わせると非常に効果的です。目的の鉱石がある地域を試掘によって探し、そのエリア内の洞窟を探索すれば、露出した鉱石を見つけて採掘することができるでしょう。
There are two general methods used to choose a location "Exploration" and "Prospecting". These are not mutually exclusive and work very well when combined. Players can prospect to find a region with the desired ore, and then explore caves within that region to find exposed ore to mine.
探索(ランダムな手法)
クラフトに使う岩(チョーク、石灰岩)や、ツールや武器、金属アイテムの材料となる鉱石が発生することがわかっている岩がある地域を、マップ上で探索してみましょう。鉱石は入り口が地表に出ている洞窟を探索することで見つかることもあります。洞窟を探検する際には、シャフトを登ったり降りたりするためのはしごや、洞窟内を照らしたり出口を示すための松明をたくさん持っていくとよいでしょう。どの洞窟にも「冒険」の可能性があるので、大きな危険と大きな報酬に直面する準備をしておきましょう。
Explore the map to locate regions with rock types used in crafting (chalk, limestone) and rock types that are known to generate ores used in crafting tools, weapons, and metal items. Sometimes ores can be located by exploring caves with entrances exposed to the surface of the world. When exploring caves, it's a good idea to bring ladders to provide a way to climb up or down shafts, and lots of torches to light the cave and mark a path back out. The possibility for "Adventure" exists in every cave, so be ready to face great danger, but also to reap great rewards.
洞窟探検の報酬
洞窟探検の利点は、鉱石が存在しないとしても地下の遺跡を発見できる可能性があることであり、そこには他の方法では手に入らない宝物や素材が眠っていることでしょう。洞窟の中にはスタティック・トランスロケーターも存在します。この機械を使えば、ワールドの未開の地に移動することが可能です。
A benefit of exploring caves is that even if ores aren't present, players may locate underground ruins, which often contain treasures and materials that a player cannot acquire any other way. Static Translocators also exist in caves. These machines can be used to transport the player into uncharted regions of the world.
洞窟の危険
- Locusts are a dangerous mob that spawns in caves and caverns.
- Drifters that are tougher than those encountered on the surface also exist.
- Drop shafts may extend for tens or hundreds of blocks in caverns, and players who fall into these cavernous pits have no chance of survival.
- Lava exists at deeper levels underground and will burn players (and gear) if personally encountered!
試掘(計画的な方法)
地表の小さな鉱床で示された場所を採掘するのは鉱石を見つける良い方法ですが、すべての鉱石が地表の石の中にスポーンするわけではありません。より深くにある鉱石を見つけるには、試掘ツルハシを使います。試掘は、そのエリアで採掘することを決める前に地表で行うことができ、チャンク内に存在する鉱石をもとに、どのエリアが採掘する価値があるかを判断するのに役立ちます。
Mining at locations marked by small surface deposits can be a good way to find ores, but not all ores in a region will spawn in surface stones. To find deeper ores, use the prospecting pick or "propick". Prospecting can be performed on the surface before choosing to mine in an area, and help players decide which regions are worthwhile to mine based on the ores present in the chunk.
密度探査モード
試掘ツルハシの一つ目のモードである密度探査モードは、最初から有効になっています。これは見込みベースの広範囲探査システムで、具体的には探査されたチャンク(32x32ブロック、ただし地表からマントルまでの範囲)に特定の鉱石が存在する見込みを示します。
This is the first mode of the propick (F key), which is by default always enabled. It is a chance based search system with long range - specifically, it shows the chance (in permilli) for specific ores to be present within the chunk of the first point sampled all the way from surface to mantle.
試掘の手順
試掘するためには「近接」している3つの岩ブロックを壊して、そのエリアの鉱石を「サンプリング」する必要があります。試掘ツルハシは岩ブロックにしか使用できません。これらのブロックは最低でも3ブロック、最高で16ブロック離れていなければなりません(サンプリングするブロックの間が)。正方形の中に3つのブロックを配置することも、最初のサンプルから最後のサンプルが8ブロック離れているような直線に配置することも可能である。3つ目の有効なサンプルブロックを壊すと、3つのブロックのうち最初のブロックがあったチャンクに基づいて、チャットウィンドウにすべての鉱石の密度が表示されます。
To prospect, a player must break 3 rock blocks in 'close' proximity to "sample" the area for ores. These blocks must be located a minimum of 3 blocks apart (blocks between samples) and a maximum of 16 blocks apart. It is possible to sample three blocks within a square, or in a line where the last sample is 8 blocks away from the first sample. Upon breaking the third valid sample block, displays the possible densities of all the ores in the chat window based on the chunk that the first of the three blocks prospected (broken) was located in.
- 「近すぎる場所を」試掘した場合:先にサンプリングしたブロックに近すぎるブロックを破壊した場合、ゲームダイアログ(チャットウィンドウに表示される)が同じサンプル数の要求を繰り返します。しかしながら、ゲームはこの無効なサンプルを登録してしまい、試掘のカウントはその「無効な」サンプルの次から始まります。新しいサンプルを取るには、試掘の合計回数にはカウントされませんが、少なくとも3個のブロックを試掘しなければなりません。
- 「遠すぎる場所を」試掘した場合:試掘したブロックが最初のサンプルから遠すぎた(16ブロックを超える)場合、ゲームダイアログ(チャットウィンドウに表示される)に「このサンプルは遠すぎて、以前に採取したサンプルと併用できません」というメッセージが表示されます。そしてこの最後のブロックが最初のサンプルに変わります。そのため遠すぎるブロックを試掘した場合、サンプリングを最初からやり直さなければなりません。
試掘の結果
試掘の結果の情報を解釈するには、このツールが鉱石の実際の存在を検知するものではなく、鉱石が存在する可能性を検知するものであることを理解する必要があります。このゲームでは、チャンクが生成されるときにランダムに生成される鉱石密度マップが使用されます。これにより鉱石の出現確率が決定されます。プレイヤーがチャンクからすべての鉱石を取り除いたとしても、試掘の結果は変わりません。またこのモードで試掘しても、クォーツや表層の銅のように検出されない鉱石もあります。
To interpret the information, one must understand that this mode does not detect the actual presence of ore blocks, but detects the chance that ores are present (in permilli). The game uses randomly generated ore density maps whenever a chunk is generated. These determine the chance for ores to appear. Even if a player removed all the ores from a chunk, the prospecting reading would remain the same. Additionally, some ores are not detected by prospecting with this mode, like quartz or surface copper.
結果の表示は、破壊した3つのブロックのうち最初のブロックを基準にしたものです。ゲームはチャンクの密度マップを読み込み、すべての鉱石の密度をチャットウィンドウに表示します。これらの値は実際の鉱石ではなく、潜在的な密度を反映しています。
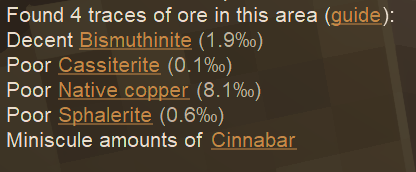
表示される結果は密度の高いものから低いものの順に、極めて高い、とても高い、高い、普通、乏しい、とても乏しいの6つのカテゴリーに分けられます。このカテゴリーの後には括弧内に千分率「PPT」([1]通常のパーセント記号「%」ではスラッシュの下にゼロが1つあるのに対し、「‰」の下にはゼロが2つあることに注意してください)で示された数字が続きます。
Using the Bismuthinite reading above as an example, you have a medium chance of locating the ore in your chunk, and approximately 19 blocks of the 1000 in this chunk contain the ore, while the Copper reading shows a low chance of locating the ore in your chunk, but if it did spawn, it would provide approximately 81 blocks of ore.
鉱石の種類によって、同じPPT ‰の数値でも密度の記述が大きく異なります(素材の希少性に基づいています)。例えば、以下のようになります。
大きな鉱脈を試掘する
鉱石の密度はワールドで生成された密度マップをもとに、約32ブロックの解像度で作成されているため、試掘の結果は隣接する4つのチャンクで似たものになります。鉱石の密度は「中心部」に集中し、周辺部に向かうにつれて減少する傾向があります。そのため、探している鉱石の密度が低かった場合は、他の方向に少し離れた場所で試掘を行い、密度の高い場所を探すとよいでしょう。十分なサンプリングを行えば鉱床の中心を見つけることができ、鉱床はしばしば複数のチャンクにまたがっています。
Prospecting results should be similar for 4 chunks in an area because the ore densities are created from a density map generated with the world, at a resolution of approximately 32 blocks. The ore densities will tend to have a more concentrated 'center' and then decrease when moving towards the circumference. So when locating a low density reading of any desired ore, try taking other prospecting samples some distance away in other directions to find an area with a higher reading. With enough sampling, a player can locate the center of the ore field, which often span a great many chunks.
Note:試掘ツルハシはクォーツ、表層の銅、塩の岩「ロックソルト」(試掘モードで表示される岩塩「ハライト」と混同しないように)を検出しません。試掘ツルハシは、ある閾値以上の鉱石のみを検出します。試掘ツルハシが鉱石の存在を示さないエリアで、鉱石の鉱床が見つかることがあります。しかしこのような「検出漏れ」現象が起きるのは非常に稀です。
ノード探査モード
試掘ツルハシの2つ目のモードである「ノード探査モード」はデフォルトでは有効になっていませんが、ワールド作成時に有効にするか、作成済みのワールドではコマンドを使って有効にすることができます。このモードでは特定の場所で正確かつ実際に入手可能な鉱床を、短~中距離で探査することができます。 ただし、このモードを使用するとツールの耐久性の消耗がかなり早くなるので注意が必要です。また岩塩(ハライト)は検出しないので、塩分を取りすぎることがなくなるでしょう。:p
This is the second mode of the propick, which can be activated with F. It offers a short to medium range search for exact and actually available deposits in a specific place. Be aware however, using this mode will drain the tools durability considerably faster. Additionally, it also doesn't pick up on Halite - don't be too salty now :p
ノード探査モードを有効化
この2つ目のモードにアクセスする最も簡単な方法は、新しいワールドを作成する際に有効にすることです。これは詳細設定(「カスタマイズ」ボタン)で行うことができます。リストの最後にある「試掘ツルハシのノード探査半径」というオプションで、無効にするかどうか、使用する場合はどのサイズで動作させるかを切り替えることができます。 ここで選択する半径は、立方体の探査領域のサイズを表します。例えば半径4は、9x9x9ブロックの検索領域に相当し、合計で729ブロックを探査することになります。
Since v1.18, this second mode is enabled by default when creating a new world. You can disable it or modify its radius in the advanced settings ("Customize" button) - in the middle of the list, the option "ProPick Node Search Radius" lets you switch between disabled or, if you want to use it, for what size you want it to work. The radius you select here describes the size of the cubic search area, for instance the radius 4 equals a search area of 9x9x9 blocks, 729 blocks searched in total.
| Radius | 2 | 4 | 6 | 8 |
| Search Size | 125 | 729 | 2197 | 4913 |
すでにワールドを作成済みの場合は、チャットで簡単なコマンドを使用してこのモードを有効にし、半径を設定または変更することができます。チャットで以下のように入力してください。
/worldConfig propickNodeSearchRadius [Radius]
設定したい半径を入れてEnterキーを押します(最後のコマンドに括弧はつけません)。半径の数値が大きくなるとコンピュータに負担がかかり、フリーズする可能性があることを覚えておいてください。さらにゲーム内での考慮点として、あまり広い探索範囲の鉱石を探査することは、そもそも密度探査とあまり変わりません。 Fキーで2つのモードを切り替えられますが、一度ゲームを再起動しておく必要があります。
試掘の手順
密度探査と同様に試掘ツルハシを使って石ブロックを壊す必要がありますが、ブロックを1つ壊すだけで、チャットの情報タブにすぐに結果が表示されます。そこには壊したブロックを中心とした探査範囲の測定値が表示されます。
Similar to the density search, you will have to break a stone block with the propick, however you will only have to break one block and will get the results immediately listed in the information tab of the chat. The readings will be shown for the search area, with the broken block as the centre. Note: Does not work on cracked rock blocks.
Prospecting Written Guide
This reddit post is a wonderfully written guide from the user Streetwind on how to start prospecting if you are completely new to prospecting in general. It clearly explains how to begin prospecting, what to bring with your first expedition, and how exactly you figure out where to dig down.
試掘の結果
表示されるのは、検索したエリアに実際に生成されている鉱石についての情報のみです。検索した立方体内に鉱石がない場合は、チャットに「近くに鉱石ノードがありません」というメッセージが表示されます。 鉱石が見つかった場合は、その鉱石を含むブロックの量が、実際の数値ではなく言葉で表示されます。
You will only be informed about actually occurring deposits in the searched area. If there are no ores in the searched cubicle, the chat will display the "no ore node nearby" message. If any deposits are found, the amount of blocks containing that ore is displayed again in words rather than actual numbers.
| Verified... | trace amounts | small amounts | medium amounts | large amounts | very large amounts | huge amounts |
| Amount | 1-9 | 10-19 | 20-39 | 40-79 | 80-119 | 120+ |
採掘の産出物
採掘しても、製錬できる塊はドロップしません。代わりに、石の大きな塊に含まれる鉱石がドロップします。採掘をしているとインベントリのスペースは貴重なものですが、この石の大きな塊は「製錬できる塊」よりも少ないスペースで済みます。岩の中の鉱石から製錬できる塊を得るためには、クラフトグリッドでハンマーを使って砕かなければなりません。「含有量が豊かな」大きな塊は鉱石の濃度が高く、砕くとより多くのナゲットが入手できます。鉱石を保管するための鍛冶用の貯蔵容器を必ず作成しておきましょう!
Smeltable nuggets do not drop from rocks when mined. Instead, ores contained in chunks of stone will be dropped. When mining, inventory space is generally at a premium, and these chunks occupy less space than "smeltable nuggets". Ores within rock must be crushed with a hammer in the crafting grid to obtain smeltable nuggets. "Rich" chunks have a higher concentration of ore and will generate more nuggets when crushed, so be sure to create smithy storage containers to store the ores!
ビデオチュートリアル:試掘ツルハシの使い方
| How to Use the Prospecting Pick |
|---|
Video Tutorial - Ore Deposits
| Ore Deposits in Vintage Story English | Erz Verteilung in Vintage Story Deutsch |
|---|---|
| Vintage Storyの鉱床(English) | Vintage Storyのエルツファタイロン(ドイツ語) |
|---|---|
You have basically 3 ways of acquiring halite, which is used to make Salt.
Purchasing
You can purchase halite from aː
- Commodities Trader for an average price of 3 rusty gears for a stack of 16.
- Survival Goods Trader for an average price of 3 rusty gears for a stack of 16.
Mining Sedimentary Rock Layers
You can use the prospecting pick to find Halite the same way you can find metal ore (see above)
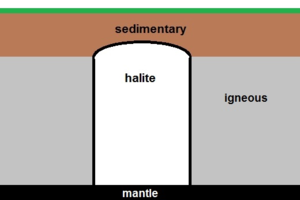
If you are in an area with at least one sedimentary layer (except bauxite) use the main Prospecting Pick mode (Density Mode, being the only one that shows halite readings). If you find any halite readings, it might be an area prone to spawn a halite deposit known as a "Salt Dome". Find the area with the best readings and around, and go caving or making vertical tunnels until you are in the bottommost sedimentary rock layer, or in the first rock layer that's not sedimentary. Then, go making horizontal tunnels in that level, following the rock type you're in. Once you find a pink rock, that's it, eureka!
A salt dome starts at the sedimentary layer and goes down to mantle level. It has so much salt that you might share it with other people and never run out, if in Multiplayer. In Singleplayer, once you find it, you won't need to search for a second time.
Sedimentary rocks that might have domes: chalk, chert, claystone, conglomerate, limestone, sandstone, shale Halite doesn't spawn in bauxite layers, but check below bauxite rock layers to be sure there isn't other sedimentary rocks.
In Deserts
Deserts have an average temperature between 15°C and 40°C and "Rarely" or "Very Rare" rainfall.
They also frequently have cow skulls, hyenas or cactuses. Look below the dirt/gravel/sand; it is few layers of halite like 2 or 3 blocks below the dirt/gravel/sand, at most. The deposit might provide you several stacks, but it might run out pretty quickly. This is what is called a "Dry lake salt bed".
You won't have propick readings to guide you; spawning is random in deserts only.
Notes
The head developer settled a debate in 2023 about density readings. To the question "Are prospecting reading in density mode chunk-based, or position-based?" Tyron responded "They are position based. thats why i don't want to represent them in the same way as prospector info". The mod Prospector Info displays density-reading results on the map in squares aligned with chunk borders, and many video tutorials have perpetuated the misconception that prospecting results are chunk-based.
History
- In version 1.19 the results of density samples will not only be printed to the chat box but also saved to the map.
| Ores, metals and minerals | |
|---|---|
| Guides | Ore Deposits • Metals |
| Metals | Copper • Iron • Meteoric iron • Gold • Silver • Lead • Tin • Zinc • Bismuth • Titanium (Ilmenite) • Nickel |
| Alloys | Bronze (Tin bronze, bismuth bronze, black bronze) • Steel • Brass • Solder (Lead solder, Silver solder) • Molybdochalkos • Cupronickel • Electrum |
| Minerals | Alum • Borax • Cinnabar • Coal • Halite (Salt) • Lapis lazuli • Quartz • Saltpeter • Sulfur • Sylvite (Potash) |
| Tools | Pickaxe • Hammer • Prospecting Pick • Crucible • Forge • Ore blasting bomb • Quern • Anvil • Bloomery • Helve hammer • Pulverizer |
| Other | Gemstones |
| Related mechanics | Panning • Mining • Clay forming • Casting • Smithing • Steel making |
| Wiki Navigation | |
|---|---|
| Vintage Story | Guides • Frequently Asked Questions • Soundtrack • Versions • Controls |
| Game systems | Crafting • Knapping • Clay forming • Smithing • Cooking • Temperature • Hunger • Mining • Temporal stability • Mechanical power • Trading • Farming • Animal husbandry |
| World | World generation • Biomes • Weather • Temporal storms |
| Items | Tools • Weapons • Armor • Clothing • Bags • Materials • Food |
| Blocks | Terrain • Plants • Decorative • Lighting • Functional • Ore |
| Entities | Hostile entities • Animals • NPCs • Players |
| Miscellaneous | List of client commands • List of server commands • Creative Starter Guide • Bot System • WorldEdit • Cinematic Camera • Adjustable FPS Video Recording • ServerBlockTicking |


