Survival Guide - Your first day/uk: Difference between revisions
No edit summary |
No edit summary |
||
| (75 intermediate revisions by 5 users not shown) | |||
| Line 1: | Line 1: | ||
<languages /> | <languages /> | ||
Цей посібник був створений завдяки співпраці між людьми й може містити помилки. Прекрасний учасник спільноти, copygirl, яка зробила чималий внесок до коду Vintage Story, написала більш точний і, можливо, зрозуміліший [https://copy.mcft.net/vs/guide/ посібник по виживанню на своїй сторінці]. А щодо вікі, нема гарантій по точності інформації на ній, оскільки вона редагується згідно знанням автора. | {{Outdated|Не оновлено для попередніх налаштувань створення світу 1.18}} | ||
Цей посібник був створений завдяки співпраці між багатьма людьми й може містити помилки. Прекрасний учасник спільноти, copygirl, яка зробила чималий внесок до коду Vintage Story, написала більш точний і, можливо, зрозуміліший [https://copy.mcft.net/vs/guide/ посібник по виживанню на своїй сторінці]. А щодо вікі, нема гарантій по точності інформації на ній, оскільки вона редагується згідно знанням автора. | |||
__TOC__ | __TOC__ | ||
== Керування == | == Керування == | ||
<div style="float:left; margin-right:20px;"> | Це стандартні налаштування. Будь ласка, май на увазі, що коли змінюєш кнопку, наприклад, {{Keypress|Shift}} для присідання на іншу кнопку, то усі комбінації, які використовували кнопку {{Keypress|Shift}}, зміняться на нову кнопку також. | ||
<div style="float:left; margin-right:20px; padding-bottom:1em;"> | |||
{| | {| | ||
|+ '''Керування персонажем''' | |||
|- | |- | ||
| | | style="padding-right:0.5em" | {{Keypress|W}} {{Keypress|A}} {{Keypress|S}} {{Keypress|D}} || Пересування | ||
|- | |- | ||
| | | style="padding-right:0.5em" | {{Keypress|Space}} || Стрибок | ||
|- | |- | ||
| | | style="padding-right:0.5em" | {{Keypress|E}} || Інвентар рюкзаків (доступ до сітки створення) | ||
|- | |- | ||
| | | style="padding-right:0.5em" | {{Keypress|C}} || Інвентар персонажа (одяг та інше спорядження) | ||
|- | |- | ||
| | | style="padding-right:0.5em" | {{Keypress|Shift}} || Присідання (використовується для розміщення активних елементів на блоках) | ||
|- | |- | ||
| | | style="padding-right:0.5em" | {{Keypress|Ctrl}} + {{Keypress|W}} || Біг | ||
|- | |- | ||
| | | style="padding-right:0.5em" | {{Keypress|G}} || Сісти | ||
|- | |- | ||
| | | style="padding-right:0.5em" | {{Keypress|Q}} || Викинути утримуваний предмет | ||
|- | |- | ||
| | | style="padding-right:0.5em" | {{Keypress|F5}} || Зміна режимів камери (першої особи, третьої особи, накладний) | ||
|} | |} | ||
</div> | </div><div style="float:left;"> | ||
<div style="float:left;"> | |||
{| | {| | ||
|+ '''Керування інтерфейсом користувача''' | |||
|- | |- | ||
| | | style="padding-right:0.5em" | {{Keypress|Tab}} || Показати/приховати чат | ||
|- | |- | ||
| | | style="padding-right:0.5em" | {{Keypress|T}} || Почати друкувати в чаті | ||
|- | |- | ||
| | | style="padding-right:0.5em" | {{Keypress|F4}} || SПоказати/приховати інтерфейс користувача | ||
|- | |- | ||
| | | style="padding-right:0.5em" | {{Keypress|F6}} || Показати/приховати мінімапу користувача | ||
|- | |- | ||
| | | style="padding-right:0.5em" | {{Keypress|B}} || Показати/приховати інформацію про блок | ||
|- | |- | ||
| <span class=" | | style="padding-right:0.5em" | <span lang="en" dir="ltr" class="mw-content-ltr">{{Keypress|H}} || Survival Handbook - can also be used while hovering over an item in the inventory</span> | ||
|- | |- | ||
| <span | | style="padding-right:0.5em" | <span lang="en" dir="ltr" class="mw-content-ltr">{{Keypress|Shift}} + {{Keypress|H}} || Survival Handbook while looking at a block or item in the world</span> | ||
|- | |- | ||
| | | style="padding-right:0.5em" | {{Keypress|M}} || Показати/приховати {{ll|worldmap|карту світу}} | ||
|- | |- | ||
| <span class=" | | style="padding-right:0.5em" | <span lang="en" dir="ltr" class="mw-content-ltr">{{Keypress|N}} || Show/Hide block interaction help</span> | ||
|- | |- | ||
| <span class=" | | style="padding-right:0.5em" | <span lang="en" dir="ltr" class="mw-content-ltr">{{Keypress|V}} || Show/Hide coordinates</span> | ||
|- | |- | ||
| <span class=" | | style="padding-right:0.5em" | <span lang="en" dir="ltr" class="mw-content-ltr">{{Keypress|F12}} || Take a screenshot</span> | ||
|- | |- | ||
| <span class=" | | style="padding-right:0.5em" | <span lang="en" dir="ltr" class="mw-content-ltr">{{Keypress|Esc}} || Exit/close any interface</span> | ||
|} | |}</div></div> | ||
</div> | {{-}} | ||
<div | |||
== Створення світу == | |||
Коли створює новий світ, гравець може вибрати між різними шаблонами або налаштувати генерацію окремо. Для новачків рекомендовано переглянути опції налаштування для їх першого світу або почати з шаблону the Exploration, так як деякі налаштування складності Стандартної гри можуть сильно розчарувати. | |||
Ключові моменти складності, що можуть бути особливо складними для нових гравців такі: | |||
* Смертна кара (Залишити чи викинути інвентар після смерті) | |||
* Темпоральна стабільність (Темпоральні бурі, Поверхнева Стабільність і Розломи) | |||
* Розподіл клімату (дистанція між різними «біомами» і чи вони реалістично розподілені по екватору, або ж випадково розкидані клаптиками) | |||
* Частота поверхневих покладів (і міді й олова, так як вони найбільш важливі стартові руди) | |||
Таблиця знизу показує можливі шаблони. Рекомендується використати кнопку Customize під вибраним шаблоном щоб далі налаштувати твій світ, так як майже усі аспекти генерації світу і досвіду гравця можуть бути змінені. Більш детальний список усіх опцій може бути знайдений на сторінці [[World Configuration|налаштування світу]]. | |||
{| class="wikitable sortable" | {| class="wikitable sortable" | ||
|- | |- | ||
! Preset !! Important Aspects | ! <span lang="en" dir="ltr" class="mw-content-ltr">Preset</span> !! <span lang="en" dir="ltr" class="mw-content-ltr">Important Aspects</span> | ||
|- | |- | ||
| Standard || Despite it's name, this is not necessarily the best starting point for any new players. It comes with the full assortment of difficulty options, meaning temporal stability, hunger, temperatures etc. are all enabled. Without customization, monsters will spawn from the first night on and inventory will be dropped on death. | | <span lang="en" dir="ltr" class="mw-content-ltr">Standard</span> || <span lang="en" dir="ltr" class="mw-content-ltr">Despite it's name, this is not necessarily the best starting point for any new players. It comes with the full assortment of difficulty options, meaning temporal stability, hunger, temperatures etc. are all enabled. Without customization, monsters will spawn from the first night on and inventory will be dropped on death.</span> | ||
|- | |- | ||
| Exploration || Most direct threats like creature hostility & temporal stability are turned off, natural difficulties like hunger and temperatures are reduced. The player will keep their inventory on death. | | <span lang="en" dir="ltr" class="mw-content-ltr">Exploration</span> || <span lang="en" dir="ltr" class="mw-content-ltr">Most direct threats like creature hostility & temporal stability are turned off, natural difficulties like hunger and temperatures are reduced. The player will keep their inventory on death.</span> | ||
|- | |- | ||
| Wilderness Survival || Hard Mode - '''not''' recommended for new players. Standard Mode with additional challenges - inventory is dropped on death and the player will respawn in a random location in a 5k block radius. Player health points are reduced and creature strength is raised. | | <span lang="en" dir="ltr" class="mw-content-ltr">Wilderness Survival</span> || <span lang="en" dir="ltr" class="mw-content-ltr">Hard Mode - '''not''' recommended for new players. Standard Mode with additional challenges - inventory is dropped on death and the player will respawn in a random location in a 5k block radius. Player health points are reduced and creature strength is raised.</span> | ||
|- | |- | ||
| Creative Building || As the name implies, this is your typical flat building world with Creative Mode enabled from the start. If you'd rather like to build in a normal map, customize a different preset to start in Creative Mode instead of Survival Mode. | | <span lang="en" dir="ltr" class="mw-content-ltr">Creative Building</span> || <span lang="en" dir="ltr" class="mw-content-ltr">As the name implies, this is your typical flat building world with Creative Mode enabled from the start. If you'd rather like to build in a normal map, customize a different preset to start in Creative Mode instead of Survival Mode.</span> | ||
|} | |} | ||
== | == Твій перший день == | ||
=== | |||
=== Спавн гравця === | |||
<div class="mw-translate-fuzzy"> | |||
Гравці з'являються у світі у «місці відродження». Якщо гравець вмирає у грі, він знову з'являється (відроджується) у вихідному місці появи доти, доки точка появи гравця не буде змінена. (Спосіб змінити місце появи гравця можна знайти пізніше у грі.) Рекомендується встановити маркер цієї точки появи, коли гравець вперше з'являється у світі. Або клацнувши правою кнопкою миші на карті світу або через команду <code>/waypoint додайте [waypointcolor] [title] </code>. Ця команда додає шляхову точку із заданим кольором і текстом. | |||
</div> | |||
=== | === Кам'яні інструменти === | ||
[[File:Stonesbranches.png|thumb| | [[File:Stonesbranches.png|thumb|Гілки й каміння|200px]] | ||
[[File:Knapping.png|right|thumb| | [[File:Knapping.png|right|thumb|Процес відколювання|200px]] | ||
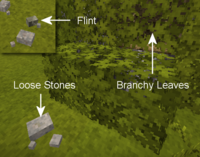
Щоб розпочати '''Кам'яний вік''', вам знадобляться '''Кам'яні знаряддя''', процес зазвичай включає наступне: | |||
# | <div class="mw-translate-fuzzy"> | ||
# <code> | # Знайдіть '''Кремінь''' або '''Інший камінь''' (базальт, граніт, андезит,обсидіан чи перідотит). | ||
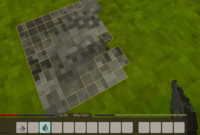
# | # <code>Присісти + Правий Клік</code> на тверду поверхню для початку процесу [[knapping/uk|оббивки]] каміння. (Тільки при використанні кременю [[knapping/uk|оббивка]] почнеться одразу. Якщо у вас інший камінь,необхідно спочатку розмістити його на твердій поверхні та <code>Присісти + Правий Клік</code> знову іншим каменем.) | ||
# | # В меню виберіть потрібний інструмент. Рекомендованими першими інструментами є [[Axe]] та [[Knife]]. | ||
# Використовуючи камінь в активній руці, <code>Лівий Клік</code> по помаранчевим вокселям, для вибивання зайвого з форми. Коли останній помаранчевий воксель буде вибито, готова кам'яна частина іструменту опиниться у хотбарі гравця. | |||
# Press E to open the inventory GUI and access the crafting grid. In the grid, combine the stone tool blade with a stick (handle) to create the finished tool. | # Press E to open the inventory GUI and access the crafting grid. In the grid, combine the stone tool blade with a stick (handle) to create the finished tool. | ||
</div> | |||
:''''' | :'''''Примітка''': палички можна збирати із землі або ламаючи гіллясте листя за допомогою {{LMB}}. '' | ||
{{-}} | {{-}} | ||
=== | === Інвентар гравця === | ||
Гравець має доступ до трьох типів слотів інвентарю. | |||
{|class="wikitable" | {|class="wikitable" | ||
| Line 120: | Line 121: | ||
|- | |- | ||
| | | | ||
<div lang="en" dir="ltr" class="mw-content-ltr"> | |||
# Off-hand slot that can hold passive items such as torchers or lanterns. | # Off-hand slot that can hold passive items such as torchers or lanterns. | ||
# Main inventory that holds 10 slots and every slot is linked to a shortcut for quick access (default: keys 1 to 0). | # Main inventory that holds 10 slots and every slot is linked to a shortcut for quick access (default: keys {{keypress|1}} to {{keypress|0}}). | ||
# Portable containers. Up to 4 containers can be added to expand the inventory even further, the slots are shown in the inventory/crafting window (default: E | # Portable containers. Up to 4 containers can be added to expand the inventory even further, the slots are shown in the inventory/crafting window (default: {{Keypress|E}}). | ||
</div> | |||
:'''Tip''': | :'''Tip''': {{ll|Reed chest|Кошики}} - найкращий перший варіант для розширення вашого інвентарю. Зберіть {{ll|Reed|рогіз}}, який зазвичай можна знайти біля озер. Сітку створення можна знайти {{ll|Reed chest|тут} або натиснувши {{keypress|H}} і виконавши пошук «кошик», щоб побачити рецепт створення. | ||
|} | |||
|} | |} | ||
{{-}} | {{-}} | ||
=== | === Їжа === | ||
[[File:Black currant and wild crops.png|250px|thumb| | [[File:Black currant and wild crops.png|250px|thumb|Час збирання їжі!]] | ||
<div lang="en" dir="ltr" class="mw-content-ltr"> | |||
Here are some of the first day options for food: | Here are some of the first day options for food: | ||
* | * {{ll|Mushroom|Mushrooms}} can be harvested with a {{ll|knife|knife}} or empty hands. They will regrow at the exact spot, so marking mushroom clusters on the map can be advantageous. Make sure to check the mushroom with the Handbook to check for poisonous variants, as some mushrooms can drain your {{ll|health|health}} or even kill you when consumed raw or cooked | ||
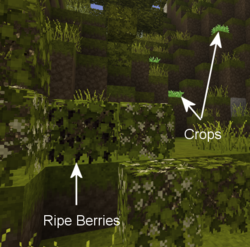
* Ripe | * Ripe {{ll|Berry|Berry Bushes}} can be harvested without tools, and then broken and replanted anywhere else. After a while they will start to bloom again. | ||
* | * {{ll|Cattail|Cattail}} roots can be harvested using a knife and cooked over a fire as a source of early game forage. | ||
* Most animals can be killed and harvested with a knife for nutritious meat and fat. | * Most animals can be killed and harvested with a knife for nutritious meat and fat. Sneak and hold the {{RMB}} with a knife in hand to harvest animals. Meat must be cooked in a fire pit. | ||
</div> | |||
{{-}} | {{-}} | ||
=== | === Глина === | ||
[[File:Claydeposits.png|250px|thumb|Знайдіть глину і візьміть її з собою або позначте на карті.]] | |||
<div lang="en" dir="ltr" class="mw-content-ltr"> | |||
Clay is a required resource to progress through the ages, and in early game it can be used to build comparatively cheap stationary storage options and your first means to preserve food for a bit longer. It is also required to craft a cooking pot, which is necessary for advanced cooking. | Clay is a required resource to progress through the ages, and in early game it can be used to build comparatively cheap stationary storage options and your first means to preserve food for a bit longer. It is also required to craft a cooking pot, which is necessary for advanced cooking. | ||
</div> | |||
Detailed information can be found in the | <div lang="en" dir="ltr" class="mw-content-ltr"> | ||
Detailed information can be found in the {{ll|Clay Forming|Clay Forming}} page. | |||
</div> | |||
{{-}} | {{-}} | ||
=== | === Освітлення / Приготування їжі === | ||
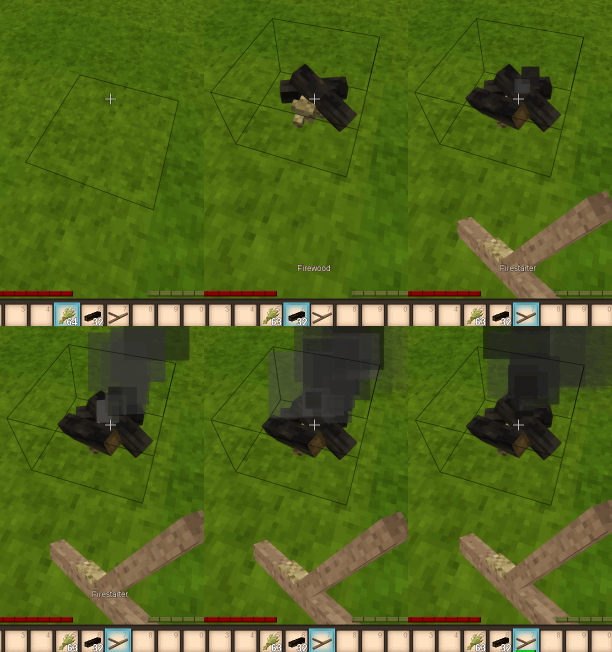
[[File:Firestarter.gif| | [[File:Firestarter.gif|Створення вогнища.|right|frame]] | ||
Once the sun sets, a player might want to create a | <div lang="en" dir="ltr" class="mw-content-ltr"> | ||
Once the sun sets, a player might want to create a {{ll|Firepit|firepit}} as a source of light and for cooking. Be aware though, {{ll|weather|rain}} will extinguish any uncovered fires or torches, so be sure to build a simple roof over any firepits. | |||
</div> | |||
<div lang="en" dir="ltr" class="mw-content-ltr"> | |||
* Firewood: | To make a firepit, gather the following resources: | ||
</div> | |||
<div lang="en" dir="ltr" class="mw-content-ltr"> | |||
* {{ll|Dry grass|Dry grass}}: {{LMB}} with a {{ll|Knife|Knife}} in hand to gather Tall Grass. | |||
* {{ll|Firewood|Firewood}}: {{LMB}} with an {{ll|Axe|Axe}} in hand to cut {{ll|tree|Trees}} and harvest '''logs'''. Place the '''axe''' and '''logs''' in the crafting grid to create firewood. | |||
</div> | |||
<div lang="en" dir="ltr" class="mw-content-ltr"> | |||
{{SneakClick|Sneak and right click}} on solid ground with the dry grass in hand to place a fire pit. Next, {{SneakClick|sneak and right click}} with 4 firewood in hand to complete the fire pit. Then, light the fire using a {{ll|Firestarter|firestarter}} (or a torch), hold {{RMB}} with either item in hand and aim at the base of the firepit. (Optionally check the handbook {{keypress|H}}, to find out how to make a {{ll|Firestarter|firestarter}}.) | |||
</div> | |||
<div lang="en" dir="ltr" class="mw-content-ltr"> | |||
''Congratulations, meat can be cooked and new torches created by heating sticks! Be careful though, a torch in your off hand will cause you to take an increased hunger penalty, and torches held while taking a dip in water will get extinguished.'' | ''Congratulations, meat can be cooked and new torches created by heating sticks! Be careful though, a torch in your off hand will cause you to take an increased hunger penalty, and torches held while taking a dip in water will get extinguished.'' | ||
</div> | |||
{{-}} | |||
=== Бій === | |||
{{ | <div lang="en" dir="ltr" class="mw-content-ltr"> | ||
[[File:Woodenclub-normal.png|60px|link=Club|left|text-top]] To defend against hostile creatures, craft stone age weapons by knapping or carving a club from a log. Different weapons have different ranges. {{ll|Spear|Spears}} are the strongest long range weapon in the stone age, but break quickly. Create a stone spearhead by knapping, and combine with a stick (shaft) in the crafting grid to finish the spear. Wooden clubs are durable but have less damage and less range. Knives, axes, or just plain sticks can all be used as weapons, but these have shorter ranges than the spear. In an emergency, small stones can be thrown at mobs. For more information, see the main article on {{ll|Combat|Combat}}. | |||
</div> | |||
[[File: | <div lang="en" dir="ltr" class="mw-content-ltr"> | ||
[[File:Armor-body-improvised-wood.png|60px|left|text-top]] {{ll|Improvised body armor|Improvised body armor}} can be crafted from dry {{ll|grass|grass}} and {{ll|firewood|firewood}} for some very basic protection. It will not protect your head or legs, but is better than nothing. Once more established in the world of Vintage Story, more advanced types of {{ll|armor|armor}} can be crafted. | |||
</div> | |||
=== Сховище === | |||
=== | <div lang="en" dir="ltr" class="mw-content-ltr"> | ||
Once the sun sets, a player might also like a shelter. There are different blocks that you can use to make a shelter using the early resources you have available. | Once the sun sets, a player might also like a shelter. There are different blocks that you can use to make a shelter using the early resources you have available. {{ll|Dry Grass|Dry grass}} can be used to make a {{ll|Bed|bed}} early on, or form hay blocks/cob for early building blocks. {{ll|Soil Blocks|Soil}} is also a good building material, and can be used to form Mud Bricks. | ||
</div> | |||
<div lang="en" dir="ltr" class="mw-content-ltr"> | |||
===Stationary Storage=== | ===Stationary Storage=== | ||
:''See | </div> | ||
<div lang="en" dir="ltr" class="mw-content-ltr"> | |||
:''See {{ll|Containers|Container's main article}} for detailed information''. | |||
</div> | |||
<div lang="en" dir="ltr" class="mw-content-ltr"> | |||
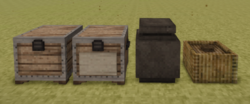
[[File:Ex Stationary Containers.png|thumb|250px|In picture: a chest, a labeled chest, a vessel and a basket.]] | [[File:Ex Stationary Containers.png|thumb|250px|In picture: a chest, a labeled chest, a vessel and a basket.]] | ||
For more storage, the player can craft two early game | For more storage, the player can craft two early game {{ll|containers|containers}}. | ||
</div> | |||
* | <div lang="en" dir="ltr" class="mw-content-ltr"> | ||
* | * {{ll|Reed chest|Reed chests}} have 8 slots for items, however they require a total of 24 cattails and shouldn't be used to store food if possible. | ||
* | * {{ll|Containers#Food Storage Containers|Storage Vessels}} have 12 slots. They require clay to craft and have the best spoilage rates in the game, which make them suitable for food storage. | ||
* {{ll|Chest|Chests}} have 16 slots, but require {{ll|boards|boards}} and {{ll|Nails and strips|Nails and strips}} , which also require access to {{ll|smithing|smithing}}. | |||
</div> | |||
{{-}} | {{-}} | ||
== | == Температура == | ||
:''Читайте про {{ll|Temperature|температуру}}, для отримання детальної інформації''. | |||
<div lang="en" dir="ltr" class="mw-content-ltr"> | |||
The player's body temperature needs to be kept around 37°C. Prolonged times with body temperature under this mark will result in freezing animations and even damage taken. Beware that dipping in water or being out in the rain will make your temperature drop faster. | The player's body temperature needs to be kept around 37°C. Prolonged times with body temperature under this mark will result in freezing animations and even damage taken. Beware that dipping in water or being out in the rain will make your temperature drop faster. | ||
Standing near a lit campfire can warm the player up and the body temperature will stay up a while even after stepping away. | Standing near a lit campfire can warm the player up and the body temperature will stay up a while even after stepping away. | ||
</div> | |||
== | == Темпоральна стабільність | ||
:''See | |||
<div lang="en" dir="ltr" class="mw-content-ltr"> | |||
:''See {{ll|Temporal Stability|Temporal Stability}} for detailed information''. | |||
</div> | |||
[[File:Tempgear.gif|right|frame]] | [[File:Tempgear.gif|right|frame]] | ||
By now a player might be wondering about the cyan gear between the health and satiety bar. This is the temporal stability meter, the level of color in the gear indicates the player's current temporal stability. As a player's temporal stability reduces, the gear turns counter clockwise and the blue color in the gear decreases. When increasing, the gear's color returns as it turns clockwise. If temporal stability reaches zero, the player's vision will change drastically, and bad things tend to happen. | <div lang="en" dir="ltr" class="mw-content-ltr"> | ||
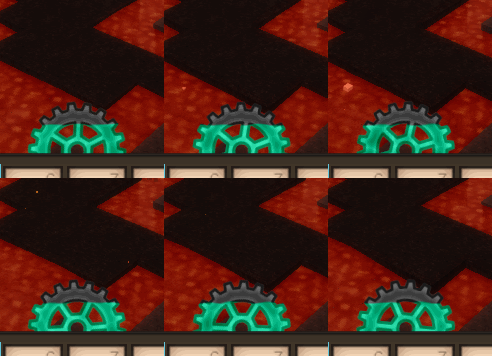
By now a player might be wondering about the cyan gear between the health and satiety bar. This is the temporal stability meter, the level of color in the gear indicates the player's current temporal stability. As a player's temporal stability reduces, the gear turns counter clockwise and the blue color in the gear decreases. When increasing, the gear's color returns as it turns clockwise. If temporal stability reaches zero, the player's vision will change drastically, and bad things tend to happen. | |||
</div> | |||
<div lang="en" dir="ltr" class="mw-content-ltr"> | |||
'''Draining temporal stability''': | '''Draining temporal stability''': | ||
* Some surface areas are temporally unstable | * Some surface areas are temporally unstable | ||
* Caves, underground caverns, and places below surface level are generally more unstable than the surface of the world | * Caves, underground caverns, and places below surface level are generally more unstable than the surface of the world | ||
* Temporal storms (occur at regular intervals) | * Temporal storms (occur at regular intervals) | ||
</div> | |||
<div lang="en" dir="ltr" class="mw-content-ltr"> | |||
'''Recovering temporal stability''': | '''Recovering temporal stability''': | ||
* Move to a location of high stability on the surface or at higher elevations in the world | * Move to a location of high stability on the surface or at higher elevations in the world | ||
* Transfer the temporal stability from a temporal gear: | * Transfer the temporal stability from a temporal gear: equip the gear in the left hand, a knife in the off hand, and hold {{RMB}} to provide a 30% boost at the cost of some HP | ||
* Killing drifters recovers small amounts of your own temporal stability | * Killing drifters recovers small amounts of your own temporal stability | ||
</div> | |||
<div lang="en" dir="ltr" class="mw-content-ltr"> | |||
== Advanced Game Mechanics == | == Advanced Game Mechanics == | ||
Once the basics are mastered, players can develop advanced technology: | </div> | ||
<div lang="en" dir="ltr" class="mw-content-ltr"> | |||
Once the basics are mastered, players can develop advanced technology: {{ll|Survival Guide - Advanced tech|Survival Guide - Advanced tech}} | |||
</div> | |||
== Відео-гайд: Перший день == | |||
Дякуємо Ashantin за створення відео-гайду та обмін із спільнотою VS. | |||
<br><youtube>BXIo8w8YAa8</youtube> | <br><youtube>BXIo8w8YAa8</youtube> | ||
{{ | {{Game navbox}} | ||
[[Category:Guides{{#translation:}}]] | [[Category:Guides{{#translation:}}]] | ||
Latest revision as of 07:54, 22 January 2024
Цей посібник був створений завдяки співпраці між багатьма людьми й може містити помилки. Прекрасний учасник спільноти, copygirl, яка зробила чималий внесок до коду Vintage Story, написала більш точний і, можливо, зрозуміліший посібник по виживанню на своїй сторінці. А щодо вікі, нема гарантій по точності інформації на ній, оскільки вона редагується згідно знанням автора.
Керування
Це стандартні налаштування. Будь ласка, май на увазі, що коли змінюєш кнопку, наприклад, Shift для присідання на іншу кнопку, то усі комбінації, які використовували кнопку Shift, зміняться на нову кнопку також.
| W A S D | Пересування |
| Space | Стрибок |
| E | Інвентар рюкзаків (доступ до сітки створення) |
| C | Інвентар персонажа (одяг та інше спорядження) |
| Shift | Присідання (використовується для розміщення активних елементів на блоках) |
| Ctrl + W | Біг |
| G | Сісти |
| Q | Викинути утримуваний предмет |
| F5 | Зміна режимів камери (першої особи, третьої особи, накладний) |
| Tab | Показати/приховати чат |
| T | Почати друкувати в чаті |
| F4 | SПоказати/приховати інтерфейс користувача |
| F6 | Показати/приховати мінімапу користувача |
| B | Показати/приховати інформацію про блок |
| H | Survival Handbook - can also be used while hovering over an item in the inventory |
| Shift + H | Survival Handbook while looking at a block or item in the world |
| M | Показати/приховати карту світу |
| N | Show/Hide block interaction help |
| V | Show/Hide coordinates |
| F12 | Take a screenshot |
| Esc | Exit/close any interface |
Створення світу
Коли створює новий світ, гравець може вибрати між різними шаблонами або налаштувати генерацію окремо. Для новачків рекомендовано переглянути опції налаштування для їх першого світу або почати з шаблону the Exploration, так як деякі налаштування складності Стандартної гри можуть сильно розчарувати.
Ключові моменти складності, що можуть бути особливо складними для нових гравців такі:
- Смертна кара (Залишити чи викинути інвентар після смерті)
- Темпоральна стабільність (Темпоральні бурі, Поверхнева Стабільність і Розломи)
- Розподіл клімату (дистанція між різними «біомами» і чи вони реалістично розподілені по екватору, або ж випадково розкидані клаптиками)
- Частота поверхневих покладів (і міді й олова, так як вони найбільш важливі стартові руди)
Таблиця знизу показує можливі шаблони. Рекомендується використати кнопку Customize під вибраним шаблоном щоб далі налаштувати твій світ, так як майже усі аспекти генерації світу і досвіду гравця можуть бути змінені. Більш детальний список усіх опцій може бути знайдений на сторінці налаштування світу.
| Preset | Important Aspects |
|---|---|
| Standard | Despite it's name, this is not necessarily the best starting point for any new players. It comes with the full assortment of difficulty options, meaning temporal stability, hunger, temperatures etc. are all enabled. Without customization, monsters will spawn from the first night on and inventory will be dropped on death. |
| Exploration | Most direct threats like creature hostility & temporal stability are turned off, natural difficulties like hunger and temperatures are reduced. The player will keep their inventory on death. |
| Wilderness Survival | Hard Mode - not recommended for new players. Standard Mode with additional challenges - inventory is dropped on death and the player will respawn in a random location in a 5k block radius. Player health points are reduced and creature strength is raised. |
| Creative Building | As the name implies, this is your typical flat building world with Creative Mode enabled from the start. If you'd rather like to build in a normal map, customize a different preset to start in Creative Mode instead of Survival Mode. |
Твій перший день
Спавн гравця
Гравці з'являються у світі у «місці відродження». Якщо гравець вмирає у грі, він знову з'являється (відроджується) у вихідному місці появи доти, доки точка появи гравця не буде змінена. (Спосіб змінити місце появи гравця можна знайти пізніше у грі.) Рекомендується встановити маркер цієї точки появи, коли гравець вперше з'являється у світі. Або клацнувши правою кнопкою миші на карті світу або через команду /waypoint додайте [waypointcolor] [title] . Ця команда додає шляхову точку із заданим кольором і текстом.
Кам'яні інструменти
Щоб розпочати Кам'яний вік, вам знадобляться Кам'яні знаряддя, процес зазвичай включає наступне:
- Знайдіть Кремінь або Інший камінь (базальт, граніт, андезит,обсидіан чи перідотит).
Присісти + Правий Клікна тверду поверхню для початку процесу оббивки каміння. (Тільки при використанні кременю оббивка почнеться одразу. Якщо у вас інший камінь,необхідно спочатку розмістити його на твердій поверхні таПрисісти + Правий Клікзнову іншим каменем.)- В меню виберіть потрібний інструмент. Рекомендованими першими інструментами є Axe та Knife.
- Використовуючи камінь в активній руці,
Лівий Клікпо помаранчевим вокселям, для вибивання зайвого з форми. Коли останній помаранчевий воксель буде вибито, готова кам'яна частина іструменту опиниться у хотбарі гравця. - Press E to open the inventory GUI and access the crafting grid. In the grid, combine the stone tool blade with a stick (handle) to create the finished tool.
- Примітка: палички можна збирати із землі або ламаючи гіллясте листя за допомогою
 .
.
Інвентар гравця
Гравець має доступ до трьох типів слотів інвентарю.
|
|}
Їжа
Here are some of the first day options for food:
- Mushrooms can be harvested with a knife or empty hands. They will regrow at the exact spot, so marking mushroom clusters on the map can be advantageous. Make sure to check the mushroom with the Handbook to check for poisonous variants, as some mushrooms can drain your health or even kill you when consumed raw or cooked
- Ripe Berry Bushes can be harvested without tools, and then broken and replanted anywhere else. After a while they will start to bloom again.
- Cattail roots can be harvested using a knife and cooked over a fire as a source of early game forage.
- Most animals can be killed and harvested with a knife for nutritious meat and fat. Sneak and hold the
 with a knife in hand to harvest animals. Meat must be cooked in a fire pit.
Глина
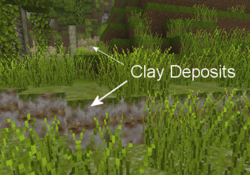
Clay is a required resource to progress through the ages, and in early game it can be used to build comparatively cheap stationary storage options and your first means to preserve food for a bit longer. It is also required to craft a cooking pot, which is necessary for advanced cooking.
Detailed information can be found in the Clay Forming page.
Освітлення / Приготування їжі
Once the sun sets, a player might want to create a firepit as a source of light and for cooking. Be aware though, rain will extinguish any uncovered fires or torches, so be sure to build a simple roof over any firepits.
To make a firepit, gather the following resources:
Sneak and right click on solid ground with the dry grass in hand to place a fire pit. Next, sneak and right click with 4 firewood in hand to complete the fire pit. Then, light the fire using a firestarter (or a torch), hold ![]() with either item in hand and aim at the base of the firepit. (Optionally check the handbook H, to find out how to make a firestarter.)
with either item in hand and aim at the base of the firepit. (Optionally check the handbook H, to find out how to make a firestarter.)
Congratulations, meat can be cooked and new torches created by heating sticks! Be careful though, a torch in your off hand will cause you to take an increased hunger penalty, and torches held while taking a dip in water will get extinguished.
Бій
Сховище
Once the sun sets, a player might also like a shelter. There are different blocks that you can use to make a shelter using the early resources you have available. Dry grass can be used to make a bed early on, or form hay blocks/cob for early building blocks. Soil is also a good building material, and can be used to form Mud Bricks.
Stationary Storage
- See Container's main article for detailed information.
For more storage, the player can craft two early game containers.
- Reed chests have 8 slots for items, however they require a total of 24 cattails and shouldn't be used to store food if possible.
- Storage Vessels have 12 slots. They require clay to craft and have the best spoilage rates in the game, which make them suitable for food storage.
- Chests have 16 slots, but require boards and Nails and strips , which also require access to smithing.
Температура
- Читайте про температуру, для отримання детальної інформації.
The player's body temperature needs to be kept around 37°C. Prolonged times with body temperature under this mark will result in freezing animations and even damage taken. Beware that dipping in water or being out in the rain will make your temperature drop faster. Standing near a lit campfire can warm the player up and the body temperature will stay up a while even after stepping away.
== Темпоральна стабільність
- See Temporal Stability for detailed information.
By now a player might be wondering about the cyan gear between the health and satiety bar. This is the temporal stability meter, the level of color in the gear indicates the player's current temporal stability. As a player's temporal stability reduces, the gear turns counter clockwise and the blue color in the gear decreases. When increasing, the gear's color returns as it turns clockwise. If temporal stability reaches zero, the player's vision will change drastically, and bad things tend to happen.
Draining temporal stability:
- Some surface areas are temporally unstable
- Caves, underground caverns, and places below surface level are generally more unstable than the surface of the world
- Temporal storms (occur at regular intervals)
Recovering temporal stability:
- Move to a location of high stability on the surface or at higher elevations in the world
- Transfer the temporal stability from a temporal gear: equip the gear in the left hand, a knife in the off hand, and hold
 to provide a 30% boost at the cost of some HP
 - Killing drifters recovers small amounts of your own temporal stability
Advanced Game Mechanics
Once the basics are mastered, players can develop advanced technology: Survival Guide - Advanced tech
Відео-гайд: Перший день
Дякуємо Ashantin за створення відео-гайду та обмін із спільнотою VS.
| Навігація по вікі | |
|---|---|
| Vintage Story | Керівництва • Питання, що часто задаються (FAQ) • Vintage Story Original Soundtrack • Версії • Управління |
| Ігрові механіки | Крафт • Оббивка • Гончарство • Металооброква • Приготування • Температура • Голод • Шахтарство • Темпоральна стабільність • Механізми • Торгівля • Фермерство • Тваринництво |
| Світ | Генерація світу • Біоми • Погода • Темпоральні шторми |
| Предмети | Інструменти • Зброя • Броня • Одяг • Сумки • Матеріали • Їжа |
| Блоки | Ландшафт • Рослини • Декорації • Світло • Функціональні • Руди |
| Істоти | Агресивні істоти • Тварини • Неігрові персонажі • Гравці |
| Miscellaneous | List of client commands • Перелік серверних команд • Creative Starter Guide • Bot System • How_to_use_WorldEdit • Cinematic Camera • Adjustable FPS Video Recording • ServerBlockTicking |

