Überlebensleitfaden - Dein erster Tag
Dieser Leitfaden ist ein Gemeinschaftsprojekt vieler Einzelpersonen und kann Fehler enthalten. Ein wundervolles Mitglied aus der Community, copygirl, die Mitwirkende vom Vintage Story Code ist, hat eine kurz und knackige, Benutzer freundliche Anleitung für das Überleben in Vintage Story auf ihrer eigenen Seite erstellt.
Steuerung
Dies ist die Standard-Tastenbelegung. Wenn Sie z.B. die Template:Tastendruck zum Schleichen auf eine andere Taste ändern, werden alle Kombinationen, die zuvor die Umschalttaste verwendet haben, ebenfalls auf die neue Tastenwahl umgestellt.
| W A S D | Um Dich zu bewegen. |
| Space | Springen |
| E | Rucksackinventar (Zugriff zum Herstellungsmenü) |
| C | Charakter Inventar (Kleidung und Ausrüstung) |
| Shift | Schleiche (Wird verwendet um Objekte auf Blöcken zu platzieren.) |
| Ctrl + W | Rennen |
| G | Hinsetzen |
| Q | Lässt das aktuell gehaltene Item fallen. |
| F5 | Wechsel zwischen den verschiedenen Kamera Optionen hin und her. (first person, third person, overhead) |
| Tab | Anzeigen/Verbergen des Chatfensters |
| T | Aktivierung für das Schreiben im Chatfenster |
| F4 | Anzeigen/Verbergen der Benutzeroberfläche |
| F6 | Anzeigen/Verbergen der Minimap |
| B | Anzeigen/Verbergen der Blockinfo |
| H | Überlebenshandbuch - kann auch benutzt werden, während man ein Item im Inventar anvisiert |
| Shift + H | Überlebenshandbuch während man einen Block oder ein Item in der Welt anvisiert |
| M | Anzeigen/Verbergen der Weltkarte |
| N | Anzeigen/Verbergen der Blockinteraktionshilfe |
| V | Anzeigen/Verbergen der Koordinaten |
| F12 | Mache einen Screenshot |
| Esc | Schließe/Beende jedes Interaktionsfenster |
Welterstellung
Wenn eine neue Welt erstellt wird, kann der Spieler zwischen verschiedenen Spielstilen entscheiden und sie auch individuell anpassen. Es wird für neue Spieler bei der ersten Welt empfohlen sich mit den Anpassungsmöglichkeiten vertraut zu machen oder den Spielstil Erkundung zu wählen. Die schwierigen Einstellungen des Standard Spielstils können ziemlich frustrierend sein.
Die folgenden Punkte zeigen einige der Herausforderungen für neue Spieler auf:
- Todesbestrafung (Erhalt oder Verlust des Spielerinventars beim Tod)
- Temporale Stabilität (Temporale Stürme, Oberflächenstabilität und Risse)
- Klimatische Verteilung (Distanz zwischen verschiedenen "Biomen" und wie ob sie realistisch um den Äquator verteilt sind, oder komplett zufällig)
- Verteilung der Oberflächen Erzadern (Kupfer und Zinn, da sie sehr wichtige Metalle am Anfang sind)
Die untenstehende Tabelle gibt einen Überblick über die verfügbaren Spielstile. Es wird empfohlen die Anpassen Schaltfläche unter den Spielstilen zu benutzen um die Einstellung der Welt weiter anzupassen, in der alle Aspekte der Weltgenerierung und Spielererfahrung enthalten sind. Eine tiefer greifende Liste aller Anpassungsmöglichkeiten kann man unter der Weltkonfiguration Seite finden.
| Spielstil | Wichtige Aspekte |
|---|---|
| Standard | Trotz des Namens, ist es nicht unbedingt die beste Startwelt für neue Spieler. Alle schwierigen verfügbaren Inhalte sind aktiviert, z.B. Temporale Stabilität, Hunger, Körpertemperatur etc. Ohne Anpassung werden Monster in der ersten Nacht erscheinen und beim Tod wird das komplette Inventar fallen gelassen. |
| Erkundung | Bedrohungen wie Feindseligkeit der Kreaturen und Temporale Stabilität sind ausgeschaltet. Natürliche Schwierigkeiten wie Hunger und Temperatur sind reduziert. Falls der Spieler stirbt, behält er sein Inventar. |
| Wildnis Überleben | Schwerer Modus - nicht empfohlen für neue Spieler. Standard Modus mit zusätzlichen Schwierigkeiten - Inventar wird beim Tod fallen gelassen und Spieler wird in einem Radius von 5000 Blöcken zufällig neu gespawnt. Der Spieler hat weniger Lebenspunkte und die Stärke aller Kreaturen ist erhöht. |
| Kreatives Bauen | Wie der Name schon impliziert, ist das die typische flach gebaute Welt mit Kreativem Modus. Wenn du lieber in einer normalen Welt spielen willst, starte den Standard Spielstil und ändere den Spielmodus von Überleben in Kreativ. |
Dein erster Tag
Spieler Spawn
Spieler starten in der Welt am „Spawnpunkt“. Wenn ein Spieler stirbt, kehrt er an den ursprünglichen Spawnpunkt zurück, bis der Punkt verlegt wird. (Später im Spiel kann der Spawnpunkt verlegt werden.) Es ist eine gute Idee, den Spawnpunkt beim Start auf der Weltkarte zu markieren. Mit einem Rechtsklick auf der Weltkarte oder dem Befehl /waypoint add [Farbe des Wegpunkts] [Titel] kann ein Wegpunkt gesetzt werden. Der Befehl fügt den Wegpunkt in der gewählten Farbe (jede .NET Farbe oder Hexfarbcode) und Text hinzu.
Stein Werkzeuge
Um die Steinzeit zu beginnen, brauchst du Steinwerkzeuge, die in der Regel wie folgt hergestellt werden:
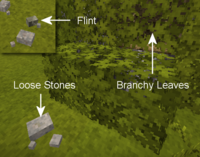
- Finde Feuerstein oder Lose Steine (Basalt, Granit, Andesit, Obsidian oder Peridotit).
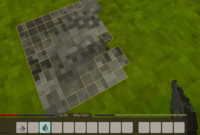
- Nimm Steine deiner Wahl in deine Haupthand drücke Shift +
 auf festen Boden, um eine Schürffläche zu erzeugen. Nur Feuerstein wird direkt eine Schürffläche erstellen. Um die anderen losen Steine zu benutzen, musst du sie einmal platzieren und dann Shift +
  mit einem anderen losen Stein.
 - Du wählst das zu erstellende Werkzeug aus dem Menü. Die Axt und das Messer sind als erste Werkzeuge sehr zu empfehlen.
- Mit einem Stein in der aktiven Hand klickt man mit der linken Maustaste
 auf die orangefarbenen Kästchen, um sie vom Stein zu entfernen und die fertige Klinge oder den Werkzeugkopf zu formen. Wenn das letzte orangefarbene Kästchen entfernt ist, wird der fertige Werkzeugkopf auf die Hotbar des Spielers übertragen.
 - Drücke E, um das GUI des Inventars zu öffnen und auf das Handwerksraster zuzugreifen. Kombiniere im Raster die Klinge des Steinwerkzeugs mit einem Stock (Griff), um das fertige Werkzeug herzustellen.
- Tipp: Mit
 können Stöcke vom Boden oder durch Abbrechen von belaubten Ästen gesammelt werden.
Inventar
Der Spieler hat Zugang zu 3 Arten von Inventarplätzen.
|
Nahrung
Hier sind einige Möglichkeiten, am ersten Tag an Nahrung zu gelangen:
- Pilze können mit einem Messer oder bloßen Händen geerntet werden. Pilze wachsen an der gleichen Stelle nach, daher kann es von Vorteil sein, Pilzgruppen auf der Karte zu markieren. Achte darauf, den Pilz mit dem Handbuch auf giftige Varianten zu überprüfen.
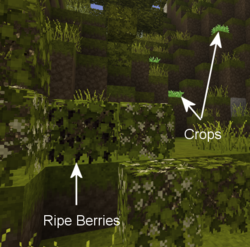
- Reife Beeren können mit bloßen Händen geerntet werden und die Büsche umgepflanzt werden. Nach einiger Zeit werden sie erneut blühen.
- Rohrkolbenwurzeln können mit einem Messer geerntet und an einer Feuerstelle gekocht werden.
- Die meisten Tiere können getötet und mit einem Messer zerlegt werden, um an nahrhaftes Fleisch und Fett zu gelangen. Halte Shift +
 mit einem Messer, um ein totes Tier zu zerlegen. Fleisch muss über einer Feuerstelle gekocht werden.
Ton
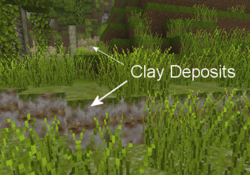
Lehm ist eine benötigte Ressource, um durch die Zeitalter zu kommen und in der Anfangsphase des Spiels kann er verwendet werden, um vergleichsweise billige stationäre Lagermöglichkeiten zu bauen und dein erstes Mittel, um Nahrung ein wenig länger zu konservieren. Er wird auch benötigt, um einen Kochtopf herzustellen, der für fortgeschrittenes Kochen notwendig ist.
Ausführliche Informationen findest du auf der Seite Lehmformung.
Licht und Kochen
Sobald die Sonne untergeht, wollen Spieler möglicherweise eine Feuerstelle als Lichtquelle oder zum Kochen aufbauen. Sei dir gewiss, dass Regen alle Feuer und Fackeln ohne Überdachung löschen wird. Baue also ein einfaches Dach über Feuerstellen.
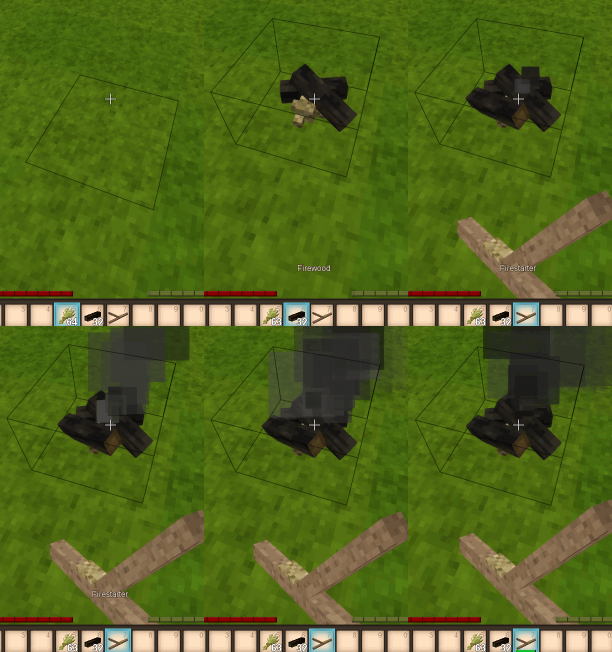
Sammle folgende Ressourcen für eine Feuerstelle:
- Trockenes Gras: Klicke
 mit einem Messer, um Gras abzuschneiden.
 - Feuerholz: Klicke
 mit einer Axt in der Hand, um Bäume zu fällen und Baumstämme zu erhalten. Nutze das Crafting-Menü, um mit der Axt aus Baumstämmen Feuerholz herzustellen.
Halte Shift + ![]() auf festem Untergrund mit trockenem Gras in der Hand, um eine Feuerstelle aufzubauen. Drücke dann Shift +
auf festem Untergrund mit trockenem Gras in der Hand, um eine Feuerstelle aufzubauen. Drücke dann Shift + ![]() mit vier Stück Feuerholz, um die Feuerstelle zu vervollständigen. Entzünde danach das Feuerholz mit einem Feueranzünder (oder einer Fackel), drücke
mit vier Stück Feuerholz, um die Feuerstelle zu vervollständigen. Entzünde danach das Feuerholz mit einem Feueranzünder (oder einer Fackel), drücke ![]() mit einem der Gegenstände in der Hand und ziele dabei auf die Feuerstelle. (Schaue optional im Handbuch mit H nach, wie du einen Feueranzünder baust.)
mit einem der Gegenstände in der Hand und ziele dabei auf die Feuerstelle. (Schaue optional im Handbuch mit H nach, wie du einen Feueranzünder baust.)
Herzlichen Glückwunsch, man kann Fleisch kochen und neue Fackeln durch Erhitzen von Stöcken herstellen! Aber Vorsicht, eine Fackel in der freien Hand führt zu einem erhöhten Hungerabzug, und Fackeln, die man beim Eintauchen in Wasser in der Hand hält, werden ausgelöscht.
Kampf
Stelle Steinzeitwaffen durch Stein- oder Holzbearbeitung her, um dich gegen feindliche Kreaturen zu verteidigen. Verschiedene Waffen haben unterschiedliche Reichweiten. Speere sind die stärksten Waffen der Steinzeit, zerbrechen aber schnell. Bearbeite einen Stein, um eine Speerspitze herzustellen und verbinde ihn mit einem Stock (Stiehl) im Crafting-Menü. Holzknüppel halten zwar länger, richten aber weniger Schaden an und haben eine geringere Reichweite. Messer, Äxte und sogar Stöcke können zur Verteidigung genutzt werden, kommen aber nicht an die Reichweite des Speers heran. Im Notfall kannst du auch Steine auf deine Feinde werfen. Lies den Artikel Kampf für weitere Informationen.
Du kannst eine improvisierte Rüstung aus trockenem Gras und Feuerholz für sehr geringen Schutz herstellen. Sie schützt zwar weder deinen Kopf noch deine Beine, ist aber besser als nichts. Wenn du in der Welt von Vintage Story Fuß gefasst hast, kannst du Fortgeschrittene Rüstung herstellen.
Unterschlupf
Sobald die Sonne untergeht, möchte der Spieler vielleicht auch einen Unterschlupf. Du kannst am Anfang aus unterschiedlichen Blöcken einen Unterschlupf bauen. Baue aus trockenem Gras ein Bett oder Heuballen/Strohlehm für anfängliche Baublöcke. Boden ist auch ein gutes Baumaterial und kann für Lehmziegel verwendet werden.
Stationäre Lagerung
- Siehe Seite über Lagermöglichkeiten für mehr Informationen.
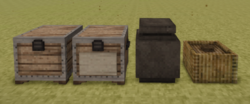
Für mehr Speicherplatz kann der Spieler zu Beginn des Spiels zwei Arten von Container herstellen.
- Körbe haben 8 Plätze für Gegenstände, benötigen aber insgesamt 24 Schilfrohr und sollten nach Möglichkeit nicht zur Lagerung von Lebensmitteln verwendet werden.
- Tonkrüge haben 12 Plätze. Zur Herstellung wird Lehm benötigt, und sie haben die besten Verderbnisraten im Spiel, was sie für die Lagerung von Lebensmitteln geeignet macht.
- Truhen haben 16 Plätze, benötigen jedoch Bretter, welche Zugriff auf das Schmelzen benötigen.
Temperatur
- Siehe Temperatur für mehr Informationen.
Die Körpertemperatur des Spielers muss bei etwa 37°C gehalten werden. Liegt die Körpertemperatur längere Zeit unter diesem Wert, führt dies zu Einfrieranimationen und sogar zu Schaden. Achtung: Wenn du ins Wasser tauchst oder im Regen stehst, sinkt deine Temperatur schneller. Wenn du dich in der Nähe eines brennenden Lagerfeuers aufhältst, kann sich der Spieler aufwärmen und die Körpertemperatur bleibt auch nach dem Verlassen des Feuers noch eine Weile hoch.
Temporale Stabilität
- Siehe Temporale Stabilität für mehr Informationen.
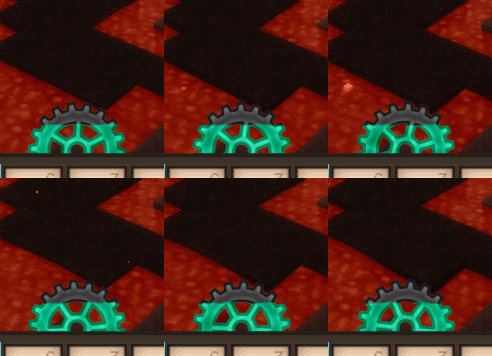
Der eine oder andere Spieler wird sich jetzt vielleicht über das blaugrüne Zahnrad zwischen der Gesundheits- und der Sättigungsleiste wundern. Dies ist die Anzeige für die zeitliche Stabilität. Die Farbe des Zahnrads zeigt die aktuelle zeitliche Stabilität des Spielers an. Wenn die zeitliche Stabilität des Spielers abnimmt, dreht sich das Zahnrad gegen den Uhrzeigersinn und die blaue Farbe des Zahnrads nimmt ab. Wenn sie zunimmt, kehrt die Farbe des Zahnrads zurück, während es sich im Uhrzeigersinn dreht. Wenn die zeitliche Stabilität den Wert Null erreicht, verändert sich die Sicht des Spielers drastisch, und es passieren oft schlimme Dinge.
Zeitliche Stabilität wiederherstellen:
- Einige Gebiete sind zeitlich instabil
- Höhlen, unterirdische Kavernen und Orte unterhalb der Erdoberfläche sind im Allgemeinen instabiler als die Erdoberfläche
- Zeitliche Stürme (treten in regelmäßigen Abständen auf)
Zeitliche Stabilität wiederherstellen:
- Umzug an einen Ort mit hoher Stabilität an der Erdoberfläche oder in höheren Lagen der Welt
- Übertrage die temporale Stabilität von einem temporalen Zahnrad: Halte das Zahnrad in der linken Hand, ein Messer in der rechten Hand und halte die rechte Maustaste
 gedrückt, um 30% der maximalen Stabilität wiederherzustellen.
 - Durch das Töten von Driftern wird ein kleiner Teil der eigenen zeitlichen Stabilität wiederhergestellt.
Fortgeschrittene Spielmechaniken
Sobald die Grundlagen beherrscht werden, können die Spieler fortgeschrittene Technologien entwickeln: Überlebenstechniken - Fortgeschritten
Tutorial Video: Erster Tag
Danke an Ashantin für die Erstellung und Weitergabe an die VS-Community.
| Wiki Navigation | |
|---|---|
| Vintage Story | Guides • Frequently Asked Questions • Soundtrack • Versions • Controls |
| Game systems | Crafting • Knapping • Clay forming • Smithing • Cooking • Temperature • Hunger • Mining • Temporal stability • Mechanical power • Trading • Farming • Animal husbandry |
| World | World generation • Biomes • Weather • Temporal storms |
| Items | Tools • Weapons • Armor • Clothing • Bags • Materials • Food |
| Blocks | Terrain • Plants • Decorative • Lighting • Functional • Ore |
| Entities | Hostile entities • Animals • NPCs • Players |
| Miscellaneous | List of client commands • List of server commands • Creative Starter Guide • Bot System • WorldEdit • Cinematic Camera • Adjustable FPS Video Recording • ServerBlockTicking |

