Survival Guide - Your first day/ja: Difference between revisions
(Created page with "プレイヤーは3種類のスロットを持っています") |
(Updating to match new version of source page) |
||
| (87 intermediate revisions by 2 users not shown) | |||
| Line 1: | Line 1: | ||
<languages /> | <languages /> | ||
{{Outdated|<span lang="en" dir="ltr" class="mw-content-ltr">Not updated for the 1.18 worldgen presets</span>}} | |||
<div lang="en" dir="ltr" class="mw-content-ltr"> | |||
This guide is a collaboration between many individuals and may have issues. A wonderful member of the community, copygirl, who is a contributor to the Vintage Story code, has compiled a more concise and potentially more user friendly [https://copy.mcft.net/vs/guide/ survival guide on her own page]. As with the wiki, there is no guarantee on the accuracy of the content and is correct to the best of the author's knowledge. | |||
</div> | |||
__TOC__ | __TOC__ | ||
<div style="float:left; margin-right:20px;"> | <div lang="en" dir="ltr" class="mw-content-ltr"> | ||
== Controls == | |||
</div> | |||
<div lang="en" dir="ltr" class="mw-content-ltr"> | |||
This is the default key bind, please keep in mind that when changing, for instance, the {{Keypress|Shift}} key for sneaking to a different one, all combinations previously using the shift key will change to your new key choice as well. | |||
</div> | |||
<div style="float:left; margin-right:20px; padding-bottom:1em;"> | |||
{| | {| | ||
|+ '''<span lang="en" dir="ltr" class="mw-content-ltr">Character controls</span>''' | |||
|- | |- | ||
| | | style="padding-right:0.5em" | <span lang="en" dir="ltr" class="mw-content-ltr">{{Keypress|W}} {{Keypress|A}} {{Keypress|S}} {{Keypress|D}} || To move around</span> | ||
|- | |- | ||
| <span | | style="padding-right:0.5em" | <span lang="en" dir="ltr" class="mw-content-ltr">{{Keypress|Space}} || Jump</span> | ||
|- | |- | ||
| <span class=" | | style="padding-right:0.5em" | <span lang="en" dir="ltr" class="mw-content-ltr">{{Keypress|E}} || Backpack Inventory (Access Crafting Grid)</span> | ||
|- | |- | ||
| <span class=" | | style="padding-right:0.5em" | <span lang="en" dir="ltr" class="mw-content-ltr">{{Keypress|C}} || Character Inventory (Clothes and other Gear)</span> | ||
|- | |- | ||
| <span class=" | | style="padding-right:0.5em" | <span lang="en" dir="ltr" class="mw-content-ltr">{{Keypress|Shift}} || Sneak (used to place active items on blocks)</span> | ||
|- | |- | ||
| <span | | style="padding-right:0.5em" | <span lang="en" dir="ltr" class="mw-content-ltr">{{Keypress|Ctrl}} + {{Keypress|W}} || Run</span> | ||
|- | |- | ||
| <span class=" | | style="padding-right:0.5em" | <span lang="en" dir="ltr" class="mw-content-ltr">{{Keypress|G}} || Sit down</span> | ||
|- | |- | ||
| <span class=" | | style="padding-right:0.5em" | <span lang="en" dir="ltr" class="mw-content-ltr">{{Keypress|Q}} || Drop currently held item</span> | ||
|- | |- | ||
| <span class=" | | style="padding-right:0.5em" | <span lang="en" dir="ltr" class="mw-content-ltr">{{Keypress|F5}} || Cycle through camera modes (first person, third person, overhead)</span> | ||
|} | |} | ||
</div> | </div><div style="float:left;"> | ||
<div style="float:left;"> | |||
{| | {| | ||
|+ '''<span lang="en" dir="ltr" class="mw-content-ltr">User interface controls</span>''' | |||
|- | |||
| style="padding-right:0.5em" | <span lang="en" dir="ltr" class="mw-content-ltr">{{Keypress|Tab}} || Show/Hide chat overlay</span> | |||
|- | |||
| style="padding-right:0.5em" | <span lang="en" dir="ltr" class="mw-content-ltr">{{Keypress|T}} || Begin typing in the chat overlay</span> | |||
|- | |||
| style="padding-right:0.5em" | <span lang="en" dir="ltr" class="mw-content-ltr">{{Keypress|F4}} || Show/Hide user interfaces</span> | |||
|- | |||
| style="padding-right:0.5em" | <span lang="en" dir="ltr" class="mw-content-ltr">{{Keypress|F6}} || Show/Hide user minimap</span> | |||
|- | |||
| style="padding-right:0.5em" | <span lang="en" dir="ltr" class="mw-content-ltr">{{Keypress|B}} || Show/Hide block info</span> | |||
|- | |||
| style="padding-right:0.5em" | <span lang="en" dir="ltr" class="mw-content-ltr">{{Keypress|H}} || Survival Handbook - can also be used while hovering over an item in the inventory</span> | |||
|- | |- | ||
| <span | | style="padding-right:0.5em" | <span lang="en" dir="ltr" class="mw-content-ltr">{{Keypress|Shift}} + {{Keypress|H}} || Survival Handbook while looking at a block or item in the world</span> | ||
|- | |- | ||
| <span class=" | | style="padding-right:0.5em" | <span lang="en" dir="ltr" class="mw-content-ltr">{{Keypress|M}} || Show/Hide {{ll|worldmap|worldmap}}</span> | ||
|- | |- | ||
| <span class=" | | style="padding-right:0.5em" | <span lang="en" dir="ltr" class="mw-content-ltr">{{Keypress|N}} || Show/Hide block interaction help</span> | ||
|- | |- | ||
| <span class=" | | style="padding-right:0.5em" | <span lang="en" dir="ltr" class="mw-content-ltr">{{Keypress|V}} || Show/Hide coordinates</span> | ||
|- | |- | ||
| <span class=" | | style="padding-right:0.5em" | <span lang="en" dir="ltr" class="mw-content-ltr">{{Keypress|F12}} || Take a screenshot</span> | ||
|- | |- | ||
| <span class=" | | style="padding-right:0.5em" | <span lang="en" dir="ltr" class="mw-content-ltr">{{Keypress|Esc}} || Exit/close any interface</span> | ||
|}</div></div> | |||
{{-}} | |||
<div lang="en" dir="ltr" class="mw-content-ltr"> | |||
== World Creation == | |||
</div> | |||
<div lang="en" dir="ltr" class="mw-content-ltr"> | |||
When creating a new world, the player can decide between different presets or customize them individually. It is recommended for new players to check the customization options for their first world or start with the Exploration template, as some of the difficulty settings of the Standard experience can be highly frustrating. | |||
</div> | |||
<div lang="en" dir="ltr" class="mw-content-ltr"> | |||
The main difficulty points that can be especially challenging for new players are as follows: | |||
* Death punishment (Keep or drop inventory on death) | |||
* Temporal Stability (Temporal Storms, Surface Stability and Rifts) | |||
* Climate Distribution (the distance between different "biomes" and whether these are distributed realistically around an equator, or randomly in patches) | |||
* Surface deposit frequency (both copper & tin, as they are both important starting metals) | |||
</div> | |||
<div lang="en" dir="ltr" class="mw-content-ltr"> | |||
The below table shows the available world presets, it is advised to use the Customize button below the preset selection to further customize your world, as almost all aspects of the world generation and player experience can be changed. An in depth list of all customization options can be found on the {{ll|World Configuration|World Configuration}} page. | |||
</div> | |||
{| class="wikitable sortable" | |||
|- | |- | ||
! <span lang="en" dir="ltr" class="mw-content-ltr">Preset</span> !! <span lang="en" dir="ltr" class="mw-content-ltr">Important Aspects</span> | |||
|- | |- | ||
| <span class=" | | <span lang="en" dir="ltr" class="mw-content-ltr">Standard</span> || <span lang="en" dir="ltr" class="mw-content-ltr">Despite it's name, this is not necessarily the best starting point for any new players. It comes with the full assortment of difficulty options, meaning temporal stability, hunger, temperatures etc. are all enabled. Without customization, monsters will spawn from the first night on and inventory will be dropped on death.</span> | ||
|- | |- | ||
| <span class=" | | <span lang="en" dir="ltr" class="mw-content-ltr">Exploration</span> || <span lang="en" dir="ltr" class="mw-content-ltr">Most direct threats like creature hostility & temporal stability are turned off, natural difficulties like hunger and temperatures are reduced. The player will keep their inventory on death.</span> | ||
|- | |- | ||
| <span class=" | | <span lang="en" dir="ltr" class="mw-content-ltr">Wilderness Survival</span> || <span lang="en" dir="ltr" class="mw-content-ltr">Hard Mode - '''not''' recommended for new players. Standard Mode with additional challenges - inventory is dropped on death and the player will respawn in a random location in a 5k block radius. Player health points are reduced and creature strength is raised.</span> | ||
|- | |- | ||
| <span class=" | | <span lang="en" dir="ltr" class="mw-content-ltr">Creative Building</span> || <span lang="en" dir="ltr" class="mw-content-ltr">As the name implies, this is your typical flat building world with Creative Mode enabled from the start. If you'd rather like to build in a normal map, customize a different preset to start in Creative Mode instead of Survival Mode.</span> | ||
|} | |} | ||
<div class="mw-translate-fuzzy"> | |||
== 最初の一日 == | == 最初の一日 == | ||
=== プレイヤーのスポーン === | === プレイヤーのスポーン === | ||
</div> | |||
<div lang="en" dir="ltr" class="mw-content-ltr"> | |||
=== Player Spawn === | |||
</div> | |||
<div class="mw-translate-fuzzy"> | |||
プレイヤーはワールド内の「スポーン位置」に出現します。ゲーム内で死亡すると初期スポーン位置に再出現(リスポーン)します(スポーン地点をリセットする方法はゲームの後半で見つかります)。ワールドに最初に出現したときに、ワールドマップにスポーン地点のマーカーを記しておくのは良いアイデアです。ワールドマップで右クリックか、コマンド<code>/waypoint add [waypointcolor] [title]</code>で記録できます。このコマンドは、指定した色(.NETカラーまたは16進数コード)でウェイポイントを追加します。 | |||
</div> | |||
=== 石の道具 === | === 石の道具 === | ||
<div class="mw-translate-fuzzy"> | |||
<gallery widths=350px heights=400px mode="packed"></gallery> | |||
</div> | |||
<div lang="en" dir="ltr" class="mw-content-ltr"> | |||
In order to start the '''Stone Age''', you will need '''Stone Tools''', the process usually involves the following: | |||
</div> | |||
<div class="mw-translate-fuzzy"> | |||
[[File:Stonesbranches.png|thumb|枝と石|200px]] | |||
[[File:Knapping.png|right|thumb|ナッピングプロセス|200px]] | |||
< | '''石器時代'''を始めるには、'''石の道具'''が必要です。これは以下のような手順で入手できます。 | ||
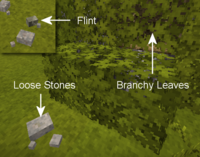
# 火打石(Flint)か、散らばった石を見つけます。石には玄武岩(Basalt)、花崗岩(Granite)、安山岩(Andesite)、黒曜石(Obsidian)、かんらん岩(Peridotite)があります。 | |||
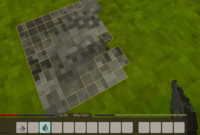
# 固い地面を<code>スニーク + 右クリック</code>で[[knapping/ja|ナッピング]]面を作ります。火打石(Flint)はすぐに[[knapping/ja|ナッピング]]面を作れますが、他の散らばった石は地面に置き、それから別の石を持った状態で再び<code>スニーク + 右クリック</code>が必要です。 | |||
# メニューから作りたい道具を選びます。最初の道具は[[Axe/ja|斧(Axe)]]と[[Knife/ja|ナイフ(Knife)]]をお勧めします。 | |||
# 石を手に持ち、オレンジ色の立方体を<code>左クリック</code>で石から除去し、刃やツールヘッドの形を作ります。最後のオレンジ色のボックスを除去すると、完成したツールヘッドがプレイヤーのホットバーへ移動します。 | |||
# <code>E</code>でインベントリGUIを開くと、クラフトグリッドにアクセスできます。このグリッドで石器の刃と棒(Stick)を組み合わせることで、道具を作ります。 | |||
:'''Note''':棒(Stick)は地面から回収したり、<code>左クリック</code>で枝葉(Branchy Leaves)を壊すことで入手できます。 | |||
</div> | |||
<div lang="en" dir="ltr" class="mw-content-ltr"> | |||
:'''''Note''': Sticks can be collected from the ground or by breaking leafy branches using {{LMB}}.'' | |||
</div> | |||
{{-}} | |||
=== プレイヤーインベントリ === | === プレイヤーインベントリ === | ||
| Line 76: | Line 146: | ||
プレイヤーは3種類のスロットを持っています | プレイヤーは3種類のスロットを持っています | ||
{|class="wikitable" | |||
|- | |||
|[[File:Inventory.png|650px|center]] | |||
|- | |||
| | |||
<div lang="en" dir="ltr" class="mw-content-ltr"> | |||
# Off-hand slot that can hold passive items such as torchers or lanterns. | |||
# Main inventory that holds 10 slots and every slot is linked to a shortcut for quick access (default: keys {{keypress|1}} to {{keypress|0}}). | |||
# Portable containers. Up to 4 containers can be added to expand the inventory even further, the slots are shown in the inventory/crafting window (default: {{Keypress|E}}). | |||
</div> | |||
<div class="mw-translate-fuzzy"> | |||
:'''Tip''':インベントリを広げるための最初の選択肢は、[[Containers#Portable_Containers|手提げカゴ(Hand Baskets)]]がベストです。湖の近くなどで見つかる[[Cooper's_Reed_(Cattail)|アシ]]を刈りましょう。グリッドクラフトのレシピは[[Containers#Portable_Containers|ここのページ]]か、<code>H</code>でカゴ(basket)を検索すると確認できます。 | |||
{{-}} | |||
</div> | |||
|} | |||
{{-}} | {{-}} | ||
=== | === 食べ物 === | ||
[[File:Black currant and wild crops.png|250px|thumb|食べ物あさりの時間です!!]] | |||
[[ | <div class="mw-translate-fuzzy"> | ||
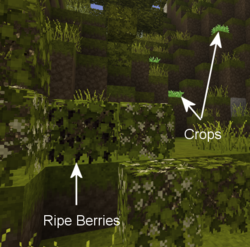
最初の一日の食べ物には、以下のような選択肢があります。 | |||
* [[Wild_Foods#Mushrooms|キノコ(Mushrooms)]]は[[knife|ナイフ]]か素手で収穫できます。ナイフで先端を収穫すると、時間が経てば再び成長します。 | |||
* 完熟した[[Berry_Bushes|ベリーの茂み]]は道具なしで収穫でき、壊して別の場所に置くこともできます。しばらくすると、再び開花し始めます。 | |||
* [[Cattail|ガマ]]の根はナイフで収穫して火で調理することで、ゲーム序盤の食料源になります。 | |||
* 大半の動物は殺してナイフで収穫することで、栄養のある肉と脂が手に入ります。動物を収穫するには、ナイフを手に持って<code>スニーク + 右クリック長押し</code>です。肉は焚き火で調理する必要があります。 | |||
</div> | |||
{{-}} | {{-}} | ||
=== | <div class="mw-translate-fuzzy"> | ||
[[File:Claydeposits.png| | === 粘土 === | ||
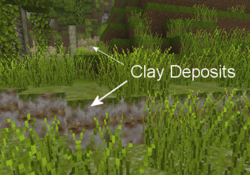
[[File:Claydeposits.png|250px|thumb|粘土を見つけ、持ち帰るかマップにマークしよう]] | |||
</div> | |||
<div lang="en" dir="ltr" class="mw-content-ltr"> | |||
[[File:Claydeposits.png|250px|thumb|Find clay and take it with you or mark it on the map.]] | |||
</div> | |||
粘土は時代を進めるために必要なリソースで、ゲーム序盤では比較的安価な貯蔵容器の作成と、食料を少し長く保存するための最初の手段として使えます。また高度な料理に必要な料理鍋のクラフトにも必要です。 | |||
詳しい情報は[[Clay Forming/ja|粘土成形(Clay Forming)]]のページで確認できます。 | |||
<div lang="en" dir="ltr" class="mw-content-ltr"> | |||
Detailed information can be found in the {{ll|Clay Forming|Clay Forming}} page. | |||
</div> | |||
{{-}} | {{-}} | ||
=== | === 明かり / 料理 === | ||
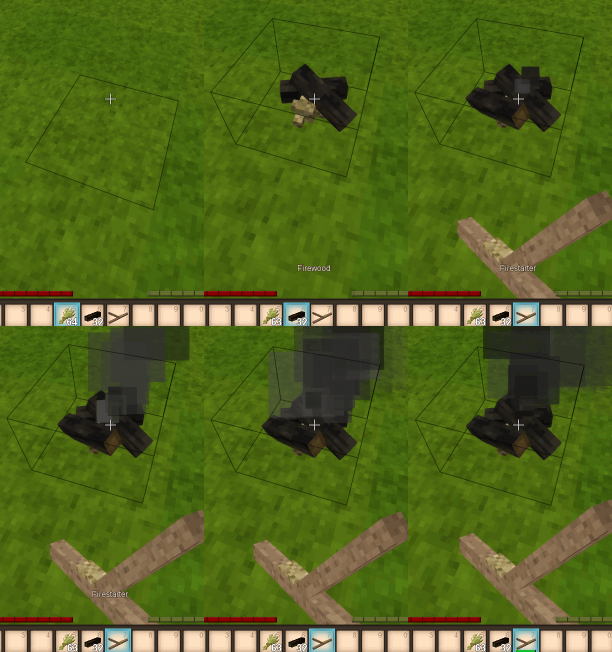
[[File:Firestarter.gif|How to craft a firepit]] | |||
<div class="mw-translate-fuzzy"> | |||
太陽が沈んだら、光源と料理のために[[Firepit/ja|焚き火(Firepit)]]を作りたくなるでしょう。火や松明は[[weather|雨]]で消えてしまうため、焚き火には簡単な屋根を作るようにしましょう。 | |||
まず以下のリソースを集めます。 | |||
</div> | |||
<div lang="en" dir="ltr" class="mw-content-ltr"> | |||
To make a firepit, gather the following resources: | |||
</div> | |||
<div class="mw-translate-fuzzy"> | |||
* 枯れ草(Dry Grass):ナイフを手に持って<code>左クリック</code>で、背の高い草(Tall Grass)を集めます | |||
* 薪(Firewood):斧を手に持って<code>左クリック</code>で[[trees|木]]を切り、原木(Log)を集めます。斧と原木をクラフトグリッドに置き、薪を作ります。 | |||
</div> | |||
[[ | <div class="mw-translate-fuzzy"> | ||
枯れ草を手に持って<code>スニーク + 右クリック</code>で地面に置き、次に薪を4つ手に持って<code>スニーク + 右クリック</code>で焚き火を完成させます。その後、[[Firestarter|着火具(Firestarter)]]または松明を手に持ち、焚き火の土台に対して<code>右クリック</code>を長押しして着火しましょう。[[Firestarter|着火具(Firestarter)]]の作り方は<code>H</code>で開けるハンドブックから確認できます。 | |||
</div> | |||
おめでとうございます、肉を調理し、棒を熱して松明を作れるようになりました! 松明を左手に持つと空腹になりやすくなり、水に沈むと消えてしまうことに注意しましょう。 | |||
{{-}} | |||
=== | <div class="mw-translate-fuzzy"> | ||
=== 戦闘 === | |||
</div> | |||
[[File:Woodenclub-normal.png|60px|link=Club|left|text-top]] | <div class="mw-translate-fuzzy"> | ||
[[File:Woodenclub-normal.png|60px|link=Club|left|text-top]] 敵対的な生き物から身を守るため、ナッピングか原木を削ることで石器時代の武器を作りましょう。武器ごとに射程距離が違います。 [[Spear|槍]]は石器時代で最も強く、遠くから攻撃することができますが、早く壊れます。槍を作るにはナッピングで石を鋭くし、クラフトグリッドで棒と組み合わせます。木の棍棒は耐久力がありますが、ダメージと射程距離は低くなっています。ナイフ、斧、ただの棒も武器として使えますが、槍よりも射程が短くなっています。緊急時には石を投げつけることもできます。詳しい情報は、[[Combat/ja|戦闘]]の記事を確認してください。 | |||
</div> | |||
[[File:Armor-body-improvised-wood.png|60px|left|text-top]] | <div class="mw-translate-fuzzy"> | ||
[[File:Armor-body-improvised-wood.png|60px|left|text-top]] とても基本的な防具として、[[grass|枯れ草(Dry Grass)]]と[[firewood|薪(Firewood)]]から即席のアーマー(Improvised Armor)をクラフトできます。頭と脚は守られませんが、何もないよりはマシでしょう。Vintage Storyの世界で足場を固めれば、より高度な[[armor|防具]]をクラフトできるようになります。 | |||
<br><br> | <br><br> | ||
</div> | |||
<div class="mw-translate-fuzzy"> | |||
=== 隠れ家 === | |||
太陽が沈んだら、隠れ家も欲しくなるかもしれません。序盤の資源を使った隠れ家を作るには、様々なブロックが利用できます。始めたばかりでも[[Dry Grass|枯れ草(Dry Grass)]]を使えば[[Bed|ベッド(Bed)]]が創れ、干し草(Hay)ブロックやコブ(Cob)は建材になります。[[Soil Blocks|土(Soil)]]も建材として優れ、泥レンガ(Mud Brick)の材料にもなります。 | |||
</div> | |||
=== | <div lang="en" dir="ltr" class="mw-content-ltr"> | ||
Once the sun sets, a player might also like a shelter. There are different blocks that you can use to make a shelter using the early resources you have available. | Once the sun sets, a player might also like a shelter. There are different blocks that you can use to make a shelter using the early resources you have available. {{ll|Dry Grass|Dry grass}} can be used to make a {{ll|Bed|bed}} early on, or form hay blocks/cob for early building blocks. {{ll|Soil Blocks|Soil}} is also a good building material, and can be used to form Mud Bricks. | ||
</div> | |||
=== | <div class="mw-translate-fuzzy"> | ||
=== 据え置き型の入れ物 === | |||
:詳しくは[[Containers|入れ物]]のページをご覧ください。 | |||
[[File:Ex Stationary Containers.png|thumb|250px|チェスト、貯蔵容器、バスケット]] | |||
保管場所のために、ゲーム序盤では二種類の[[containers|入れ物]]をクラフトできます。 | |||
</div> | |||
<div lang="en" dir="ltr" class="mw-content-ltr"> | |||
:''See {{ll|Containers|Container's main article}} for detailed information''. | |||
</div> | |||
== [[Temperature]] == | <div lang="en" dir="ltr" class="mw-content-ltr"> | ||
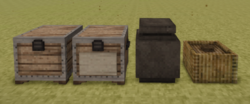
[[File:Ex Stationary Containers.png|thumb|250px|In picture: a chest, a labeled chest, a vessel and a basket.]] | |||
For more storage, the player can craft two early game {{ll|containers|containers}}. | |||
</div> | |||
<div class="mw-translate-fuzzy"> | |||
* [[basket|バスケット(Basket)]]は8スロットありますが、ガマ(Cattail)が24個必要で、可能なら食料の保存には使うべきではありません。 | |||
* 粘土の[[Containers#Food Storage Containers|貯蔵容器(Storage Vessel)]]は12スロットあり、クラフトに粘土を必要としますが、ゲーム中で最も腐敗速度を抑えられ、食料の保存に適しています。 | |||
* [[boards|チェスト(Chest)]]は16スロットありますが[[boards|板(Board)]]が必要で、[[smithing|鍛冶(Smithing)]]を行う必要があります。 | |||
</div> | |||
{{-}} | |||
<div class="mw-translate-fuzzy"> | |||
== 温度 == | |||
:詳しくは[[Temperature|温度]]についてのページをご覧ください。 | |||
プレイヤーの体温は37°C前後に保つ必要があります。これ以下の状態が長く続くと、震えるアニメーションが発生し、ダメージを受けることもあります。水に浸かったり雨の中にいると体温の低下が早まるので注意しましょう。火のついたキャンプファイヤーの近くに立っていると体が温まり、離れてもしばらくは体温が保たれます。 | |||
</div> | |||
<div lang="en" dir="ltr" class="mw-content-ltr"> | |||
:''See {{ll|Temperature|Temperature}} for detailed information''. | |||
</div> | |||
<div lang="en" dir="ltr" class="mw-content-ltr"> | |||
The player's body temperature needs to be kept around 37°C. Prolonged times with body temperature under this mark will result in freezing animations and even damage taken. Beware that dipping in water or being out in the rain will make your temperature drop faster. | The player's body temperature needs to be kept around 37°C. Prolonged times with body temperature under this mark will result in freezing animations and even damage taken. Beware that dipping in water or being out in the rain will make your temperature drop faster. | ||
Standing near a lit campfire can warm the player up and the body temperature will stay up a while even after stepping away. | Standing near a lit campfire can warm the player up and the body temperature will stay up a while even after stepping away. | ||
</div> | |||
== | <div class="mw-translate-fuzzy"> | ||
== テンポラル・スタビリティ == | |||
</div> | |||
[[File:Tempgear.gif|right]] | <div lang="en" dir="ltr" class="mw-content-ltr"> | ||
:''See {{ll|Temporal Stability|Temporal Stability}} for detailed information''. | |||
</div> | |||
:詳しくは[[Temporal Stability|テンポラル・スタビリティ]]についてのページをご覧ください。 | |||
[[File:Tempgear.gif|right|frame]] | |||
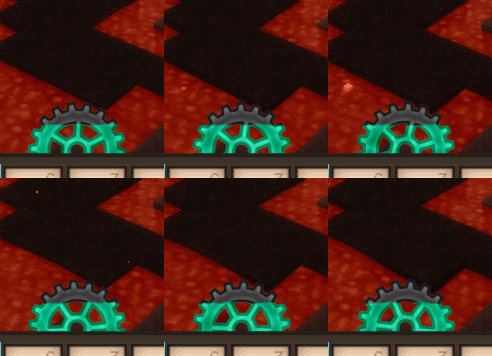
そろそろ健康バーと満腹バーの間にあるシアン色の歯車が気になっているかもしれません。これはテンポラル・スタビリティ(Temporal Stability、時間的安定性)のメーターで、歯車の色が現在のテンポラル・スタビリティを表しています。テンポラル・スタビリティが低下すると歯車が反時計回りに回転し、歯車の青色が減少します。上昇すると色が戻り、時計回りに回転します。テンポラル・スタビリティがゼロになると視界が急激に変化し、悪いことが起きやすくなります。 | |||
''' | '''テンポラル・スタビリティの低下''' | ||
* | * 一部の地上エリアは時間的に不安定です | ||
* | * 洞窟、地下の大洞窟、地表よりも低い場所は、地表よりも不安定です | ||
* | * テンポラル・ストーム(一定の間隔で発生します) | ||
''' | <div class="mw-translate-fuzzy"> | ||
* | '''テンポラル・スタビリティの回復''' | ||
* | * 地表や高所の安定性の高い場所に移動します | ||
* | * テンポラル・ギア(Temporal Gear)からテンポラル・スタビリティを移します。左手にギア、右手にナイフを持ち、<code>右クリック</code>長押しで30%のブーストがかかります | ||
* ドリフター(Drifter)を殺すと、テンポラル・スタビリティが少し回復します | |||
</div> | |||
== | <div class="mw-translate-fuzzy"> | ||
== 高度なゲームメカニクス == | |||
基本をマスターしたら、高度なテクノロジーを発展させることができるようになります:[[Survival Guide - Advanced tech/ja|サバイバルガイド ― 高度な技術]] | |||
</div> | |||
== | <div lang="en" dir="ltr" class="mw-content-ltr"> | ||
Once the basics are mastered, players can develop advanced technology: {{ll|Survival Guide - Advanced tech|Survival Guide - Advanced tech}} | |||
</div> | |||
<div class="mw-translate-fuzzy"> | |||
== チュートリアルビデオ:最初の一日 == | |||
ビデオを作成しVSコミュニティに共有してくれたAshantin氏に感謝します。 | |||
<br><youtube>BXIo8w8YAa8</youtube> | |||
</div> | |||
<div lang="en" dir="ltr" class="mw-content-ltr"> | |||
Thanks to Ashantin for creating and sharing with the VS community. | Thanks to Ashantin for creating and sharing with the VS community. | ||
<br><youtube>BXIo8w8YAa8</youtube> | <br><youtube>BXIo8w8YAa8</youtube> | ||
</div> | |||
{{ | {{Game navbox}} | ||
[[Category:Guides{{#translation:}}]] | |||
Latest revision as of 17:53, 16 November 2023

This page is outdated.
The content on this page is not up to date with the most recent game update. If you do wish to contribute, please request wiki edit access on the Discord.
This guide is a collaboration between many individuals and may have issues. A wonderful member of the community, copygirl, who is a contributor to the Vintage Story code, has compiled a more concise and potentially more user friendly survival guide on her own page. As with the wiki, there is no guarantee on the accuracy of the content and is correct to the best of the author's knowledge.
Controls
This is the default key bind, please keep in mind that when changing, for instance, the Shift key for sneaking to a different one, all combinations previously using the shift key will change to your new key choice as well.
| W A S D | To move around |
| Space | Jump |
| E | Backpack Inventory (Access Crafting Grid) |
| C | Character Inventory (Clothes and other Gear) |
| Shift | Sneak (used to place active items on blocks) |
| Ctrl + W | Run |
| G | Sit down |
| Q | Drop currently held item |
| F5 | Cycle through camera modes (first person, third person, overhead) |
| Tab | Show/Hide chat overlay |
| T | Begin typing in the chat overlay |
| F4 | Show/Hide user interfaces |
| F6 | Show/Hide user minimap |
| B | Show/Hide block info |
| H | Survival Handbook - can also be used while hovering over an item in the inventory |
| Shift + H | Survival Handbook while looking at a block or item in the world |
| M | Show/Hide worldmap |
| N | Show/Hide block interaction help |
| V | Show/Hide coordinates |
| F12 | Take a screenshot |
| Esc | Exit/close any interface |
World Creation
When creating a new world, the player can decide between different presets or customize them individually. It is recommended for new players to check the customization options for their first world or start with the Exploration template, as some of the difficulty settings of the Standard experience can be highly frustrating.
The main difficulty points that can be especially challenging for new players are as follows:
- Death punishment (Keep or drop inventory on death)
- Temporal Stability (Temporal Storms, Surface Stability and Rifts)
- Climate Distribution (the distance between different "biomes" and whether these are distributed realistically around an equator, or randomly in patches)
- Surface deposit frequency (both copper & tin, as they are both important starting metals)
The below table shows the available world presets, it is advised to use the Customize button below the preset selection to further customize your world, as almost all aspects of the world generation and player experience can be changed. An in depth list of all customization options can be found on the World Configuration page.
| Preset | Important Aspects |
|---|---|
| Standard | Despite it's name, this is not necessarily the best starting point for any new players. It comes with the full assortment of difficulty options, meaning temporal stability, hunger, temperatures etc. are all enabled. Without customization, monsters will spawn from the first night on and inventory will be dropped on death. |
| Exploration | Most direct threats like creature hostility & temporal stability are turned off, natural difficulties like hunger and temperatures are reduced. The player will keep their inventory on death. |
| Wilderness Survival | Hard Mode - not recommended for new players. Standard Mode with additional challenges - inventory is dropped on death and the player will respawn in a random location in a 5k block radius. Player health points are reduced and creature strength is raised. |
| Creative Building | As the name implies, this is your typical flat building world with Creative Mode enabled from the start. If you'd rather like to build in a normal map, customize a different preset to start in Creative Mode instead of Survival Mode. |
最初の一日
プレイヤーのスポーン
Player Spawn
プレイヤーはワールド内の「スポーン位置」に出現します。ゲーム内で死亡すると初期スポーン位置に再出現(リスポーン)します(スポーン地点をリセットする方法はゲームの後半で見つかります)。ワールドに最初に出現したときに、ワールドマップにスポーン地点のマーカーを記しておくのは良いアイデアです。ワールドマップで右クリックか、コマンド/waypoint add [waypointcolor] [title]で記録できます。このコマンドは、指定した色(.NETカラーまたは16進数コード)でウェイポイントを追加します。
石の道具
In order to start the Stone Age, you will need Stone Tools, the process usually involves the following:
石器時代を始めるには、石の道具が必要です。これは以下のような手順で入手できます。
- 火打石(Flint)か、散らばった石を見つけます。石には玄武岩(Basalt)、花崗岩(Granite)、安山岩(Andesite)、黒曜石(Obsidian)、かんらん岩(Peridotite)があります。
- 固い地面を
スニーク + 右クリックでナッピング面を作ります。火打石(Flint)はすぐにナッピング面を作れますが、他の散らばった石は地面に置き、それから別の石を持った状態で再びスニーク + 右クリックが必要です。 - メニューから作りたい道具を選びます。最初の道具は斧(Axe)とナイフ(Knife)をお勧めします。
- 石を手に持ち、オレンジ色の立方体を
左クリックで石から除去し、刃やツールヘッドの形を作ります。最後のオレンジ色のボックスを除去すると、完成したツールヘッドがプレイヤーのホットバーへ移動します。 EでインベントリGUIを開くと、クラフトグリッドにアクセスできます。このグリッドで石器の刃と棒(Stick)を組み合わせることで、道具を作ります。
- Note:棒(Stick)は地面から回収したり、
左クリックで枝葉(Branchy Leaves)を壊すことで入手できます。
- Note: Sticks can be collected from the ground or by breaking leafy branches using
 .
.
プレイヤーインベントリ
プレイヤーは3種類のスロットを持っています
|
食べ物
最初の一日の食べ物には、以下のような選択肢があります。
- キノコ(Mushrooms)はナイフか素手で収穫できます。ナイフで先端を収穫すると、時間が経てば再び成長します。
- 完熟したベリーの茂みは道具なしで収穫でき、壊して別の場所に置くこともできます。しばらくすると、再び開花し始めます。
- ガマの根はナイフで収穫して火で調理することで、ゲーム序盤の食料源になります。
- 大半の動物は殺してナイフで収穫することで、栄養のある肉と脂が手に入ります。動物を収穫するには、ナイフを手に持って
スニーク + 右クリック長押しです。肉は焚き火で調理する必要があります。
粘土は時代を進めるために必要なリソースで、ゲーム序盤では比較的安価な貯蔵容器の作成と、食料を少し長く保存するための最初の手段として使えます。また高度な料理に必要な料理鍋のクラフトにも必要です。
詳しい情報は粘土成形(Clay Forming)のページで確認できます。
Detailed information can be found in the Clay Forming page.
明かり / 料理
太陽が沈んだら、光源と料理のために焚き火(Firepit)を作りたくなるでしょう。火や松明は雨で消えてしまうため、焚き火には簡単な屋根を作るようにしましょう。
まず以下のリソースを集めます。
To make a firepit, gather the following resources:
- 枯れ草(Dry Grass):ナイフを手に持って
左クリックで、背の高い草(Tall Grass)を集めます - 薪(Firewood):斧を手に持って
左クリックで木を切り、原木(Log)を集めます。斧と原木をクラフトグリッドに置き、薪を作ります。
枯れ草を手に持ってスニーク + 右クリックで地面に置き、次に薪を4つ手に持ってスニーク + 右クリックで焚き火を完成させます。その後、着火具(Firestarter)または松明を手に持ち、焚き火の土台に対して右クリックを長押しして着火しましょう。着火具(Firestarter)の作り方はHで開けるハンドブックから確認できます。
おめでとうございます、肉を調理し、棒を熱して松明を作れるようになりました! 松明を左手に持つと空腹になりやすくなり、水に沈むと消えてしまうことに注意しましょう。
戦闘
隠れ家
太陽が沈んだら、隠れ家も欲しくなるかもしれません。序盤の資源を使った隠れ家を作るには、様々なブロックが利用できます。始めたばかりでも枯れ草(Dry Grass)を使えばベッド(Bed)が創れ、干し草(Hay)ブロックやコブ(Cob)は建材になります。土(Soil)も建材として優れ、泥レンガ(Mud Brick)の材料にもなります。
Once the sun sets, a player might also like a shelter. There are different blocks that you can use to make a shelter using the early resources you have available. Dry grass can be used to make a bed early on, or form hay blocks/cob for early building blocks. Soil is also a good building material, and can be used to form Mud Bricks.
- See Container's main article for detailed information.
For more storage, the player can craft two early game containers.
- バスケット(Basket)は8スロットありますが、ガマ(Cattail)が24個必要で、可能なら食料の保存には使うべきではありません。
- 粘土の貯蔵容器(Storage Vessel)は12スロットあり、クラフトに粘土を必要としますが、ゲーム中で最も腐敗速度を抑えられ、食料の保存に適しています。
- チェスト(Chest)は16スロットありますが板(Board)が必要で、鍛冶(Smithing)を行う必要があります。
温度
- 詳しくは温度についてのページをご覧ください。
プレイヤーの体温は37°C前後に保つ必要があります。これ以下の状態が長く続くと、震えるアニメーションが発生し、ダメージを受けることもあります。水に浸かったり雨の中にいると体温の低下が早まるので注意しましょう。火のついたキャンプファイヤーの近くに立っていると体が温まり、離れてもしばらくは体温が保たれます。
- See Temperature for detailed information.
The player's body temperature needs to be kept around 37°C. Prolonged times with body temperature under this mark will result in freezing animations and even damage taken. Beware that dipping in water or being out in the rain will make your temperature drop faster. Standing near a lit campfire can warm the player up and the body temperature will stay up a while even after stepping away.
テンポラル・スタビリティ
- See Temporal Stability for detailed information.
- 詳しくはテンポラル・スタビリティについてのページをご覧ください。
そろそろ健康バーと満腹バーの間にあるシアン色の歯車が気になっているかもしれません。これはテンポラル・スタビリティ(Temporal Stability、時間的安定性)のメーターで、歯車の色が現在のテンポラル・スタビリティを表しています。テンポラル・スタビリティが低下すると歯車が反時計回りに回転し、歯車の青色が減少します。上昇すると色が戻り、時計回りに回転します。テンポラル・スタビリティがゼロになると視界が急激に変化し、悪いことが起きやすくなります。
テンポラル・スタビリティの低下
- 一部の地上エリアは時間的に不安定です
- 洞窟、地下の大洞窟、地表よりも低い場所は、地表よりも不安定です
- テンポラル・ストーム(一定の間隔で発生します)
テンポラル・スタビリティの回復
- 地表や高所の安定性の高い場所に移動します
- テンポラル・ギア(Temporal Gear)からテンポラル・スタビリティを移します。左手にギア、右手にナイフを持ち、
右クリック長押しで30%のブーストがかかります - ドリフター(Drifter)を殺すと、テンポラル・スタビリティが少し回復します
高度なゲームメカニクス
基本をマスターしたら、高度なテクノロジーを発展させることができるようになります:サバイバルガイド ― 高度な技術
Once the basics are mastered, players can develop advanced technology: Survival Guide - Advanced tech
チュートリアルビデオ:最初の一日
ビデオを作成しVSコミュニティに共有してくれたAshantin氏に感謝します。
Thanks to Ashantin for creating and sharing with the VS community.
| Wiki Navigation | |
|---|---|
| Vintage Story | Guides • Frequently Asked Questions • Soundtrack • Versions • Controls |
| Game systems | Crafting • Knapping • Clay forming • Smithing • Cooking • Temperature • Hunger • Mining • Temporal stability • Mechanical power • Trading • Farming • Animal husbandry |
| World | World generation • Biomes • Weather • Temporal storms |
| Items | Tools • Weapons • Armor • Clothing • Bags • Materials • Food |
| Blocks | Terrain • Plants • Decorative • Lighting • Functional • Ore |
| Entities | Hostile entities • Animals • NPCs • Players |
| Miscellaneous | List of client commands • List of server commands • Creative Starter Guide • Bot System • WorldEdit • Cinematic Camera • Adjustable FPS Video Recording • ServerBlockTicking |
