Anvil/it: Difference between revisions
(Updating to match new version of source page) Tags: Mobile edit Mobile web edit |
(Updating to match new version of source page) |
||
| (11 intermediate revisions by the same user not shown) | |||
| Line 1: | Line 1: | ||
<languages /> | <languages /> | ||
< | {{GameVersion|1.18.15}} | ||
{{Block | |||
|Name = <span lang="en" dir="ltr" class="mw-content-ltr">Anvil</span> | |||
|Image = File:Grid Copper anvil.png | |Image = File:Grid Copper anvil.png | ||
|Stackable = No | |Stackable = <span lang="en" dir="ltr" class="mw-content-ltr">No</span> | ||
|Material = Metal | |Material = <span lang="en" dir="ltr" class="mw-content-ltr">Metal</span> | ||
|Drops = Itself | |Drops = <span lang="en" dir="ltr" class="mw-content-ltr">Itself</span> | ||
|FloatRight=yes | |||
|NoBreak=yes | |||
}} | }} | ||
<div lang="en" dir="ltr" class="mw-content-ltr"> | <div lang="en" dir="ltr" class="mw-content-ltr"> | ||
'''Anvils''' are functional blocks used as the work surface when {{ll|smithing|smithing}} metal items. | |||
</div> | |||
__TOC__ | __TOC__ | ||
<div lang="en" dir="ltr" class="mw-content-ltr"> | <div lang="en" dir="ltr" class="mw-content-ltr"> | ||
| Line 23: | Line 23: | ||
<div lang="en" dir="ltr" class="mw-content-ltr"> | <div lang="en" dir="ltr" class="mw-content-ltr"> | ||
In the game, you will need a Tier (n-1) anvil to work Tier (n) materials, i.e. you will need a bronze (Tier | In the game, you will need a Tier (n-1) anvil to work Tier (n) materials, i.e. you will need a bronze (Tier 2) anvil to work iron (Tier 3) ingots. | ||
</div> | </div> | ||
<div lang="en" dir="ltr" class="mw-content-ltr"> | <div lang="en" dir="ltr" class="mw-content-ltr"> | ||
===Copper (Tier | ===Copper (Tier 1) and Bronze (Tier 2) Anvil=== | ||
</div> | </div> | ||
<div lang="en" dir="ltr" class="mw-content-ltr"> | <div lang="en" dir="ltr" class="mw-content-ltr"> | ||
The first step in this process is to create an | The first step in this process is to create an {{ll|Molds|anvil mold}} via the {{ll|Clay Forming|clay forming}} mechanic. The anvil is then cast using the {{ll|casting|casting}} mechanic. An anvil requires 900 units (9 ingots-worth) of copper or bronze alloy to fill the mold. Once an anvil is cast and removed from the mold, it may be placed like any other block onto a solid surface. No tools are required to {{Breaking|break}} an anvil to pick it up and re-position it. | ||
</div> | </div> | ||
<div lang="en" dir="ltr" class="mw-content-ltr"> | <div lang="en" dir="ltr" class="mw-content-ltr"> | ||
===Iron and Meteoric Iron Anvil (Tier | ===Iron and Meteoric Iron Anvil (Tier 3)=== | ||
</div> | </div> | ||
<div lang="en" dir="ltr" class="mw-content-ltr"> | <div lang="en" dir="ltr" class="mw-content-ltr"> | ||
[[File:Anvil welding.PNG|thumb|200px|An iron anvil base with applied borax waiting for the top part.]] | [[File:Anvil welding.PNG|thumb|200px|An iron anvil base with applied borax waiting for the top part.]] | ||
Anvils made out of iron or meteoric iron | Anvils made out of iron or meteoric iron cannot be cast in molds like copper and bronze anvils, since iron and meteoric iron cannot be melted in a crucible. The player first has to make the upper and lower parts of the anvil separately, smithing them with any {{ll|hammer|hammer}} on a bronze anvil. Then, the two parts need to be welded together with powdered {{ll|borax|borax}}. | ||
</div> | </div> | ||
<div lang="en" dir="ltr" class="mw-content-ltr"> | <div lang="en" dir="ltr" class="mw-content-ltr"> | ||
To make a complete iron anvil, a total of 10 iron ingots are needed, 5 each for the anvil base and anvil top, as well as one powdered borax. One ingot amounts to 42 | To make a complete iron anvil, a total of 10 iron ingots are needed, 5 each for the anvil base and anvil top, as well as one powdered borax. One ingot amounts to 42 voxels added, and the anvil base and top need 196 and 210 voxels respectively. | ||
</div> | </div> | ||
<div lang="en" dir="ltr" class="mw-content-ltr"> | <div lang="en" dir="ltr" class="mw-content-ltr"> | ||
{{ | {{Protip | ||
|The recipe has an upper height limit of | |The recipe has an upper height limit of voxels, which means adding too many ingots too fast without first distributing previously placed voxels might effectively delete voxels altogether! Make sure to add the next ingot only after distributing the voxels from the last one. | ||
}} | }} | ||
</div> | </div> | ||
| Line 58: | Line 58: | ||
<div lang="en" dir="ltr" class="mw-content-ltr"> | <div lang="en" dir="ltr" class="mw-content-ltr"> | ||
Start the crafting process by placing a heated iron ingot on the anvil - bronze or higher anvil tier is needed. Select the anvil base and start hammering. Note that for the base, a total of 5 ingots need to be added, and there is at maximum 14 | Start the crafting process by placing a heated iron ingot on the anvil - bronze or higher anvil tier is needed. Select the anvil base and start hammering. Note that for the base, a total of 5 ingots need to be added, and there is at maximum 14 voxels worth room for error. This process might be easier when starting with one iron plate as the base, and then adding 3 more ingots, one at a time.<br> | ||
To lessen the chance of wasting | To lessen the chance of wasting voxels - and thus ingots - it is necessary to add one ingot, flatten it out and only then add the next - and so forth. The space on which the next ingot will be added is always the same, and the player can make sure that this space is flat and below the maximum height limit of the recipe, which is 6 voxels, or 3 ingots stacked. Keep in mind that a new ingot added will only fill in the empty voxels in that specific space, so it is recommended to keep the ingot place as flat as possible. The ingot will however rise with the rest, meaning it will be added ''on top'' of the current surface.<br><br> | ||
An optimum way of smithing can be seen below, with the focus on keeping the "ingot landing space" as empty and flat as possible. However, keep in mind that this is the best way to save iron ingots, not the best way to save coal. | An optimum way of smithing can be seen below, with the focus on keeping the "ingot landing space" as empty and flat as possible. However, keep in mind that this is the best way to save iron ingots, not the best way to save coal. | ||
</div> | </div> | ||
<div lang="en" dir="ltr" class="mw-content-ltr"> | <div lang="en" dir="ltr" class="mw-content-ltr"> | ||
{{ | {{Protip | ||
| | |You do not need to leave space around the anvil to go behind to work on the back part of the item. Just do a right mouse click with the hammer in hand and the item you are working on will rotate. | ||
}} | }} | ||
</div> | </div> | ||
| Line 79: | Line 79: | ||
<div lang="en" dir="ltr" class="mw-content-ltr"> | <div lang="en" dir="ltr" class="mw-content-ltr"> | ||
The anvil base needs a total of 196 | The anvil base needs a total of 196 voxels, divided into five layers: | ||
*80 first layer | *80 first layer | ||
*38 each for second and third layer | *38 each for second and third layer | ||
| Line 90: | Line 90: | ||
<div lang="en" dir="ltr" class="mw-content-ltr"> | <div lang="en" dir="ltr" class="mw-content-ltr"> | ||
For the anvil top, follow the same process. However, keep in mind that for the top part | For the anvil top, follow the same process. However, keep in mind that for the top part, not even one voxel should be wasted. This means there is no margin for error, and any wasted voxels will result in a sixth ingot added to finish the item. As the top part is rather slim, a plate is not helpful as the smithing base.<br> | ||
</div> | </div> | ||
| Line 104: | Line 104: | ||
<div lang="en" dir="ltr" class="mw-content-ltr"> | <div lang="en" dir="ltr" class="mw-content-ltr"> | ||
The anvil top needs a total of 210 | The anvil top needs a total of 210 voxels, divided into five layers: | ||
*78 first layer | *78 first layer | ||
*48 second layer | *48 second layer | ||
| Line 117: | Line 117: | ||
<div lang="en" dir="ltr" class="mw-content-ltr"> | <div lang="en" dir="ltr" class="mw-content-ltr"> | ||
After both the base and top are finished, heat both of them up in a forge. Once heated, first place the base part down on the ground. Take one portion of | After both the base and top are finished, heat both of them up in a forge. Once heated, first place the base part down on the ground. Take one portion of {{ll|Borax|powdered borax}} and apply with a {{SneakClick}} on the placed base, then add the top part. Hammer until both parts are welded together, this should take about 12 hits. | ||
</div> | </div> | ||
| Line 125: | Line 125: | ||
<div lang="en" dir="ltr" class="mw-content-ltr"> | <div lang="en" dir="ltr" class="mw-content-ltr"> | ||
The anvil is the work surface used for | The anvil is the work surface used for {{ll|smithing|smithing}} {{ll|metal|metal}} {{ll|Tools and Weapons|tools}} from ingots heated in a {{ll|forge|forge}}. When a heated ingot is placed on the anvil, a dialog box opens to allow the player to select the item to be crafted. Copper and Bronze items can be worked on any anvil, but iron items can only be worked on a bronze or iron anvil and steel items can only be worked on an iron anvil. | ||
</div> | </div> | ||
<div lang="en" dir="ltr" class="mw-content-ltr"> | <div lang="en" dir="ltr" class="mw-content-ltr"> | ||
There is no need to craft steel anvils at | There is no need to craft steel anvils at this time, as there are no Tier 5 metals in the game. | ||
</div> | </div> | ||
<div lang="en" dir="ltr" class="mw-content-ltr"> | <div lang="en" dir="ltr" class="mw-content-ltr"> | ||
== | ==Recycling== | ||
</div> | </div> | ||
| Line 155: | Line 155: | ||
</div> | </div> | ||
<div lang="en" dir="ltr" class="mw-content-ltr"> | |||
== History == | |||
</div> | |||
<div lang="en" dir="ltr" class="mw-content-ltr"> | |||
== Notes == | |||
</div> | |||
<div lang="en" dir="ltr" class="mw-content-ltr"> | |||
* While the metal tier matters for the anvil, it doesn't matter for the hammer or helve hammer. | |||
** A copper hammer may be used to smith a steel ingot. But higher tiers are preferable for their higher durability (more uses before breaking). | |||
** A bronze helve hammer may be used to smith a steel ingot. Helve hammers have no durability, and there's no reason to prefer higher tier metals. | |||
* Though iron and meteoric iron anvils are both tier 3, you need an iron anvil in order to smith meteoric iron ingots. | |||
</div> | |||
<div lang="en" dir="ltr" class="mw-content-ltr"> | |||
== Gallery == | |||
</div> | |||
<div lang="en" dir="ltr" class="mw-content-ltr"> | |||
== See also == | |||
</div> | |||
<div lang="en" dir="ltr" class="mw-content-ltr"> | |||
== References == | |||
</div> | |||
{{Metals navbox}} | |||
{{Blocks navbox}} | {{Blocks navbox}} | ||
{{Game navbox}} | {{Game navbox}} | ||
[[Category:Blocks{{#translation:}}]] | |||
[[Category:Tools{{#translation:}}]] | [[Category:Tools{{#translation:}}]] | ||
Latest revision as of 10:28, 7 April 2024
This page was last verified for Vintage Story version 1.18.15.
| Anvil | |

| |
| Material | Metal |
| Stackable | No |
| Drops | Itself |
| Blocks | |
Anvils are functional blocks used as the work surface when smithing metal items.
Creation
In the game, you will need a Tier (n-1) anvil to work Tier (n) materials, i.e. you will need a bronze (Tier 2) anvil to work iron (Tier 3) ingots.
Copper (Tier 1) and Bronze (Tier 2) Anvil
The first step in this process is to create an anvil mold via the clay forming mechanic. The anvil is then cast using the casting mechanic. An anvil requires 900 units (9 ingots-worth) of copper or bronze alloy to fill the mold. Once an anvil is cast and removed from the mold, it may be placed like any other block onto a solid surface. No tools are required to break an anvil to pick it up and re-position it.
Iron and Meteoric Iron Anvil (Tier 3)

Anvils made out of iron or meteoric iron cannot be cast in molds like copper and bronze anvils, since iron and meteoric iron cannot be melted in a crucible. The player first has to make the upper and lower parts of the anvil separately, smithing them with any hammer on a bronze anvil. Then, the two parts need to be welded together with powdered borax.
To make a complete iron anvil, a total of 10 iron ingots are needed, 5 each for the anvil base and anvil top, as well as one powdered borax. One ingot amounts to 42 voxels added, and the anvil base and top need 196 and 210 voxels respectively.
Protip:
The recipe has an upper height limit of voxels, which means adding too many ingots too fast without first distributing previously placed voxels might effectively delete voxels altogether! Make sure to add the next ingot only after distributing the voxels from the last one. |
Anvil Base
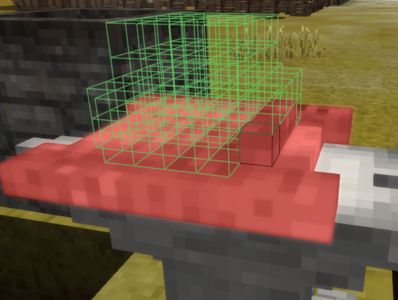
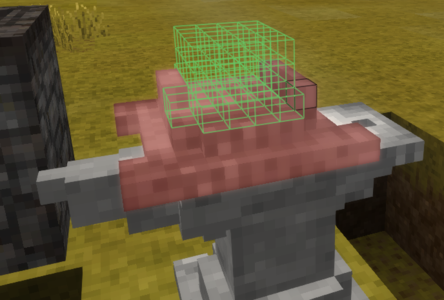
Start the crafting process by placing a heated iron ingot on the anvil - bronze or higher anvil tier is needed. Select the anvil base and start hammering. Note that for the base, a total of 5 ingots need to be added, and there is at maximum 14 voxels worth room for error. This process might be easier when starting with one iron plate as the base, and then adding 3 more ingots, one at a time.
To lessen the chance of wasting voxels - and thus ingots - it is necessary to add one ingot, flatten it out and only then add the next - and so forth. The space on which the next ingot will be added is always the same, and the player can make sure that this space is flat and below the maximum height limit of the recipe, which is 6 voxels, or 3 ingots stacked. Keep in mind that a new ingot added will only fill in the empty voxels in that specific space, so it is recommended to keep the ingot place as flat as possible. The ingot will however rise with the rest, meaning it will be added on top of the current surface.
An optimum way of smithing can be seen below, with the focus on keeping the "ingot landing space" as empty and flat as possible. However, keep in mind that this is the best way to save iron ingots, not the best way to save coal.
Protip:
You do not need to leave space around the anvil to go behind to work on the back part of the item. Just do a right mouse click with the hammer in hand and the item you are working on will rotate. |
2 ingots
3 ingots
4 ingots
5 ingots


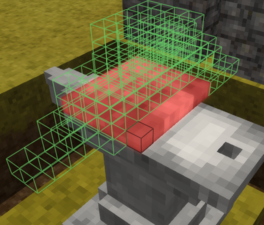
The anvil base needs a total of 196 voxels, divided into five layers:
- 80 first layer
- 38 each for second and third layer
- 20 each for fourth and fifth layer
Anvil Top
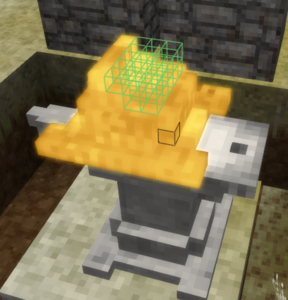
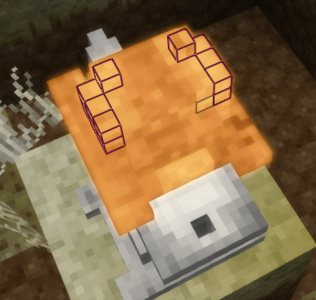
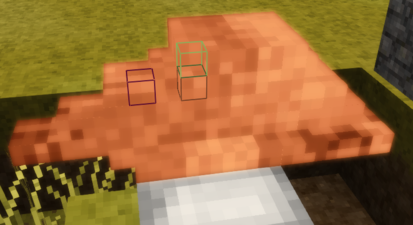
For the anvil top, follow the same process. However, keep in mind that for the top part, not even one voxel should be wasted. This means there is no margin for error, and any wasted voxels will result in a sixth ingot added to finish the item. As the top part is rather slim, a plate is not helpful as the smithing base.
1 ingot

2 ingots
3 ingots

4 ingots
5 ingots


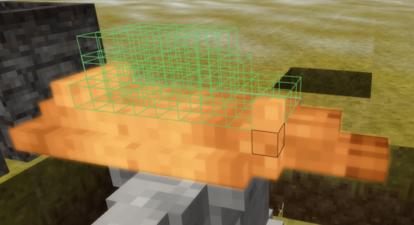
The anvil top needs a total of 210 voxels, divided into five layers:
- 78 first layer
- 48 second layer
- 40 third layer
- 24 fourth layer
- 20 fifth layer
Welding
After both the base and top are finished, heat both of them up in a forge. Once heated, first place the base part down on the ground. Take one portion of powdered borax and apply with a Shift+right click on the placed base, then add the top part. Hammer until both parts are welded together, this should take about 12 hits.
Usage
The anvil is the work surface used for smithing metal tools from ingots heated in a forge. When a heated ingot is placed on the anvil, a dialog box opens to allow the player to select the item to be crafted. Copper and Bronze items can be worked on any anvil, but iron items can only be worked on a bronze or iron anvil and steel items can only be worked on an iron anvil.
There is no need to craft steel anvils at this time, as there are no Tier 5 metals in the game.
Recycling
An anvil cannot be smelted to recover the material used in creating the item, however since version 1.14, the player can use a chisel and anvil of the same metal type in the crafting grid to recover 8 ingots worth of metal. Keep in mind that both the anvil and the chisel will be destroyed in the process, meaning from the original 10 ingots, two will be permanently lost.
Since version 1.14, falling anvils do considerable damage when hitting a player or other entity.
Video Tutorials
| Detailed guide through the iron anvil smithing process |
|---|
History
Notes
- While the metal tier matters for the anvil, it doesn't matter for the hammer or helve hammer.
- A copper hammer may be used to smith a steel ingot. But higher tiers are preferable for their higher durability (more uses before breaking).
- A bronze helve hammer may be used to smith a steel ingot. Helve hammers have no durability, and there's no reason to prefer higher tier metals.
- Though iron and meteoric iron anvils are both tier 3, you need an iron anvil in order to smith meteoric iron ingots.
Gallery
See also
References
| Ores, metals and minerals | |
|---|---|
| Guides | Ore Deposits • Metals |
| Metals | Copper • Iron • Meteoric iron • Gold • Silver • Lead • Tin • Zinc • Bismuth • Titanium (Ilmenite) |
| Alloys | Bronze (Tin bronze, bismuth bronze, black bronze) • Steel • Brass • Solder (Lead solder, Silver solder) • Molybdochalkos • Cupronickel • Electrum |
| Minerals | Alum • Borax • Cinnabar • Coal • Halite (Salt) • Lapis lazuli • Quartz • Saltpeter • Sulfur • Sylvite (Potash) |
| Tools | Pickaxe • Hammer • Prospecting Pick • Crucible • Forge • Ore blasting bomb • Quern • Anvil • Bloomery • Helve hammer • Pulverizer |
| Other | Gemstones |
| Related mechanics | Panning • Mining • Clay forming • Casting • Smithing • Steel making |
| Wiki Navigation | |
|---|---|
| Vintage Story | Guides • Frequently Asked Questions • Soundtrack • Versions • Controls |
| Game systems | Crafting • Knapping • Clay forming • Smithing • Cooking • Temperature • Hunger • Mining • Temporal stability • Mechanical power • Trading • Farming • Animal husbandry |
| World | World generation • Biomes • Weather • Temporal storms |
| Items | Tools • Weapons • Armor • Clothing • Bags • Materials • Food |
| Blocks | Terrain • Plants • Decorative • Lighting • Functional • Ore |
| Entities | Hostile entities • Animals • NPCs • Players |
| Miscellaneous | List of client commands • List of server commands • Creative Starter Guide • Bot System • WorldEdit • Cinematic Camera • Adjustable FPS Video Recording • ServerBlockTicking |