Survival Guide - Your first day/pl: Difference between revisions
(Updating to match new version of source page) Tags: Mobile edit Mobile web edit |
(Updating to match new version of source page) Tags: Mobile edit Mobile web edit |
||
| Line 1: | Line 1: | ||
<languages /> | <languages /> | ||
{{Outdated|<span lang="en" dir="ltr" class="mw-content-ltr">Not updated for the 1.18 worldgen presets</span>}} | |||
<div lang="en" dir="ltr" class="mw-content-ltr"> | <div lang="en" dir="ltr" class="mw-content-ltr"> | ||
This guide is a collaboration between many individuals and may have issues. A wonderful member of the community, copygirl, who is a contributor to the Vintage Story code, has compiled a more concise and potentially more user friendly [https://copy.mcft.net/vs/guide/ survival guide on her own page]. As with the wiki, there is no guarantee on the accuracy of the content and is correct to the best of the author's knowledge. | This guide is a collaboration between many individuals and may have issues. A wonderful member of the community, copygirl, who is a contributor to the Vintage Story code, has compiled a more concise and potentially more user friendly [https://copy.mcft.net/vs/guide/ survival guide on her own page]. As with the wiki, there is no guarantee on the accuracy of the content and is correct to the best of the author's knowledge. | ||
</div> | |||
__TOC__ | __TOC__ | ||
<div lang="en" dir="ltr" class="mw-content-ltr"> | |||
== Controls == | == Controls == | ||
This is the default key bind, please keep in mind that when changing, for instance, the | This is the default key bind, please keep in mind that when changing, for instance, the {{Keypress|Shift}} key for sneaking to a different one, all combinations previously using the shift key will change to your new key choice as well. | ||
</div> | </div> | ||
<div style="float:left; margin-right:20px; padding-bottom:1em;"> | |||
<div style="float:left; margin-right:20px;"> | |||
{| | {| | ||
|+ <span lang="en" dir="ltr" class="mw-content-ltr">'''Character controls'''</span> | |||
|- | |- | ||
| | | style="padding-right:0.5em" | <span lang="en" dir="ltr" class="mw-content-ltr">{{Keypress|W}} {{Keypress|A}} {{Keypress|S}} {{Keypress|D}} || To move around</span> | ||
|- | |- | ||
| <span | | style="padding-right:0.5em" | <span lang="en" dir="ltr" class="mw-content-ltr">{{Keypress|Space}} || Jump</span> | ||
|- | |- | ||
| <span class=" | | style="padding-right:0.5em" | <span lang="en" dir="ltr" class="mw-content-ltr">{{Keypress|E}} || Backpack Inventory (Access Crafting Grid)</span> | ||
|- | |- | ||
| <span class=" | | style="padding-right:0.5em" | <span lang="en" dir="ltr" class="mw-content-ltr">{{Keypress|C}} || Character Inventory (Clothes and other Gear)</span> | ||
|- | |- | ||
| <span class=" | | style="padding-right:0.5em" | <span lang="en" dir="ltr" class="mw-content-ltr">{{Keypress|Shift}} || Sneak (used to place active items on blocks)</span> | ||
|- | |- | ||
| <span | | style="padding-right:0.5em" | <span lang="en" dir="ltr" class="mw-content-ltr">{{Keypress|Ctrl}} + {{Keypress|W}} || Run</span> | ||
|- | |- | ||
| <span class=" | | style="padding-right:0.5em" | <span lang="en" dir="ltr" class="mw-content-ltr">{{Keypress|G}} || Sit down</span> | ||
|- | |- | ||
| <span class=" | | style="padding-right:0.5em" | <span lang="en" dir="ltr" class="mw-content-ltr">{{Keypress|Q}} || Drop currently held item</span> | ||
|- | |- | ||
| <span class=" | | style="padding-right:0.5em" | <span lang="en" dir="ltr" class="mw-content-ltr">{{Keypress|F5}} || Cycle through camera modes (first person, third person, overhead)</span> | ||
|} | |} | ||
</div> | </div><div style="float:left;"> | ||
<div style="float:left;"> | |||
{| | {| | ||
|+ <span lang="en" dir="ltr" class="mw-content-ltr">'''User interface controls'''</span> | |||
|- | |- | ||
| <span | | style="padding-right:0.5em" | <span lang="en" dir="ltr" class="mw-content-ltr">{{Keypress|Tab}} || Show/Hide chat overlay</span> | ||
|- | |- | ||
| <span class=" | | style="padding-right:0.5em" | <span lang="en" dir="ltr" class="mw-content-ltr">{{Keypress|T}} || Begin typing in the chat overlay</span> | ||
|- | |- | ||
| <span class=" | | style="padding-right:0.5em" | <span lang="en" dir="ltr" class="mw-content-ltr">{{Keypress|F4}} || Show/Hide user interfaces</span> | ||
|- | |- | ||
| <span class=" | | style="padding-right:0.5em" | <span lang="en" dir="ltr" class="mw-content-ltr">{{Keypress|F6}} || Show/Hide user minimap</span> | ||
|- | |- | ||
| <span class=" | | style="padding-right:0.5em" | <span lang="en" dir="ltr" class="mw-content-ltr">{{Keypress|B}} || Show/Hide block info</span> | ||
|- | |- | ||
| <span class=" | | style="padding-right:0.5em" | <span lang="en" dir="ltr" class="mw-content-ltr">{{Keypress|H}} || Survival Handbook - can also be used while hovering over an item in the inventory</span> | ||
|- | |- | ||
| <span | | style="padding-right:0.5em" | <span lang="en" dir="ltr" class="mw-content-ltr">{{Keypress|Shift}} + {{Keypress|H}} || Survival Handbook while looking at a block or item in the world</span> | ||
|- | |- | ||
| <span class=" | | style="padding-right:0.5em" | <span lang="en" dir="ltr" class="mw-content-ltr">{{Keypress|M}} || Show/Hide [[worldmap]]</span> | ||
|- | |- | ||
| <span class=" | | style="padding-right:0.5em" | <span lang="en" dir="ltr" class="mw-content-ltr">{{Keypress|N}} || Show/Hide block interaction help</span> | ||
|- | |- | ||
| <span class=" | | style="padding-right:0.5em" | <span lang="en" dir="ltr" class="mw-content-ltr">{{Keypress|V}} || Show/Hide coordinates</span> | ||
|- | |- | ||
| <span class=" | | style="padding-right:0.5em" | <span lang="en" dir="ltr" class="mw-content-ltr">{{Keypress|F12}} || Take a screenshot</span> | ||
|- | |- | ||
| <span class=" | | style="padding-right:0.5em" | <span lang="en" dir="ltr" class="mw-content-ltr">{{Keypress|Esc}} || Exit/close any interface</span> | ||
|} | |}</div></div> | ||
</div> | {{-}} | ||
<div | <div lang="en" dir="ltr" class="mw-content-ltr"> | ||
== World Creation == | |||
When creating a new world, the player can decide between different presets or customize them individually. It is recommended for new players to check the customization options for their first world or start with the Exploration template, as some of the difficulty settings of the Standard experience can be highly frustrating. | |||
</div> | </div> | ||
<div lang="en" dir="ltr" class="mw-content-ltr"> | <div lang="en" dir="ltr" class="mw-content-ltr"> | ||
The main difficulty points that can be especially challenging for new players are as follows: | The main difficulty points that can be especially challenging for new players are as follows: | ||
* Death punishment (Keep or drop inventory on death) | * Death punishment (Keep or drop inventory on death) | ||
| Line 80: | Line 72: | ||
* Climate Distribution (the distance between different "biomes" and whether these are distributed realistically around an equator, or randomly in patches) | * Climate Distribution (the distance between different "biomes" and whether these are distributed realistically around an equator, or randomly in patches) | ||
* Surface deposit frequency (both copper & tin, as they are both important starting metals) | * Surface deposit frequency (both copper & tin, as they are both important starting metals) | ||
< | </div> | ||
<div lang="en" dir="ltr" class="mw-content-ltr"> | |||
The below table shows the available world presets, it is advised to use the Customize button below the preset selection to further customize your world, as almost all aspects of the world generation and player experience can be changed. An in depth list of all customization options can be found on the [[World Configuration]] page. | The below table shows the available world presets, it is advised to use the Customize button below the preset selection to further customize your world, as almost all aspects of the world generation and player experience can be changed. An in depth list of all customization options can be found on the [[World Configuration]] page. | ||
</div> | </div> | ||
| Line 116: | Line 110: | ||
</div> | </div> | ||
<div class="mw-translate-fuzzy"> | |||
[[File:Stonesbranches.png|thumb|Gałęzie i kamienia|200px]] | [[File:Stonesbranches.png|thumb|Gałęzie i kamienia|200px]] | ||
[[File:Knapping.png|right|thumb|Proces łupania|200px]] | [[File:Knapping.png|right|thumb|Proces łupania|200px]] | ||
| Line 128: | Line 123: | ||
:'''''Porada''': Patyki mogą być zebrane z podłoża lub przy niszczeniu liściastych gałęzi używając <code>Lewy przycisk</code>.'' | :'''''Porada''': Patyki mogą być zebrane z podłoża lub przy niszczeniu liściastych gałęzi używając <code>Lewy przycisk</code>.'' | ||
{{-}} | {{-}} | ||
</div> | |||
<div lang="en" dir="ltr" class="mw-content-ltr"> | <div lang="en" dir="ltr" class="mw-content-ltr"> | ||
:'''''Note''': Sticks can be collected from the ground or by breaking leafy branches using | :'''''Note''': Sticks can be collected from the ground or by breaking leafy branches using {{keypress|left click}}.'' | ||
</div> | </div> | ||
{{-}} | {{-}} | ||
=== Ekwipunek gracza === | === Ekwipunek gracza === | ||
| Line 145: | Line 135: | ||
[[File:Inventory.png|650px|center|frame]] | [[File:Inventory.png|650px|center|frame]] | ||
# | {|class="wikitable" | ||
# | |- | ||
# | |[[File:Inventory.png|650px|center]] | ||
|- | |||
| | |||
<div lang="en" dir="ltr" class="mw-content-ltr"> | |||
# Off-hand slot that can hold passive items such as torchers or lanterns. | |||
# Main inventory that holds 10 slots and every slot is linked to a shortcut for quick access (default: keys {{keypress|1}} to {{keypress|0}}). | |||
# Portable containers. Up to 4 containers can be added to expand the inventory even further, the slots are shown in the inventory/crafting window (default: {{Keypress|E}}). | |||
</div> | |||
<div class="mw-translate-fuzzy"> | |||
'''Porada''': [[Containers/pl#Portable_Containers|Koszyk]] Jest najlepszym pierwszym pojemnikiem rozszerzającym twój ekwipunek. Zbieraj [[Cooper's_Reed_(Cattail)/pl|Trzcinę]], którą zazwyczaj można znaleźć w pobliżu jezior. Przepis może być znaleziony [[Containers/pl#Portable_Containers|tutaj]] lub po wciśnięciu klawisza <code>H</code> i wpisaniu ''koszyk''. | '''Porada''': [[Containers/pl#Portable_Containers|Koszyk]] Jest najlepszym pierwszym pojemnikiem rozszerzającym twój ekwipunek. Zbieraj [[Cooper's_Reed_(Cattail)/pl|Trzcinę]], którą zazwyczaj można znaleźć w pobliżu jezior. Przepis może być znaleziony [[Containers/pl#Portable_Containers|tutaj]] lub po wciśnięciu klawisza <code>H</code> i wpisaniu ''koszyk''. | ||
</div> | |||
|} | |||
{{-}} | {{-}} | ||
=== Jedzenie === | === Jedzenie === | ||
| Line 170: | Line 166: | ||
</div> | </div> | ||
{{-}} | |||
=== Glina === | === Glina === | ||
[[File:Claydeposits.png|250px|thumb|Znajdź glinę i zabierz ją ze sobą lub zaznacz na mapie.]] | [[File:Claydeposits.png|250px|thumb|Znajdź glinę i zabierz ją ze sobą lub zaznacz na mapie.]] | ||
| Line 182: | Line 179: | ||
</div> | </div> | ||
{{-}} | {{-}} | ||
=== Światło / Gotowanie === | === Światło / Gotowanie === | ||
| Line 192: | Line 186: | ||
</gallery> | </gallery> | ||
<div class="mw-translate-fuzzy"> | |||
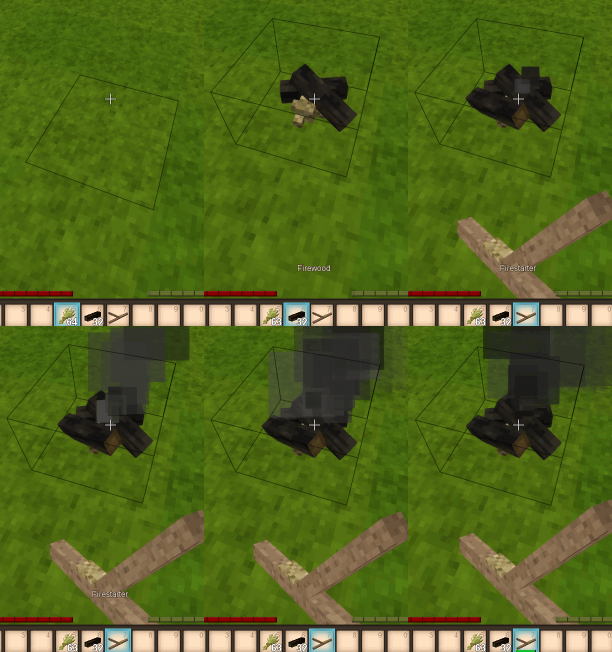
[[File:Firestarter.gif|Tworzenie ogniska.|right|frame]] | [[File:Firestarter.gif|Tworzenie ogniska.|right|frame]] | ||
Po zachodzie słońca gracz może chcieć stworzyć [[Firepit/pl|ognisko]] jako źródło światła i aby gotować. Pamiętaj jednak, że [[weather/pl|deszcz]] gasi wszelkie nieosłonięte pochodnie i ogień, więc zbuduj prosty dach nad dowolnymi ogniskami. <br> | Po zachodzie słońca gracz może chcieć stworzyć [[Firepit/pl|ognisko]] jako źródło światła i aby gotować. Pamiętaj jednak, że [[weather/pl|deszcz]] gasi wszelkie nieosłonięte pochodnie i ogień, więc zbuduj prosty dach nad dowolnymi ogniskami. <br> | ||
Zbierz następujące zasoby: | Zbierz następujące zasoby: | ||
</div> | |||
<div lang="en" dir="ltr" class="mw-content-ltr"> | |||
To make a firepit, gather the following resources: | |||
</div> | |||
<div class="mw-translate-fuzzy"> | |||
*Sucha trawa <code>Lewy przycisk</code> z nożem w ręce aby zebrać z wysokiej trawy, | *Sucha trawa <code>Lewy przycisk</code> z nożem w ręce aby zebrać z wysokiej trawy, | ||
*Drewno opałowe <code>Lewy przycisk</code> z toporem w ręce aby ściąć [[trees/pl|drzewa]] i zebrać pnie. Połóż topór i pnie w oknie wytwarzania aby stworzyć drewno opałowe. | *Drewno opałowe <code>Lewy przycisk</code> z toporem w ręce aby ściąć [[trees/pl|drzewa]] i zebrać pnie. Połóż topór i pnie w oknie wytwarzania aby stworzyć drewno opałowe. | ||
</div> | |||
<div class="mw-translate-fuzzy"> | |||
Przytrzymaj <code>Skradanie + Prawy przycisk</code> na stabilnym podłożu z suchą trawą w ręce, aby umieścić ognisko. Następnie <code>Skradanie + Prawy przycisk</code> z 4 drewnami opałowymi w rękach aby dokończyć ognisko. Następnie rozpal ogień za pomocą [[Firestarter/pl|rozpałki]] (lub pochodni), przytrzymaj <code>Prawy przycisk</code> z przedmiotem w dłoni i wyceluj w podstawę paleniska. | Przytrzymaj <code>Skradanie + Prawy przycisk</code> na stabilnym podłożu z suchą trawą w ręce, aby umieścić ognisko. Następnie <code>Skradanie + Prawy przycisk</code> z 4 drewnami opałowymi w rękach aby dokończyć ognisko. Następnie rozpal ogień za pomocą [[Firestarter/pl|rozpałki]] (lub pochodni), przytrzymaj <code>Prawy przycisk</code> z przedmiotem w dłoni i wyceluj w podstawę paleniska. | ||
</div> | |||
''Gratulacje, możesz ugotować mięso, a nowe pochodnie stworzysz podgrzewając patyki! Lecz bądź ostrożny, pochodnia w twojej ręce spowoduje zwiększony głód, a noszenie pochodni podczas pływania spowoduje że zgaśnie.'' | ''Gratulacje, możesz ugotować mięso, a nowe pochodnie stworzysz podgrzewając patyki! Lecz bądź ostrożny, pochodnia w twojej ręce spowoduje zwiększony głód, a noszenie pochodni podczas pływania spowoduje że zgaśnie.'' | ||
{{-}} | {{-}} | ||
{{-}} | {{-}} | ||
<div lang="en" dir="ltr" class="mw-content-ltr"> | <div lang="en" dir="ltr" class="mw-content-ltr"> | ||
=== Combat === | === Combat === | ||
| Line 214: | Line 214: | ||
<div lang="en" dir="ltr" class="mw-content-ltr"> | <div lang="en" dir="ltr" class="mw-content-ltr"> | ||
[[File:Woodenclub-normal.png|60px|link=Club|left|text-top]] To defend against hostile creatures, craft stone age weapons by knapping or carving a club from a log. Different weapons have different ranges. [[Spear]]s are the strongest long range weapon in the stone age, but break quickly. Create a stone spearhead by knapping, and combine with a stick (shaft) in the crafting grid to finish the spear. Wooden clubs are durable but have less damage and less range. Knives, axes, or just plain sticks can all be used as weapons, but these have shorter ranges than the spear. In an emergency, small stones can be thrown at mobs. For more information, see the main article on [[Combat]] | [[File:Woodenclub-normal.png|60px|link=Club|left|text-top]] To defend against hostile creatures, craft stone age weapons by knapping or carving a club from a log. Different weapons have different ranges. [[Spear]]s are the strongest long range weapon in the stone age, but break quickly. Create a stone spearhead by knapping, and combine with a stick (shaft) in the crafting grid to finish the spear. Wooden clubs are durable but have less damage and less range. Knives, axes, or just plain sticks can all be used as weapons, but these have shorter ranges than the spear. In an emergency, small stones can be thrown at mobs. For more information, see the main article on [[Combat]]. | ||
</div> | </div> | ||
<div lang="en" dir="ltr" class="mw-content-ltr"> | <div lang="en" dir="ltr" class="mw-content-ltr"> | ||
[[File:Armor-body-improvised-wood.png|60px|left|text-top]] [[Improvised body armor]] can be crafted from dry [[grass]] and [[firewood]] for some very basic protection. It will not protect your head or legs, but is better than nothing. Once more established in the world of Vintage Story, more advanced types of [[armor]] can be crafted. | [[File:Armor-body-improvised-wood.png|60px|left|text-top]] [[Improvised body armor]] can be crafted from dry [[grass]] and [[firewood]] for some very basic protection. It will not protect your head or legs, but is better than nothing. Once more established in the world of Vintage Story, more advanced types of [[armor]] can be crafted. | ||
</div> | </div> | ||
| Line 230: | Line 229: | ||
===Stationary Storage=== | ===Stationary Storage=== | ||
:''See [[Containers| Container's main article]] for detailed information''. | :''See [[Containers| Container's main article]] for detailed information''. | ||
</div> | |||
<div lang="en" dir="ltr" class="mw-content-ltr"> | |||
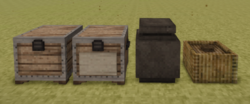
[[File:Ex Stationary Containers.png|thumb|250px|In picture: a chest, a labeled chest, a vessel and a basket.]] | [[File:Ex Stationary Containers.png|thumb|250px|In picture: a chest, a labeled chest, a vessel and a basket.]] | ||
For more storage, the player can craft two early game [[containers]]. | For more storage, the player can craft two early game [[containers]]. | ||
| Line 240: | Line 242: | ||
</div> | </div> | ||
{{-}} | {{-}} | ||
<div lang="en" dir="ltr" class="mw-content-ltr"> | <div lang="en" dir="ltr" class="mw-content-ltr"> | ||
== Temperature == | == Temperature == | ||
:''See [[Temperature| Temperature | :''See [[Temperature|Temperature]] for detailed information''. | ||
</div> | </div> | ||
| Line 256: | Line 255: | ||
<div lang="en" dir="ltr" class="mw-content-ltr"> | <div lang="en" dir="ltr" class="mw-content-ltr"> | ||
== Temporal Stability == | == Temporal Stability == | ||
:''See [[Temporal Stability| Temporal Stability | :''See [[Temporal Stability|Temporal Stability]] for detailed information''. | ||
</div> | </div> | ||
| Line 277: | Line 276: | ||
'''Recovering temporal stability''': | '''Recovering temporal stability''': | ||
* Move to a location of high stability on the surface or at higher elevations in the world | * Move to a location of high stability on the surface or at higher elevations in the world | ||
* Transfer the temporal stability from a temporal gear: | * Transfer the temporal stability from a temporal gear: equip the gear in the left hand, a knife in the off hand, and hold {{Keypress|right mouse button}} to provide a 30% boost at the cost of some HP | ||
* Killing drifters recovers small amounts of your own temporal stability | * Killing drifters recovers small amounts of your own temporal stability | ||
</div> | </div> | ||
Revision as of 23:57, 6 August 2023

Ta strona jest nieaktualna.
Zawartość obecnej strony jest przestarzała w stosunku do najnowszej aktualizacji gry. Jeśli chcesz wspomóc, poproś o dostęp do edycji strony na Discordzie projektu.
This guide is a collaboration between many individuals and may have issues. A wonderful member of the community, copygirl, who is a contributor to the Vintage Story code, has compiled a more concise and potentially more user friendly survival guide on her own page. As with the wiki, there is no guarantee on the accuracy of the content and is correct to the best of the author's knowledge.
Controls
This is the default key bind, please keep in mind that when changing, for instance, the Shift key for sneaking to a different one, all combinations previously using the shift key will change to your new key choice as well.
| W A S D | To move around |
| Space | Jump |
| E | Backpack Inventory (Access Crafting Grid) |
| C | Character Inventory (Clothes and other Gear) |
| Shift | Sneak (used to place active items on blocks) |
| Ctrl + W | Run |
| G | Sit down |
| Q | Drop currently held item |
| F5 | Cycle through camera modes (first person, third person, overhead) |
| Tab | Show/Hide chat overlay |
| T | Begin typing in the chat overlay |
| F4 | Show/Hide user interfaces |
| F6 | Show/Hide user minimap |
| B | Show/Hide block info |
| H | Survival Handbook - can also be used while hovering over an item in the inventory |
| Shift + H | Survival Handbook while looking at a block or item in the world |
| M | Show/Hide worldmap |
| N | Show/Hide block interaction help |
| V | Show/Hide coordinates |
| F12 | Take a screenshot |
| Esc | Exit/close any interface |
World Creation
When creating a new world, the player can decide between different presets or customize them individually. It is recommended for new players to check the customization options for their first world or start with the Exploration template, as some of the difficulty settings of the Standard experience can be highly frustrating.
The main difficulty points that can be especially challenging for new players are as follows:
- Death punishment (Keep or drop inventory on death)
- Temporal Stability (Temporal Storms, Surface Stability and Rifts)
- Climate Distribution (the distance between different "biomes" and whether these are distributed realistically around an equator, or randomly in patches)
- Surface deposit frequency (both copper & tin, as they are both important starting metals)
The below table shows the available world presets, it is advised to use the Customize button below the preset selection to further customize your world, as almost all aspects of the world generation and player experience can be changed. An in depth list of all customization options can be found on the World Configuration page.
| Preset | Important Aspects |
|---|---|
| Standard | Despite it's name, this is not necessarily the best starting point for any new players. It comes with the full assortment of difficulty options, meaning temporal stability, hunger, temperatures etc. are all enabled. Without customization, monsters will spawn from the first night on and inventory will be dropped on death. |
| Exploration | Most direct threats like creature hostility & temporal stability are turned off, natural difficulties like hunger and temperatures are reduced. The player will keep their inventory on death. |
| Wilderness Survival | Hard Mode - not recommended for new players. Standard Mode with additional challenges - inventory is dropped on death and the player will respawn in a random location in a 5k block radius. Player health points are reduced and creature strength is raised. |
| Creative Building | As the name implies, this is your typical flat building world with Creative Mode enabled from the start. If you'd rather like to build in a normal map, customize a different preset to start in Creative Mode instead of Survival Mode. |
Twój pierwszy dzień
Punkt odrodzenia gracza
Gracze pojawiają się w świecie na "Punkcie odrodzenia". Jeśli gracz umiera w grze, ponownie pojawi się (odrodzi) w początkowym miejscu odrodzenia, dopóki punkt odrodzenia nie zostanie zresetowany.(Sposób na zresetowanie miejsca odrodzenia gracza jest możliwy do odkrycia w dalszej części gry.). Dobrym pomysłem jest ustawienie znacznika na miejscu odrodzenia, kiedy gracz po raz pierwszy pojawia się na świecie. Kliknij prawym przyciskiem myszy na mapie świata lub za pomocą polecenia /waypoint add [waypointcolor] [title]. Ta komenda dodaje punkt nawigacyjny o podanym kolorze. (dowolny kolor .NET lub kod Hex) i tekst.
Kamienne narzędzia
In order to start the Stone Age, you will need Stone Tools, the process usually involves the following:
Aby rozpocząć Erę kamienia łupanego , potrzebujesz Kamiennych narzędzi, proces zazwyczaj obejmuje następujące czynności :
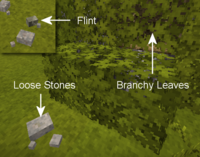
- Poszukaj krzemieni lub luźno leżących kamieni (bazalt, granit, andezyt, obsydian lub perydotyt).
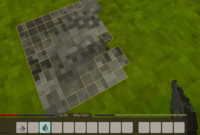
Skradanie + Prawy przyciskna solidnym podłożu, by przygotować miejsce do łupania. (Tylko krzemień tworzy natychmiastowo miejsce do łupania.) Celem użycia pozostałych luźnych kamieni, musisz je umieścić raz, a następnie ponownieSkradanie + Prawy przyciskz innym luźnym kamieniem.- Wybierz narzędzie do stworzenia z menu. Axe/pl i Knife/pl są wysoko rekomendowane na pierwsze narzędzia.
- Użyj kamienia w aktywnej ręce,
Lewy przyciskna pomarańczowych kwadratach, aby usunąć je z kamienia i ukształtować ostrze lub głowicę narzędzia. Kiedy ostatni pomarańczowy kwadrat zostanie usunięty, kompletna głownia przeniesie się do hotbaru gracza. - Naciśnij E, żeby otworzyć inwentarz i zdobyć dostęp do siatki rzemieślniczej. Na siatce, połącz kamienną głowicę narzędzia z patykiem (rączką), w celu ukończenia narzędzia.
- Porada: Patyki mogą być zebrane z podłoża lub przy niszczeniu liściastych gałęzi używając
Lewy przycisk.
- Note: Sticks can be collected from the ground or by breaking leafy branches using left click.
Ekwipunek gracza
Gracz ma dostęp do 3 typów slotów w ekwipunku.
|
Jedzenie
Oto niektóre z opcji jedzenia na pierwsze dni:
- Grzyby mogą być zebrane za pomocą noża lub pustej ręki. Zebranie jedynie górnej części za pomocą noża pozwoli im odrosnąć za jakiś czas.
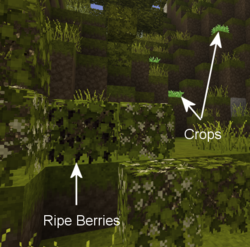
- Dojrzałe krzewy jagodowe mogą być zbierane bez narzędzi, a także zbijane i przesadzane gdziekolwiek indziej. Po chwili zaczną ponownie kwitnąć.
- Trzcinowe korzenie mogą być zebrane za pomocą noża, a następnie ugotowane na ogniu we wczesnej fazie gry.
- Większość zwierząt można zabić i zebrać za pomocą noża dla pożywnego mięsa i tłuszczu. Przytrzymaj
Skradanie + Prawy przyciskz nożem w ręku, żeby zebrać zwierzę. Mięso może być ugotowane nad ogniskiem.
Glina
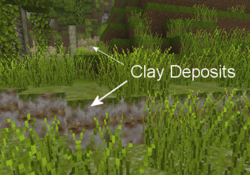
Glina jest wymaganym zasobem, aby przejść przez epoki, a we wczesnej fazie gry może być wykorzystana do budowy stosunkowo tanich stacjonarnych opcji przechowywania i pierwszego sposobu na dłuższe przechowywanie żywności. Wymagane jest również wytworzenie garnka do gotowania, który jest niezbędny do zaawansowanego gotowania.
Szczegółowe informacje można znaleźć na stronie formowania gliny.
Detailed information can be found in the Clay Forming page.
Światło / Gotowanie
Po zachodzie słońca gracz może chcieć stworzyć ognisko jako źródło światła i aby gotować. Pamiętaj jednak, że deszcz gasi wszelkie nieosłonięte pochodnie i ogień, więc zbuduj prosty dach nad dowolnymi ogniskami.
Zbierz następujące zasoby:
To make a firepit, gather the following resources:
- Sucha trawa
Lewy przyciskz nożem w ręce aby zebrać z wysokiej trawy, - Drewno opałowe
Lewy przyciskz toporem w ręce aby ściąć drzewa i zebrać pnie. Połóż topór i pnie w oknie wytwarzania aby stworzyć drewno opałowe.
Przytrzymaj Skradanie + Prawy przycisk na stabilnym podłożu z suchą trawą w ręce, aby umieścić ognisko. Następnie Skradanie + Prawy przycisk z 4 drewnami opałowymi w rękach aby dokończyć ognisko. Następnie rozpal ogień za pomocą rozpałki (lub pochodni), przytrzymaj Prawy przycisk z przedmiotem w dłoni i wyceluj w podstawę paleniska.
Gratulacje, możesz ugotować mięso, a nowe pochodnie stworzysz podgrzewając patyki! Lecz bądź ostrożny, pochodnia w twojej ręce spowoduje zwiększony głód, a noszenie pochodni podczas pływania spowoduje że zgaśnie.
Combat
Shelter
Once the sun sets, a player might also like a shelter. There are different blocks that you can use to make a shelter using the early resources you have available. Dry grass can be used to make a bed early on, or form hay blocks/cob for early building blocks. Soil is also a good building material, and can be used to form Mud Bricks.
Stationary Storage
- See Container's main article for detailed information.
For more storage, the player can craft two early game containers.
- Baskets have 8 slots for items, however they require a total of 24 cattails and shouldn't be used to store food if possible.
- Storage Vessels have 12 slots. They require clay to craft and have the best spoilage rates in the game, which make them suitable for food storage.
- Chests have 16 slots, but require boards, which also require access to smithing.
Temperature
- See Temperature for detailed information.
The player's body temperature needs to be kept around 37°C. Prolonged times with body temperature under this mark will result in freezing animations and even damage taken. Beware that dipping in water or being out in the rain will make your temperature drop faster. Standing near a lit campfire can warm the player up and the body temperature will stay up a while even after stepping away.
Temporal Stability
- See Temporal Stability for detailed information.
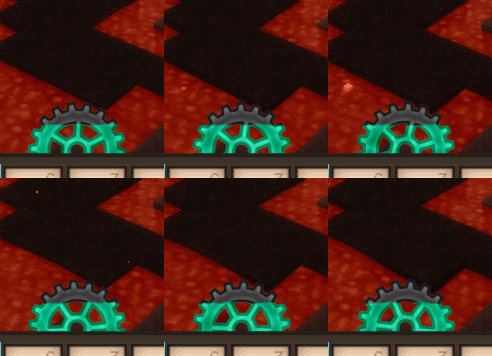
By now a player might be wondering about the cyan gear between the health and satiety bar. This is the temporal stability meter, the level of color in the gear indicates the player's current temporal stability. As a player's temporal stability reduces, the gear turns counter clockwise and the blue color in the gear decreases. When increasing, the gear's color returns as it turns clockwise. If temporal stability reaches zero, the player's vision will change drastically, and bad things tend to happen.
Draining temporal stability:
- Some surface areas are temporally unstable
- Caves, underground caverns, and places below surface level are generally more unstable than the surface of the world
- Temporal storms (occur at regular intervals)
Recovering temporal stability:
- Move to a location of high stability on the surface or at higher elevations in the world
- Transfer the temporal stability from a temporal gear: equip the gear in the left hand, a knife in the off hand, and hold right mouse button to provide a 30% boost at the cost of some HP
- Killing drifters recovers small amounts of your own temporal stability
Advanced Game Mechanics
Once the basics are mastered, players can develop advanced technology: Survival Guide - Advanced tech
Tutorial Video: First Day
Thanks to Ashantin for creating and sharing with the VS community.
| Wiki Navigation | |
|---|---|
| Vintage Story | Guides • Frequently Asked Questions • Soundtrack • Versions • Controls |
| Game systems | Crafting • Knapping • Clay forming • Smithing • Cooking • Temperature • Hunger • Mining • Temporal stability • Mechanical power • Trading • Farming • Animal husbandry |
| World | World generation • Biomes • Weather • Temporal storms |
| Items | Tools • Weapons • Armor • Clothing • Bags • Materials • Food |
| Blocks | Terrain • Plants • Decorative • Lighting • Functional • Ore |
| Entities | Hostile entities • Animals • NPCs • Players |
| Miscellaneous | List of client commands • List of server commands • Creative Starter Guide • Bot System • WorldEdit • Cinematic Camera • Adjustable FPS Video Recording • ServerBlockTicking |
