Steel making/ja: Difference between revisions
(Updating to match new version of source page) |
(Updating to match new version of source page) |
||
| (21 intermediate revisions by the same user not shown) | |||
| Line 1: | Line 1: | ||
<languages/> | <languages/> | ||
<div class="mw- | {{GameVersion|1.19.3}} | ||
<div lang="en" dir="ltr" class="mw-content-ltr"> | |||
'''Steel making''' is the process of carbonizing {{ll|iron|iron}} under high temperatures, for which a new type of furnace building is required. | |||
</div> | |||
__TOC__ | __TOC__ | ||
<div lang="en" dir="ltr" class="mw-content-ltr"> | |||
==Required facilities== | |||
</div> | |||
<div lang="en" dir="ltr" class="mw-content-ltr"> | |||
To produce {{ll|steel|steel}}, a player needs an iron {{ll|anvil|anvil}}, a {{ll|forge|forge}}, and a refractory cementation furnace building, which itself will require a {{ll|pulverizer|pulverizer}}. | |||
</div> | |||
<div lang="en" dir="ltr" class="mw-content-ltr"> | |||
===Required materials=== | |||
</div> | |||
<div lang="en" dir="ltr" class="mw-content-ltr"> | |||
To build a functioning cementation furnace, the player needs: | |||
*1 iron door | |||
*2 stone coffin sections | |||
*2 stone coffin lids | |||
*6 refractory brick gratings | |||
*53 refractory brick blocks* | |||
*a number of dirt or stone blocks to build the coal burning area beneath the furnace structure itself. | |||
</div> | </div> | ||
<div class="mw- | <div lang="en" dir="ltr" class="mw-content-ltr"> | ||
The minimum raw ingredients for these items are listed below. | |||
</div> | </div> | ||
== | <div lang="en" dir="ltr" class="mw-content-ltr"> | ||
*6 iron plates (12 iron ingots) | |||
*8 whole granite, andesite, basalt or peridotite blocks | |||
*456 fireclay, which is about 8 stacks | |||
*29 {{ll|mortar|mortar}} | |||
*228 of each powdered ingredient needed, depending on tier, which is about 4 stacks each | |||
</div> | |||
=== | <div lang="en" dir="ltr" class="mw-content-ltr"> | ||
===Creating refractory bricks=== | |||
</div> | |||
<div lang="en" dir="ltr" class="mw-content-ltr"> | |||
Refractory blocks are important for the steel making process as no other currently available block can withstand the extreme heat necessary to produce {{ll|steel|steel}}. Refractory blocks come in three different tiers, all of which can be used to make the cementation furnace. All refractory brick blocks have a chance to receive damage per use of the cementation furnace smelting process, however, using higher tier blocks will reduce the amount that receive damage per use: | |||
*Tier 1: has a heat resistance of 90% (1 in 10 chance to break). | |||
*Tier 2: 95% (1 in 20 chance to break) | |||
*Tier 3: 99.9% (1 in 1000 chance to break). (Tier 3 may actually have a heat resistance of 99.9% and thus a 1 in 1000 chance to break. This information needs verification.) | |||
</div> | |||
<div lang="en" dir="ltr" class="mw-content-ltr"> | |||
To produce refractory blocks, stone and ore types specified below need to be crushed in a {{ll|pulverizer|pulverizer}}. These powders can then be used in the crafting grid together with {{ll|fire clay|fire clay}} to make unfired refractory bricks. Different compositions of powders are required for the different tiers. | |||
</div> | |||
{| class="wikitable sortable" | {| class="wikitable sortable" | ||
|- | |- | ||
! | ! <span lang="en" dir="ltr" class="mw-content-ltr">Material</span> !! <span lang="en" dir="ltr" class="mw-content-ltr">Stone</span> !! <span lang="en" dir="ltr" class="mw-content-ltr">Powder</span> !! <span lang="en" dir="ltr" class="mw-content-ltr">Minimum pounder cap tier</span> | ||
|- | |- | ||
| | | <span lang="en" dir="ltr" class="mw-content-ltr">{{ll|Bauxite|Bauxite}}</span> || [[File:Stone-bauxite.png|<span lang="en" dir="ltr" class="mw-content-ltr">Bauxite</span>|100px|link=]] || [[File:Crushed-bauxite.png|<span lang="en" dir="ltr" class="mw-content-ltr">Crushed bauxite</span>|100px|link=]] || style="text-align:center;" | <span lang="en" dir="ltr" class="mw-content-ltr">Bronze</span> | ||
|- | |- | ||
| | | <span lang="en" dir="ltr" class="mw-content-ltr">{{ll|Quartz|Quartz}}</span> || [[File:Grid Clear quartz.png|<span lang="en" dir="ltr" class="mw-content-ltr">Quartz</span>|100px|link=]] || [[File:Crushed-quartz.png|<span lang="en" dir="ltr" class="mw-content-ltr">Crushed quartz</span>|100px|link=]] || style="text-align:center;" | <span lang="en" dir="ltr" class="mw-content-ltr">Bronze</span> | ||
|- | |- | ||
| | | <span lang="en" dir="ltr" class="mw-content-ltr">{{ll|Olivine|Olivine}}</span> || [[File:Olivine.png|<span lang="en" dir="ltr" class="mw-content-ltr">Olivine</span>|100px|link=]] || [[File:Crushed-olivine.png|<span lang="en" dir="ltr" class="mw-content-ltr">Crushed olivine</span>|100px|link=]] || style="text-align:center;" | <span lang="en" dir="ltr" class="mw-content-ltr">Iron</span> | ||
|- | |- | ||
| | | <span lang="en" dir="ltr" class="mw-content-ltr">{{ll|Ilmenite|Ilmenite}}</span> || [[File:Ore-bountiful-ilmenite-kimberlite.png|<span lang="en" dir="ltr" class="mw-content-ltr">Ilmenite</span>|100px|link=]] || [[File:Crushed-ilmenite.png|<span lang="en" dir="ltr" class="mw-content-ltr">Crushed ilmenite</span>|100px|link=]] || style="text-align:center;" | <span lang="en" dir="ltr" class="mw-content-ltr">Steel</span> | ||
|} | |} | ||
{{Protip | |||
|<span lang="en" dir="ltr" class="mw-content-ltr">One chunk of poor or medium ilmenite creates one crushed ilmenite. Rich and bountiful create two.</span>}} | |||
<div lang="en" dir="ltr" class="mw-content-ltr"> | |||
From tier 1 to tier 3, the recipes for '''raw refractory bricks''' are as follows: | |||
</div> | </div> | ||
<div style="display:flex;flex-wrap:wrap;"> | <div style="display:flex;flex-wrap:wrap;"> | ||
{{Grid/Crafting | <div style="margin-right:10px"> | ||
|A1=Fire | {{Crafting | ||
| | |Ingredients=2x {{ll|Fire clay|<span lang="en" dir="ltr" class="mw-content-ltr">Fire clay</span>}}<br>1x {{ll|Quartz|<span lang="en" dir="ltr" class="mw-content-ltr">Crushed quartz</span>}}<br>1x {{ll|Bauxite|<span lang="en" dir="ltr" class="mw-content-ltr">Crushed bauxite</span>}} | ||
|A2=Crushed-quartz|B2=Crushed | |Grid/CraftingCode={{Grid/Crafting | ||
| | |A1=Fire clay|A1-link=Special:MyLanguage/Fire clay|A1_name=<span lang="en" dir="ltr" class="mw-content-ltr">Fire clay</span> | ||
| | |B1=Fire clay|B1-link=Special:MyLanguage/Fire clay|B1_name=<span lang="en" dir="ltr" class="mw-content-ltr">Fire clay</span> | ||
| | |A2=Crushed quartz|A2-link=Special:MyLanguage/Quartz|A2_name=<span lang="en" dir="ltr" class="mw-content-ltr">Crushed quartz</span> | ||
| | |B2=Crushed bauxite|B2-link=Special:MyLanguage/Bauxite|B2_name=<span lang="en" dir="ltr" class="mw-content-ltr">Crushed bauxite</span> | ||
{{Grid/Crafting | |Output=Unfired refractory brick (Tier 1)|Output_name=<span lang="en" dir="ltr" class="mw-content-ltr">Unfired refractory brick (Tier 1)</span> | ||
|A1=Fire | }}}} | ||
| | </div> | ||
|A2=Crushed-quartz|B2=Crushed- | <div style="margin-right:10px"> | ||
| | {{Crafting | ||
|Ingredients=2x {{ll|Fire clay|<span lang="en" dir="ltr" class="mw-content-ltr">Fire clay</span>}}<br>1x {{ll|Quartz|<span lang="en" dir="ltr" class="mw-content-ltr">Crushed quartz</span>}}<br>1x {{ll|Bauxite|<span lang="en" dir="ltr" class="mw-content-ltr">Crushed bauxite</span>}}<br>1x {{ll|Olivine|<span lang="en" dir="ltr" class="mw-content-ltr">Crushed olivine</span>}} | |||
| | |Grid/CraftingCode={{Grid/Crafting | ||
| | |A1=Fire clay|A1-link=Special:MyLanguage/Fire clay|A1_name=<span lang="en" dir="ltr" class="mw-content-ltr">Fire clay</span> | ||
{{Grid/Crafting | |B1=Fire clay|B1-link=Special:MyLanguage/Fire clay|B1_name=<span lang="en" dir="ltr" class="mw-content-ltr">Fire clay</span> | ||
|A1=Fire | |A2=Crushed quartz|A2-link=Special:MyLanguage/Quartz|A2_name=<span lang="en" dir="ltr" class="mw-content-ltr">Crushed quartz</span> | ||
| | |B2=Crushed bauxite|B2-link=Special:MyLanguage/Bauxite|B2_name=<span lang="en" dir="ltr" class="mw-content-ltr">Crushed bauxite</span> | ||
|A2=Crushed-quartz|B2=Crushed | |A3=Crushed olivine|A3-link=Special:MyLanguage/Olivine|A3_name=<span lang="en" dir="ltr" class="mw-content-ltr">Crushed olivine</span> | ||
| | |Output=Unfired refractory brick (Tier 2)|Output_name=<span lang="en" dir="ltr" class="mw-content-ltr">Unfired refractory brick (Tier 2)</span> | ||
|A3=Crushed olivine|B3=Crushed ilmenite| | }}}} | ||
| | </div> | ||
|Output= | <div style="margin-right:10px"> | ||
{{Crafting | |||
|Ingredients=2x {{ll|Fire clay|<span lang="en" dir="ltr" class="mw-content-ltr">Fire clay</span>}}<br>1x {{ll|Quartz|<span lang="en" dir="ltr" class="mw-content-ltr">Crushed quartz</span>}}<br>1x {{ll|Bauxite|<span lang="en" dir="ltr" class="mw-content-ltr">Crushed bauxite</span>}}<br>1x {{ll|Olivine|<span lang="en" dir="ltr" class="mw-content-ltr">Crushed olivine</span>}}<br>1x {{ll|Ilmenite|<span lang="en" dir="ltr" class="mw-content-ltr">Crushed ilmenite</span>}} | |||
|Grid/CraftingCode={{Grid/Crafting | |||
|A1=Fire clay|A1-link=Special:MyLanguage/Fire clay|A1_name=<span lang="en" dir="ltr" class="mw-content-ltr">Fire clay</span> | |||
|B1=Fire clay|B1-link=Special:MyLanguage/Fire clay|B1_name=<span lang="en" dir="ltr" class="mw-content-ltr">Fire clay</span> | |||
|A2=Crushed quartz|A2-link=Special:MyLanguage/Quartz|A2_name=<span lang="en" dir="ltr" class="mw-content-ltr">Crushed quartz</span> | |||
|B2=Crushed bauxite|B2-link=Special:MyLanguage/Bauxite|B2_name=<span lang="en" dir="ltr" class="mw-content-ltr">Crushed bauxite</span> | |||
|A3=Crushed olivine|A3-link=Special:MyLanguage/Olivine|A3_name=<span lang="en" dir="ltr" class="mw-content-ltr">Crushed olivine</span> | |||
|B3=Crushed ilmenite|B3-link=Special:MyLanguage/Ilmenite|B3_name=<span lang="en" dir="ltr" class="mw-content-ltr">Crushed ilmenite</span> | |||
|Output=Unfired refractory brick (Tier 3)|Output_name=<span lang="en" dir="ltr" class="mw-content-ltr">Unfired refractory brick (Tier 3)</span> | |||
}}}} | |||
</div> | |||
</div> | </div> | ||
<br> | <br> | ||
<div lang="en" dir="ltr" class="mw-content-ltr"> | |||
Raw refractory bricks need to be baked in a {{ll|pit kiln|pit kiln}} to turn into fired refractory bricks. | |||
</div> | |||
<div lang="en" dir="ltr" class="mw-content-ltr"> | |||
Fired refractory bricks can then be used to craft their tier specific '''brick blocks''' and '''brick grating blocks'''. Here are the recipes for tier 1: | |||
</div> | |||
<div style="display:flex;flex-wrap:wrap;"> | <div style="display:flex;flex-wrap:wrap;"> | ||
{{Grid/Crafting | <div style="margin-right:10px"> | ||
|A1= | {{Crafting | ||
| | |Ingredients=8x {{ll|Refractory brick|<span lang="en" dir="ltr" class="mw-content-ltr">Refractory brick (Tier 1)</span>}}<br>1x {{ll|Mortar|<span lang="en" dir="ltr" class="mw-content-ltr">Mortar</span>}} | ||
|A2= | |Grid/CraftingCode={{Grid/Crafting | ||
| | |A1=Refractory brick (Tier 1)|A1-link=Special:MyLanguage/Refractory brick|A1_name=<span lang="en" dir="ltr" class="mw-content-ltr">Refractory brick (Tier 1)</span> | ||
| | |B1=Refractory brick (Tier 1)|B1-link=Special:MyLanguage/Refractory brick|B1_name=<span lang="en" dir="ltr" class="mw-content-ltr">Refractory brick (Tier 1)</span> | ||
| | |C1=Refractory brick (Tier 1)|C1-link=Special:MyLanguage/Refractory brick|C1_name=<span lang="en" dir="ltr" class="mw-content-ltr">Refractory brick (Tier 1)</span> | ||
|Output= | |A2=Refractory brick (Tier 1)|A2-link=Special:MyLanguage/Refractory brick|A2_name=<span lang="en" dir="ltr" class="mw-content-ltr">Refractory brick (Tier 1)</span> | ||
{{Grid/Crafting | |B2=mortar|B2-link=Special:MyLanguage/Mortar|B2_name=<span lang="en" dir="ltr" class="mw-content-ltr">Mortar</span> | ||
|A1= | |C2=Refractory brick (Tier 1)|C2-link=Special:MyLanguage/Refractory brick|C2_name=<span lang="en" dir="ltr" class="mw-content-ltr">Refractory brick (Tier 1)</span> | ||
| | |A3=Refractory brick (Tier 1)|A3-link=Special:MyLanguage/Refractory brick|A3_name=<span lang="en" dir="ltr" class="mw-content-ltr">Refractory brick (Tier 1)</span> | ||
|A2= | |B3=Refractory brick (Tier 1)|B3-link=Special:MyLanguage/Refractory brick|B3_name=<span lang="en" dir="ltr" class="mw-content-ltr">Refractory brick (Tier 1)</span> | ||
| | |C3=Refractory brick (Tier 1)|C3-link=Special:MyLanguage/Refractory brick|C3_name=<span lang="en" dir="ltr" class="mw-content-ltr">Refractory brick (Tier 1)</span> | ||
|A3= | |Output=Refractory bricks (Tier 1)|OA=2|Output_name=<span lang="en" dir="ltr" class="mw-content-ltr">Refractory bricks (Tier 1)</span> | ||
| | }}}} | ||
|Output= | </div> | ||
<div style="margin-right:10px"> | |||
{{Crafting | |||
|Ingredients=6x {{ll|Refractory brick|<span lang="en" dir="ltr" class="mw-content-ltr">Refractory brick (Tier 1)</span>}}<br>1x {{ll|Mortar|<span lang="en" dir="ltr" class="mw-content-ltr">Mortar</span>}} | |||
|Grid/CraftingCode={{Grid/Crafting | |||
|A1=Refractory brick (Tier 1)|A1-link=Special:MyLanguage/Refractory brick|A1_name=<span lang="en" dir="ltr" class="mw-content-ltr">Refractory brick (Tier 1)</span> | |||
|C1=Refractory brick (Tier 1)|C1-link=Special:MyLanguage/Refractory brick|C1_name=<span lang="en" dir="ltr" class="mw-content-ltr">Refractory brick (Tier 1)</span> | |||
|A2=Refractory brick (Tier 1)|A2-link=Special:MyLanguage/Refractory brick|A2_name=<span lang="en" dir="ltr" class="mw-content-ltr">Refractory brick (Tier 1)</span> | |||
|B2=mortar|B2-link=Special:MyLanguage/Mortar|B2_name=<span lang="en" dir="ltr" class="mw-content-ltr">Mortar</span> | |||
|C2=Refractory brick (Tier 1)|C2-link=Special:MyLanguage/Refractory brick|C2_name=<span lang="en" dir="ltr" class="mw-content-ltr">Refractory brick (Tier 1)</span> | |||
|A3=Refractory brick (Tier 1)|A3-link=Special:MyLanguage/Refractory brick|A3_name=<span lang="en" dir="ltr" class="mw-content-ltr">Refractory brick (Tier 1)</span> | |||
|C3=Refractory brick (Tier 1)|C3-link=Special:MyLanguage/Refractory brick|C3_name=<span lang="en" dir="ltr" class="mw-content-ltr">Refractory brick (Tier 1)</span> | |||
|Output=Refractory brick grating (Tier1)|OA=3|Output_name=<span lang="en" dir="ltr" class="mw-content-ltr">Refractory brick grating (Tier 1)</span> | |||
}}}} | |||
</div> | </div> | ||
</div> | </div> | ||
=== | <div lang="en" dir="ltr" class="mw-content-ltr"> | ||
===Building a cementation furnace=== | |||
</div> | |||
<div | <div lang="en" dir="ltr" class="mw-content-ltr"> | ||
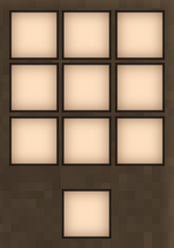
[[File:Furnace overlay.PNG|thumb|200px]] | |||
| | |||
</div> | </div> | ||
=== | <div lang="en" dir="ltr" class="mw-content-ltr"> | ||
The cementation furnace is a multiblock structure that needs to be built in a specific way to ensure it is functioning as intended. When starting the build of a furnace, the player can use {{Keypress|Shift}} + {{RMB}} on the stone coffin with coal or an empty hand to trigger a building help overlay. Using {{Keypress|Shift}} + {{RMB}} will additionally inform the player about the number of still missing or mis-placed blocks in the structure. To deactivate this overlay, simply use {{RMB}} on the stone coffin. | |||
</div> | |||
{{Protip | {{Protip | ||
| | |<span lang="en" dir="ltr" class="mw-content-ltr">The direction from where the player accesses the coffin while checking for the overlay will dictate the direction the building overlay is shown. The furnace will always assume that the coffin block the player hits when checking is the one nearest to the future furnace door - regardless if the player accesses from the side of the coffin or from the actual end of it.</span>}} | ||
<div lang="en" dir="ltr" class="mw-content-ltr"> | |||
===Other required blocks=== | |||
</div> | |||
<div lang="en" dir="ltr" class="mw-content-ltr"> | |||
Additionally to the refractory blocks, there are some more specialist blocks necessary to build a functioning steel making furnace: | |||
*an '''iron door''' | |||
*a '''stone coffin''' (composed of 2 sections of stone coffin) | |||
*a '''coffin lid''' (composed of 2 sections of coffin lids). | |||
An iron door can either be found in {{ll|ruins|ruins}}, or crafted out of 6 iron plates. Stone coffins can be made out of {{ll|granite|granite}}, {{ll|andesite|andesite}}, {{ll|basalt|basalt}} or {{ll|peridotite|peridotite}}. | |||
</div> | |||
<div style="display:flex;flex-wrap:wrap;"> | |||
<div style="margin-right:10px"> | |||
{{Crafting | |||
|Ingredients=6x {{ll|Metal_plate|<span lang="en" dir="ltr" class="mw-content-ltr">Iron plate</span>}} | |||
|Grid/CraftingCode={{Grid/Crafting | |||
|A1=Iron plate|A1-link=Special:MyLanguage/Metal_plate|A1_name=<span lang="en" dir="ltr" class="mw-content-ltr">Iron plate</span> | |||
|B1=Iron plate|B1-link=Special:MyLanguage/Metal_plate|B1_name=<span lang="en" dir="ltr" class="mw-content-ltr">Iron plate</span> | |||
|A2=Iron plate|A2-link=Special:MyLanguage/Metal_plate|A2_name=<span lang="en" dir="ltr" class="mw-content-ltr">Iron plate</span> | |||
|B2=Iron plate|B2-link=Special:MyLanguage/Metal_plate|B2_name=<span lang="en" dir="ltr" class="mw-content-ltr">Iron plate</span> | |||
|A3=Iron plate|A3-link=Special:MyLanguage/Metal_plate|A3_name=<span lang="en" dir="ltr" class="mw-content-ltr">Iron plate</span> | |||
|B3=Iron plate|B3-link=Special:MyLanguage/Metal_plate|B3_name=<span lang="en" dir="ltr" class="mw-content-ltr">Iron plate</span> | |||
|Output=Iron door|Output_name=<span lang="en" dir="ltr" class="mw-content-ltr">Iron door</span> | |||
}}}} | |||
</div> | |||
<div style="margin-right:10px"> | |||
{{Crafting | |||
|Ingredients=1x {{ll|Hammer|<span lang="en" dir="ltr" class="mw-content-ltr">Hammer</span>}}<br>3x {{ll|Rock#Relieving_Stone_Blocks|<span lang="en" dir="ltr" class="mw-content-ltr">Rock</span>}}<br>1x {{ll|Chisel|<span lang="en" dir="ltr" class="mw-content-ltr">Chisel</span>}} | |||
|Grid/CraftingCode={{Grid/Crafting | |||
|B1=Copper hammer|B1-link=Special:MyLanguage/Hammer|B1_name=<span lang="en" dir="ltr" class="mw-content-ltr">Hammer</span> | |||
|A2=Granite rock|A2-link=Special:MyLanguage/Rock#Relieving_Stone_Blocks|A2_name=<span lang="en" dir="ltr" class="mw-content-ltr">Rock</span> | |||
|B2=Copper Chisel|B2-link=Special:MyLanguage/Chisel|B2_name=<span lang="en" dir="ltr" class="mw-content-ltr">Chisel</span> | |||
|C2=Granite rock|C2-link=Special:MyLanguage/Rock#Relieving_Stone_Blocks|C2_name=<span lang="en" dir="ltr" class="mw-content-ltr">Rock</span> | |||
|B3=Granite rock|B3-link=Special:MyLanguage/Rock#Relieving_Stone_Blocks|B3_name=<span lang="en" dir="ltr" class="mw-content-ltr">Rock</span> | |||
|Output=Granite stone coffin section|Output_name=<span lang="en" dir="ltr" class="mw-content-ltr">Stone coffin section</span> | |||
}}}} | |||
</div> | |||
<div style="margin-right:10px"> | |||
{{Crafting | |||
|Ingredients=1x {{ll|Hammer|<span lang="en" dir="ltr" class="mw-content-ltr">Hammer</span>}}<br>1x {{ll|Chisel|<span lang="en" dir="ltr" class="mw-content-ltr">Chisel</span>}}<br>1x {{ll|Rock#Relieving_Stone_Blocks|<span lang="en" dir="ltr" class="mw-content-ltr">Rock</span>}}<br>1x {{ll|Borax|<span lang="en" dir="ltr" class="mw-content-ltr">Powdered borax</span>}} | |||
|Grid/CraftingCode={{Grid/Crafting | |||
|B1=Copper hammer|B1-link=Special:MyLanguage/Hammer|B1_name=<span lang="en" dir="ltr" class="mw-content-ltr">Hammer</span> | |||
|B2=Copper Chisel|B2-link=Special:MyLanguage/Chisel|B2_name=<span lang="en" dir="ltr" class="mw-content-ltr">Chisel</span> | |||
|B3=Granite rock|B3-link=Special:MyLanguage/Rock#Relieving_Stone_Blocks|B3_name=<span lang="en" dir="ltr" class="mw-content-ltr">Rock</span> | |||
|C3=Powdered borax|C3-link=Special:MyLanguage/Borax|C3_name=<span lang="en" dir="ltr" class="mw-content-ltr">Powdered borax</span> | |||
|Output=Granite stone coffin lid|Output_name=<span lang="en" dir="ltr" class="mw-content-ltr">Stone coffin lid</span> | |||
}}}} | |||
</div> | |||
</div> | |||
<div class="mw- | <div lang="en" dir="ltr" class="mw-content-ltr"> | ||
==== | ==The structure== | ||
</div> | </div> | ||
=== | <div lang="en" dir="ltr" class="mw-content-ltr"> | ||
# | #First, place the 6 grate blocks on the ground and the 2 coffin sections on them. These are the center blocks of the structure. The coffin sections will always be placed with the open side towards the player. As soon as the full coffin is placed - without coffin lid, for now - the player can use {{Keypress|Shift}} + {{RMB}} on the coffin to display the building help. | ||
# | #The full size of the furnace takes up a 5x5 space that is 6 blocks tall, however, an additional layer below the grates will be required to place fuel in. | ||
# | #Raise the walls up by two blocks, and don't forget to place the iron door at some point in the process. | ||
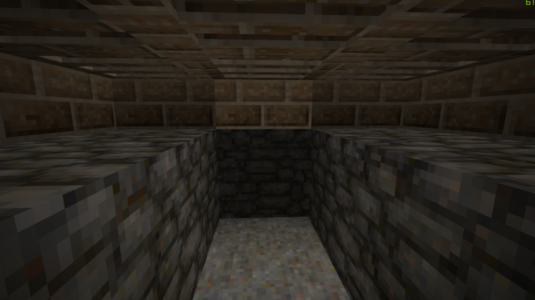
# | #Build up the roof, covering every open block with one above in a stair pattern. The finished furnace should have a 2 block high chimney as shown below. The chimney on top of the structure does not have to be open to the sky at the moment, but if it is blocked there will be no smoke indications shown while the furnace is running. | ||
# | #The confusing part about building a cementation furnace is the space below the actual brick structure. For the process to work, the player needs to be able to access the two spots below the coffin placed on the grate blocks, as the steel making requires fuel layers to be placed on those two blocks. Due to the fact that coal will behave similar to snow if piled up to high, it is recommended to put stabilizing blocks to the side of the two open spaces for the coal. It is not required to close this space off airtight, the player can choose to leave a permanent hole or put in a coke oven door. Note that none of the refractory brick blocks can be removed to access this space, instead the opening needs to be created one block below the lowest brick layer. | ||
# | #If the structure was build correctly, there will be no further indication of missing or misplaced block when using {{Keypress|Shift}} + {{RMB}} on the coffin. | ||
</div> | |||
<gallery widths=200px heights=200px mode="packed"> | <gallery widths="200px" heights="200px" mode="packed"> | ||
File:Furnace building 1.PNG | File:Furnace building 1.PNG | ||
File:Furnace building 2.PNG | File:Furnace building 2.PNG | ||
| Line 156: | Line 246: | ||
</gallery> | </gallery> | ||
<gallery widths=200px heights=200px mode="packed"> | <gallery widths="200px" heights="200px" mode="packed"> | ||
File:Furnace underbelly.PNG| | File:Furnace underbelly.PNG|<span lang="en" dir="ltr" class="mw-content-ltr">Coal needs to be piled exactly below the two middle grid blocks.</span> | ||
File:Furnace underbelly chiselled.PNG| | File:Furnace underbelly chiselled.PNG|<span lang="en" dir="ltr" class="mw-content-ltr">The coal piles need to be encased in some form to prevent collapse - this can also be done with chiselling.</span> | ||
</gallery> | </gallery> | ||
<div class="mw- | <div lang="en" dir="ltr" class="mw-content-ltr"> | ||
== | ==Creating blister steel== | ||
</div> | |||
<div lang="en" dir="ltr" class="mw-content-ltr"> | |||
Blister steel is the first step of creating steel from iron, and functions the same way an iron bloom does. To heat iron up to the required temperatures to make carbonization possible, the player first needs to build a special furnace structure out of refractory blocks and other specialist blocks. | |||
< | Also, prepare a ''lot'' of charcoal, or collect a lot of black coal. One batch of steel will use 168 pieces of charcoal. | ||
</div> | |||
<div lang="en" dir="ltr" class="mw-content-ltr"> | |||
===Smelting process=== | |||
</div> | |||
<div lang="en" dir="ltr" class="mw-content-ltr"> | |||
With a finished refractory furnace build, the next step requires the player to fill the coffin. | |||
One stone coffin will hold a total of 16 iron ingots and 40 fuel pieces - either {{ll|coke|coke}} or {{ll|charcoal|charcoal}}. With the fuel in your active hand, target the inside the coffin and use {{Keypress|Shift}} + {{RMB}} to place one layer of fuel first, then one layer of iron ingots. Repeat until the coffin is full and will not accept any more items. The coffin should allow 5 layers of fuel with 8 pieces per layer, and 4 layers of iron ingots with 4 ingots per layer. | |||
Once filled, the coffin tool tip will indicate that a coffin lid needs to be placed on top of the coffin. You can now place the 2 lid blocks. Note that the coffin needs to be filled completely, otherwise the process will not start even if the lid is placed and coal beneath ignited. | |||
</div> | |||
<div lang="en" dir="ltr" class="mw-content-ltr"> | |||
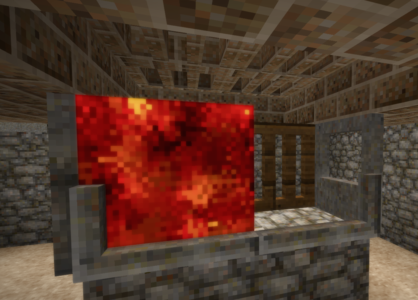
After the coffin is closed, the player should leave the burning chamber and close the door. It is not recommended to enter the chamber again in the middle of the smelting process, as the extreme heat inside will cause 5 HP damage per tick if inside while the bricks are still heated. The coffin tool tip will indicate that the process requires fuel to be placed and ignited '''below''' the two grates under the coffin. | |||
Access the underbelly of the furnace as shown above from the side or the back of the furnace. Place fuel in equal amounts on the two spaces directly below the coffin. Each fuel layer on one block takes 2 fuel items, meaning a full layer on both blocks requires 4 fuel items. {{ll|Coal|Charcoal}}, {{ll|coal|black coal}}, {{ll|coal|anthracite}} and {{ll|coke|coke}} work as possible fuel items. | |||
</div> | |||
<div lang="en" dir="ltr" class="mw-content-ltr"> | |||
After the carburation process is 100% completed and the temperature has lowered, you can open the iron door and enter. Use a {{ll|pickaxe|pickaxe}} to break the lid and the coffin to take the blister steel ingots and some of the remaining fuel. The coffin and lid sections can be used again for another carburation. | |||
</div> | |||
<div lang="en" dir="ltr" class="mw-content-ltr"> | |||
Damaged refractory brick blocks have to be broken and replaced. When you break them, they return some of their materials back, similar to a broken bloomery. Check carefully every block (some might be hidden under other blocks). If some damaged blocks remain, you will not be able to start another carburation process. Grate blocks do not get damaged at the moment, which means there is no sense in making them out of higher tier bricks. In addition, not all of the blocks on the cementation furnace building need to be of the same tier, allowing for use of refractory blocks of a different tier when replacing damaged ones. | |||
</div> | |||
<div lang="en" dir="ltr" class="mw-content-ltr"> | |||
When testing out the process in creative or survival, keep in mind that the coffin tooltip might take a few seconds to update correctly from one state to the next, specifically once the player ignites fuel below. The coffin will show the progress in percentages, but again it might take a tick until that progress info is shown correctly. A working furnace will have fire particles inside the burning chamber - which also indicates the danger of stepping inside at that time - as well as smoke rising from the chimney. | |||
</div> | </div> | ||
{{Protip | {{Protip | ||
| | |<span lang="en" dir="ltr" class="mw-content-ltr">The coffin will retain the progressed reached, even if the coal burns out before the process is finished! This allows the player to start the process with a low amount of fuel, and add further fuel as needed, or log off from a server without fear of loosing progress and materials. If using charcoal, exactly 5 full loads of 32 will be enough fuel for a full firing of blister steel ingots.</span> | ||
}} | }} | ||
<div lang="en" dir="ltr" class="mw-content-ltr"> | |||
One firing of 16 iron ingots will reward the player with an equal amount of blister steel ingots. | |||
</div> | |||
== | <div lang="en" dir="ltr" class="mw-content-ltr"> | ||
===Making steel=== | |||
</div> | |||
<div lang="en" dir="ltr" class="mw-content-ltr"> | |||
Blister steel in itself is not yet workable steel, instead it behaves similar to iron blooms, and further refining is necessary. To turn blister steel into steel ingots, it needs to be processed on an {{ll|anvil|iron anvil}} either by hand or with the help of a {{ll|helve hammer|helve hammer}}. | |||
</div> | |||
<div lang="en" dir="ltr" class="mw-content-ltr"> | |||
==Trivia== | |||
</div> | |||
<div lang="en" dir="ltr" class="mw-content-ltr"> | |||
The design of the refractory furnace is a modified version of the ''Manuel de la métallurgie du Fer'', from 1895 [https://upload.wikimedia.org/wikipedia/commons/2/23/Four_cementation_anglais.jpg] | |||
</div> | |||
<div lang="en" dir="ltr" class="mw-content-ltr"> | |||
==Video tutorials== | |||
</div> | |||
{| class="wikitable" | {| class="wikitable" | ||
|- | |- | ||
! | ! <span lang="en" dir="ltr" class="mw-content-ltr">Detailed guide on what to get for steelmaking to start</span> !! <span lang="en" dir="ltr" class="mw-content-ltr">Guide on how to build and use the furnace</span> !! <span lang="en" dir="ltr" class="mw-content-ltr">German full Guide on how to make steel</span> | ||
|- | |- | ||
| <youtube width="400" height="240">gqRt5gpFH_U</youtube> || <youtube width="400" height="240">KlNh3CwyzSs</youtube> || <youtube width="400" height="240">c54tjBZD-LM</youtube> | | <youtube width="400" height="240">gqRt5gpFH_U</youtube> || <youtube width="400" height="240">KlNh3CwyzSs</youtube> || <youtube width="400" height="240">c54tjBZD-LM</youtube> | ||
|} | |} | ||
{{ | {{-}} | ||
{{ | {{Metals navbox}} | ||
{{Game navbox}} | |||
[[Category:Guides{{#translation:}}]] | |||
Latest revision as of 14:36, 1 February 2024
This page was last verified for Vintage Story version 1.19.3.
Steel making is the process of carbonizing iron under high temperatures, for which a new type of furnace building is required.
Required facilities
To produce steel, a player needs an iron anvil, a forge, and a refractory cementation furnace building, which itself will require a pulverizer.
Required materials
To build a functioning cementation furnace, the player needs:
- 1 iron door
- 2 stone coffin sections
- 2 stone coffin lids
- 6 refractory brick gratings
- 53 refractory brick blocks*
- a number of dirt or stone blocks to build the coal burning area beneath the furnace structure itself.
The minimum raw ingredients for these items are listed below.
- 6 iron plates (12 iron ingots)
- 8 whole granite, andesite, basalt or peridotite blocks
- 456 fireclay, which is about 8 stacks
- 29 mortar
- 228 of each powdered ingredient needed, depending on tier, which is about 4 stacks each
Creating refractory bricks
Refractory blocks are important for the steel making process as no other currently available block can withstand the extreme heat necessary to produce steel. Refractory blocks come in three different tiers, all of which can be used to make the cementation furnace. All refractory brick blocks have a chance to receive damage per use of the cementation furnace smelting process, however, using higher tier blocks will reduce the amount that receive damage per use:
- Tier 1: has a heat resistance of 90% (1 in 10 chance to break).
- Tier 2: 95% (1 in 20 chance to break)
- Tier 3: 99.9% (1 in 1000 chance to break). (Tier 3 may actually have a heat resistance of 99.9% and thus a 1 in 1000 chance to break. This information needs verification.)
To produce refractory blocks, stone and ore types specified below need to be crushed in a pulverizer. These powders can then be used in the crafting grid together with fire clay to make unfired refractory bricks. Different compositions of powders are required for the different tiers.
| Material | Stone | Powder | Minimum pounder cap tier |
|---|---|---|---|
| Bauxite |  |
 |
Bronze |
| Quartz |  |
 |
Bronze |
| Olivine |  |
 |
Iron |
| Ilmenite |  |
 |
Steel |
| Protip: |
From tier 1 to tier 3, the recipes for raw refractory bricks are as follows:
Raw refractory bricks need to be baked in a pit kiln to turn into fired refractory bricks.
Fired refractory bricks can then be used to craft their tier specific brick blocks and brick grating blocks. Here are the recipes for tier 1:
| Ingredients | Crafting Recipe |
|---|---|
| 8x Refractory brick 1x Mortar |
|
| Ingredients | Crafting Recipe |
|---|---|
| 6x Refractory brick 1x Mortar |
|
Building a cementation furnace

The cementation furnace is a multiblock structure that needs to be built in a specific way to ensure it is functioning as intended. When starting the build of a furnace, the player can use Shift + ![]() on the stone coffin with coal or an empty hand to trigger a building help overlay. Using Shift +
on the stone coffin with coal or an empty hand to trigger a building help overlay. Using Shift + ![]() will additionally inform the player about the number of still missing or mis-placed blocks in the structure. To deactivate this overlay, simply use
will additionally inform the player about the number of still missing or mis-placed blocks in the structure. To deactivate this overlay, simply use ![]() on the stone coffin.
on the stone coffin.
| Protip: |
Other required blocks
Additionally to the refractory blocks, there are some more specialist blocks necessary to build a functioning steel making furnace:
- an iron door
- a stone coffin (composed of 2 sections of stone coffin)
- a coffin lid (composed of 2 sections of coffin lids).
An iron door can either be found in ruins, or crafted out of 6 iron plates. Stone coffins can be made out of granite, andesite, basalt or peridotite.
| Ingredients | Crafting Recipe |
|---|---|
| 6x Metal_plate |
|
| Ingredients | Crafting Recipe |
|---|---|
| 1x Hammer 3x Rock#Relieving_Stone_Blocks 1x Chisel |
|
| Ingredients | Crafting Recipe |
|---|---|
| 1x Hammer 1x Chisel 1x Rock#Relieving_Stone_Blocks 1x Borax |
|
The structure
- First, place the 6 grate blocks on the ground and the 2 coffin sections on them. These are the center blocks of the structure. The coffin sections will always be placed with the open side towards the player. As soon as the full coffin is placed - without coffin lid, for now - the player can use Shift +
 on the coffin to display the building help.
 - The full size of the furnace takes up a 5x5 space that is 6 blocks tall, however, an additional layer below the grates will be required to place fuel in.
- Raise the walls up by two blocks, and don't forget to place the iron door at some point in the process.
- Build up the roof, covering every open block with one above in a stair pattern. The finished furnace should have a 2 block high chimney as shown below. The chimney on top of the structure does not have to be open to the sky at the moment, but if it is blocked there will be no smoke indications shown while the furnace is running.
- The confusing part about building a cementation furnace is the space below the actual brick structure. For the process to work, the player needs to be able to access the two spots below the coffin placed on the grate blocks, as the steel making requires fuel layers to be placed on those two blocks. Due to the fact that coal will behave similar to snow if piled up to high, it is recommended to put stabilizing blocks to the side of the two open spaces for the coal. It is not required to close this space off airtight, the player can choose to leave a permanent hole or put in a coke oven door. Note that none of the refractory brick blocks can be removed to access this space, instead the opening needs to be created one block below the lowest brick layer.
- If the structure was build correctly, there will be no further indication of missing or misplaced block when using Shift + on the coffin.


Coal needs to be piled exactly below the two middle grid blocks.
The coal piles need to be encased in some form to prevent collapse - this can also be done with chiselling.


Creating blister steel
Blister steel is the first step of creating steel from iron, and functions the same way an iron bloom does. To heat iron up to the required temperatures to make carbonization possible, the player first needs to build a special furnace structure out of refractory blocks and other specialist blocks. Also, prepare a lot of charcoal, or collect a lot of black coal. One batch of steel will use 168 pieces of charcoal.
Smelting process
With a finished refractory furnace build, the next step requires the player to fill the coffin.
One stone coffin will hold a total of 16 iron ingots and 40 fuel pieces - either coke or charcoal. With the fuel in your active hand, target the inside the coffin and use Shift + ![]() to place one layer of fuel first, then one layer of iron ingots. Repeat until the coffin is full and will not accept any more items. The coffin should allow 5 layers of fuel with 8 pieces per layer, and 4 layers of iron ingots with 4 ingots per layer.
Once filled, the coffin tool tip will indicate that a coffin lid needs to be placed on top of the coffin. You can now place the 2 lid blocks. Note that the coffin needs to be filled completely, otherwise the process will not start even if the lid is placed and coal beneath ignited.
to place one layer of fuel first, then one layer of iron ingots. Repeat until the coffin is full and will not accept any more items. The coffin should allow 5 layers of fuel with 8 pieces per layer, and 4 layers of iron ingots with 4 ingots per layer.
Once filled, the coffin tool tip will indicate that a coffin lid needs to be placed on top of the coffin. You can now place the 2 lid blocks. Note that the coffin needs to be filled completely, otherwise the process will not start even if the lid is placed and coal beneath ignited.
After the coffin is closed, the player should leave the burning chamber and close the door. It is not recommended to enter the chamber again in the middle of the smelting process, as the extreme heat inside will cause 5 HP damage per tick if inside while the bricks are still heated. The coffin tool tip will indicate that the process requires fuel to be placed and ignited below the two grates under the coffin. Access the underbelly of the furnace as shown above from the side or the back of the furnace. Place fuel in equal amounts on the two spaces directly below the coffin. Each fuel layer on one block takes 2 fuel items, meaning a full layer on both blocks requires 4 fuel items. Charcoal, black coal, anthracite and coke work as possible fuel items.
After the carburation process is 100% completed and the temperature has lowered, you can open the iron door and enter. Use a pickaxe to break the lid and the coffin to take the blister steel ingots and some of the remaining fuel. The coffin and lid sections can be used again for another carburation.
Damaged refractory brick blocks have to be broken and replaced. When you break them, they return some of their materials back, similar to a broken bloomery. Check carefully every block (some might be hidden under other blocks). If some damaged blocks remain, you will not be able to start another carburation process. Grate blocks do not get damaged at the moment, which means there is no sense in making them out of higher tier bricks. In addition, not all of the blocks on the cementation furnace building need to be of the same tier, allowing for use of refractory blocks of a different tier when replacing damaged ones.
When testing out the process in creative or survival, keep in mind that the coffin tooltip might take a few seconds to update correctly from one state to the next, specifically once the player ignites fuel below. The coffin will show the progress in percentages, but again it might take a tick until that progress info is shown correctly. A working furnace will have fire particles inside the burning chamber - which also indicates the danger of stepping inside at that time - as well as smoke rising from the chimney.
| Protip: |
One firing of 16 iron ingots will reward the player with an equal amount of blister steel ingots.
Making steel
Blister steel in itself is not yet workable steel, instead it behaves similar to iron blooms, and further refining is necessary. To turn blister steel into steel ingots, it needs to be processed on an iron anvil either by hand or with the help of a helve hammer.
Trivia
The design of the refractory furnace is a modified version of the Manuel de la métallurgie du Fer, from 1895 [1]
![[1]](https://upload.wikimedia.org/wikipedia/commons/2/23/Four_cementation_anglais.jpg)
Video tutorials
| Detailed guide on what to get for steelmaking to start | Guide on how to build and use the furnace | German full Guide on how to make steel |
|---|---|---|
| Ores, metals and minerals | |
|---|---|
| Guides | Ore Deposits • Metals |
| Metals | Copper • Iron • Meteoric iron • Gold • Silver • Lead • Tin • Zinc • Bismuth • Titanium (Ilmenite) |
| Alloys | Bronze (Tin bronze, bismuth bronze, black bronze) • Steel • Brass • Solder (Lead solder, Silver solder) • Molybdochalkos • Cupronickel • Electrum |
| Minerals | Alum • Borax • Cinnabar • Coal • Halite (Salt) • Lapis lazuli • Quartz • Saltpeter • Sulfur • Sylvite (Potash) |
| Tools | Pickaxe • Hammer • Prospecting Pick • Crucible • Forge • Ore blasting bomb • Quern • Anvil • Bloomery • Helve hammer • Pulverizer |
| Other | Gemstones |
| Related mechanics | Panning • Mining • Clay forming • Casting • Smithing • Steel making |
| Wiki Navigation | |
|---|---|
| Vintage Story | Guides • Frequently Asked Questions • Soundtrack • Versions • Controls |
| Game systems | Crafting • Knapping • Clay forming • Smithing • Cooking • Temperature • Hunger • Mining • Temporal stability • Mechanical power • Trading • Farming • Animal husbandry |
| World | World generation • Biomes • Weather • Temporal storms |
| Items | Tools • Weapons • Armor • Clothing • Bags • Materials • Food |
| Blocks | Terrain • Plants • Decorative • Lighting • Functional • Ore |
| Entities | Hostile entities • Animals • NPCs • Players |
| Miscellaneous | List of client commands • List of server commands • Creative Starter Guide • Bot System • WorldEdit • Cinematic Camera • Adjustable FPS Video Recording • ServerBlockTicking |