生存指南 - 你的第一天
本指南是由玩家們一起協作的完成的,可能會出現錯誤。一位出色的社區玩家copygirl,她是Vintage Story代碼的貢獻者,她在她自己的頁面上編寫了一個更簡潔且可能對玩家更友好的生存指南。與wiki上一樣,不保證內容的準確性,但都是根據作者所知編寫的。
控制
這是默認的按鍵,請記住更改時,例如Shift按鍵用於潛行,那麼以前的組合鍵所使用的Shift鍵也會變更為你新改動後的按鍵。
角色
| W A S D | 四處移動 |
| Space | 跳躍 |
| E | 背包物品欄(打開製作網格) |
| C | 角色物品欄(衣服和其他裝備) |
| Shift | 潛行(用於在方塊上放置活動物品) |
| Ctrl + W | 跑步 |
| G | 坐下 |
| Q | 丟棄當前持有物品 |
| F5 | 循環切換相機模式(第一人稱、第三人稱、頭頂) |
用戶界面
| tab | 打開/隱藏聊天欄 |
| T | 直接聊天欄輸入 |
| F4 | 顯示/隱藏用戶界面 |
| F6 | 顯示/隱藏小地圖 |
| B | 顯示/隱藏方塊信息 |
| H | 生成手冊 - 也可以在將滑鼠指針懸停在物品欄中的物品上時使用 |
| SHIFT + H | 查看世界中方塊或物品的生存手冊內容 |
| M | 顯示/隱藏世界地圖 |
| N | 顯示/隱藏方塊交互幫助 |
| V | 顯示/隱藏坐標 |
| F12 | 截圖 |
| esc | 退出/關閉任何界面 |
世界生成
在創建新世界時,玩家可以選擇不同的預設或單獨自定義設置。
建議新玩家檢查他們的第一個世界的自定義選項或從冒險預設開始,因為標準預設的一些難度設置可能非常難受。
對新玩家來說最具有挑戰性的難點主要如下:
- 死亡懲罰(在死亡時保留或掉落物品)
- 時空穩態(時間風暴、地表穩態和裂縫)
- 氣候分布(不同「生物群落」之間的距離,以及是否真實地分布在赤道周圍,還是隨機分布)
- 地表沉積概率(銅和錫,因為它們都是重要的起步金屬)
下方表格顯示了可用的世界預設,建議使用預設選項下方的自定義按鈕來進一步自定義你的世界,因為世界生成和玩家體驗的幾乎所有方面都可以更改。所有自定義選項的詳細列表可以在世界配置頁面上找到。
| 預設 | 重要方面 |
|---|---|
| 標準 | 儘管如它名字所示,但這並不一定是任何新玩家的最好開始。它有著各種難度選項,這意味著時間穩態、飢餓、溫度等都已啟用。如果沒有進行自定義,怪物將從第一天晚上開始生成,並且物品將在死亡時掉落。 |
| 冒險 | 大多數直接威脅,如生物敵意和時間穩態都已關閉,飢餓和溫度等自然困難也降低了。玩家將在死亡時保留他們的物品。 |
| 荒野求生 | 困難模式 - 不推薦給新玩家。增加了額外挑戰的標準模式 - 死亡時會掉落物品,玩家將在5千格方塊半徑內的隨機位置重生。玩家生命值降低,生物強度提高。 |
| 創意建造 | 顧名思義,這是典型的超平坦建築世界,從一開始就啟用了創造模式。如果你想在普通地圖上建造,請自定義不同的預設以在創造模式而不是生存模式下啟動。 |
你的第一天
玩家生成
Players appear in the world at the "spawn location". If a player dies in the game, the player will reappear (respawn) at the initial spawn location until the player spawn point is reset (a way to reset player's spawn location can be found later in the game.) It's a good idea to set a marker for this spawn point when a player first appears in the world. Either right mouse click on the world map or through the command /waypoint add [waypointcolor] [title]. This command adds a waypoint with given color (any .NET Color or a Hex Code) and text.
石制工具
In order to start the Stone Age, you will need Stone Tools, the process usually involves the following:
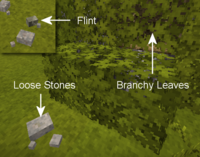
- Find Flint or Loose Stones (basalt, granite, andesite, obsidian or peridotite).
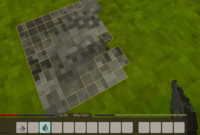
Sneak + Right clickon solid ground to create a knapping surface. (Only Flint will immediately create a knapping surface. In order to use the other loose stones, you need to place it once, thenSneak + Right clickagain with another loose stone.- Choose the tool to create from the menu. Axe and a Knife are highly recommended as first tools.
- Using a stone in the active hand,
left clickon the orange boxes to remove them from the stone and shape the finished blade or tool head. When the last orange box is removed, the completed tool head will transfer to the player's hotbar. - Press E to open the inventory GUI and access the crafting grid. In the grid, combine the stone tool blade with a stick (handle) to create the finished tool.
- Note: Sticks can be collected from the ground or by breaking leafy branches using
left click.
玩家物品欄
玩家可以使用3種類型物品欄插槽。
|
Food
Here are some of the first day options for food:
- Mushrooms can be harvested with a knife or empty hands. They will regrow at the exact spot, so marking mushroom clusters on the map can be advantageous. Make sure to check the mushroom with the Handbook to check for poisonous variants, as some mushrooms can drain your health or even kill you when consumed raw or cooked
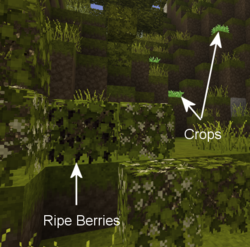
- Ripe Berry Bushes can be harvested without tools, and then broken and replanted anywhere else. After a while they will start to bloom again.
- Cattail roots can be harvested using a knife and cooked over a fire as a source of early game forage.
- Most animals can be killed and harvested with a knife for nutritious meat and fat. Hold
Sneak + Hold Right mouse buttonwith a knife in hand to harvest animals. Meat must be cooked in a fire pit.
Clay
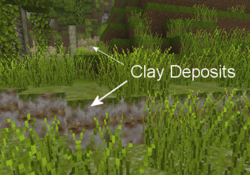
Clay is a required resource to progress through the ages, and in early game it can be used to build comparatively cheap stationary storage options and your first means to preserve food for a bit longer. It is also required to craft a cooking pot, which is necessary for advanced cooking.
Detailed information can be found in the Clay Forming page.
Light / Cooking
Once the sun sets, a player might want to create a firepit as a source of light and for cooking. Be aware though, rain will extinguish any uncovered fires or torches, so be sure to build a simple roof over any firepits.
Gather the following resources:
- Dry grass:
left clickwith a Knife in hand to gather Tall Grass. - Firewood:
left clickwith an Axe in hand to cut Trees and harvest logs. Place the axe and logs in the crafting grid to create firewood.
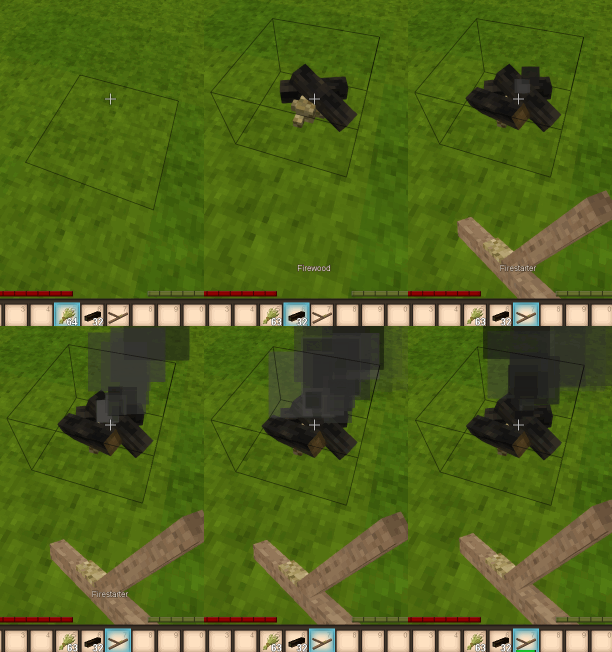
Hold Sneak + Right click on solid ground with the dry grass in hand to place a fire pit. Next, Sneak + Right click with 4 firewood in hand to complete the fire pit. Then, light the fire using a firestarter (or a torch), hold Right click with either item in hand and aim at the base of the firepit. (Optionally check the handbook, opened with H, to find out how to make a firestarter.)
Congratulations, meat can be cooked and new torches created by heating sticks! Be careful though, a torch in your off hand will cause you to take an increased hunger penalty, and torches held while taking a dip in water will get extinguished.
Combat
To defend against hostile creatures, craft stone age weapons by knapping or carving a club from a log. Different weapons have different ranges. Spears are the strongest long range weapon in the stone age, but break quickly. Create a stone spearhead by knapping, and combine with a stick (shaft) in the crafting grid to finish the spear. Wooden clubs are durable but have less damage and less range. Knives, axes, or just plain sticks can all be used as weapons, but these have shorter ranges than the spear. In an emergency, small stones can be thrown at mobs. For more information, see the main article on Combat
Improvised body armor can be crafted from dry grass and firewood for some very basic protection. It will not protect your head or legs, but is better than nothing. Once more established in the world of Vintage Story, more advanced types of armor can be crafted.
Shelter
Once the sun sets, a player might also like a shelter. There are different blocks that you can use to make a shelter using the early resources you have available. Dry grass can be used to make a bed early on, or form hay blocks/cob for early building blocks. Soil is also a good building material, and can be used to form Mud Bricks.
Stationary Storage
- See Container's main article for detailed information.
For more storage, the player can craft two early game containers.
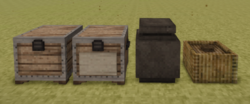
- Baskets have 8 slots for items, however they require a total of 24 cattails and shouldn't be used to store food if possible.
- Storage Vessels have 12 slots. They require clay to craft and have the best spoilage rates in the game, which make them suitable for food storage.
- Chests have 16 slots, but require boards, which also require access to smithing.
Temperature
- See Temperature's main article for detailed information.
The player's body temperature needs to be kept around 37°C. Prolonged times with body temperature under this mark will result in freezing animations and even damage taken. Beware that dipping in water or being out in the rain will make your temperature drop faster. Standing near a lit campfire can warm the player up and the body temperature will stay up a while even after stepping away.
Temporal Stability
- See Temporal Stability's main article for detailed information.
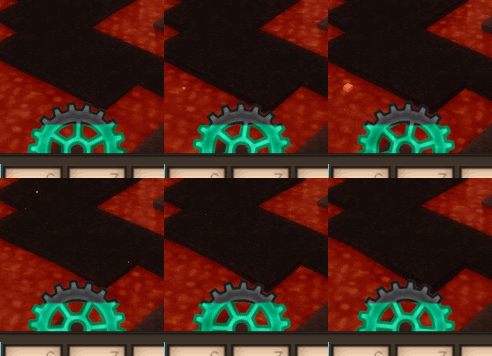
By now a player might be wondering about the cyan gear between the health and satiety bar. This is the temporal stability meter, the level of color in the gear indicates the player's current temporal stability. As a player's temporal stability reduces, the gear turns counter clockwise and the blue color in the gear decreases. When increasing, the gear's color returns as it turns clockwise. If temporal stability reaches zero, the player's vision will change drastically, and bad things tend to happen.
Draining temporal stability:
- Some surface areas are temporally unstable
- Caves, underground caverns, and places below surface level are generally more unstable than the surface of the world
- Temporal storms (occur at regular intervals)
Recovering temporal stability:
- Move to a location of high stability on the surface or at higher elevations in the world
- Transfer the temporal stability from a temporal gear: hold the gear in the left hand, a knife in the right hand, and hold
right mouse buttonto provide a 30% boost - Killing drifters recovers small amounts of your own temporal stability
Advanced Game Mechanics
Once the basics are mastered, players can develop advanced technology: Survival Guide - Advanced tech
Tutorial Video: First Day
Thanks to Ashantin for creating and sharing with the VS community.
| Wiki Navigation | |
|---|---|
| Vintage Story | Guides • Frequently Asked Questions • Soundtrack • Versions • Controls |
| Game systems | Crafting • Knapping • Clay forming • Smithing • Cooking • Temperature • Hunger • Mining • Temporal stability • Mechanical power • Trading • Farming • Animal husbandry |
| World | World generation • Biomes • Weather • Temporal storms |
| Items | Tools • Weapons • Armor • Clothing • Bags • Materials • Food |
| Blocks | Terrain • Plants • Decorative • Lighting • Functional • Ore |
| Entities | Hostile entities • Animals • NPCs • Players |
| Miscellaneous | List of client commands • List of server commands • Creative Starter Guide • Bot System • WorldEdit • Cinematic Camera • Adjustable FPS Video Recording • ServerBlockTicking |
