Smithing/de: Difference between revisions
(Updating to match new version of source page) Tags: Mobile edit Mobile web edit |
(Updating to match new version of source page) |
||
| Line 1: | Line 1: | ||
<languages/> | <languages/> | ||
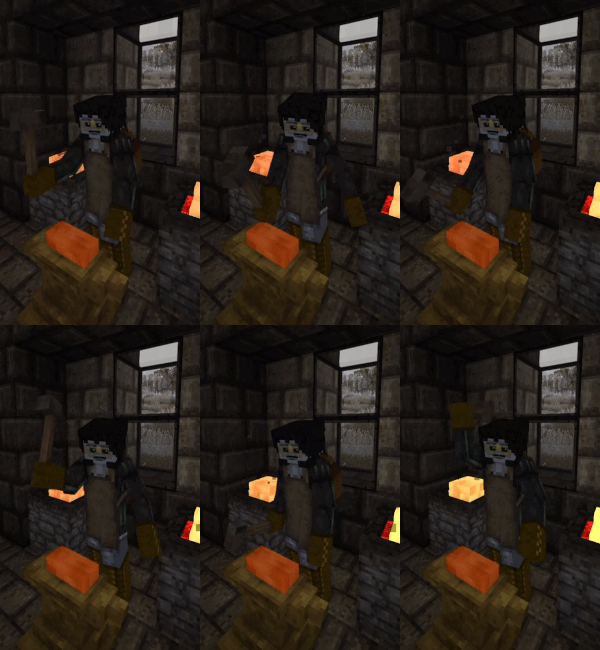
[[File:Smithing_Action.gif|thumb|250px|Seraph smithing.]] | |||
Smithing is a powerful way to form [[Metal|metal]] ingots into crafting components, [[armor]] materials, [[Tools and Weapons|tool and weapon heads]]. | |||
__TOC__ | |||
<div class="mw-translate-fuzzy"> | <div class="mw-translate-fuzzy"> | ||
| Line 6: | Line 10: | ||
==Erforderliche Materialien== | ==Erforderliche Materialien== | ||
Um Gegenstände zu schmieden, benötigt der Spieler [[Anvil|Amboss]], [[Hammer|Hammer]], [[Forge|Schmiede]], Brennstoff ([[Coal|Kohle]] oder [[Charcoal|Holzkohle]]), und [[Metal|Metallbarren]]. | Um Gegenstände zu schmieden, benötigt der Spieler [[Anvil|Amboss]], [[Hammer|Hammer]], [[Forge|Schmiede]], Brennstoff ([[Coal|Kohle]] oder [[Charcoal|Holzkohle]]), und [[Metal|Metallbarren]]. | ||
</div> | </div> | ||
To smith items, a player needs an [[Anvil|anvil]], a [[Hammer|hammer]], a [[Forge|forge]] with fuel (such as [[Coal|coal]] or [[Charcoal|charcoal]]), and [[Metal|metal]] ingots. <br> | |||
In the case of Copper and Bronze Alloy, the metal must be [[casting|casted]] to form ingots using the [[crucible]] and [[molds|clay molds]] prior to working them in the anvil. Iron ingots require preparation using a bloomery. | |||
:''See the [[Bloomery]] and [[Casting]] for more detailed information.'' | :''See the [[Bloomery]] and [[Casting]] for more detailed information.'' | ||
| Line 17: | Line 24: | ||
#'''Das Werkzeug auswählen''': Wenn ein Barren auf dem [[Anvil|Amboss]] platziert wird (Schleichen + rechte Maustaste), öffnet sich ein Fenster, in dem der Spieler auswählen kann, welchen Gegenstand, Werkzeug oder Waffe er schmieden möchte. | #'''Das Werkzeug auswählen''': Wenn ein Barren auf dem [[Anvil|Amboss]] platziert wird (Schleichen + rechte Maustaste), öffnet sich ein Fenster, in dem der Spieler auswählen kann, welchen Gegenstand, Werkzeug oder Waffe er schmieden möchte. | ||
</div> | </div> | ||
# '''Load the Forge''': {{SneakClick|Add}} fuel ([[Coal|coal]] or [[Charcoal|charcoal]]) to the [[Forge|forge]], then {{SneakClick|add up}} to four ingots. | |||
# '''Ignite the Forge''': {{SneakClick|Ignite}} with a torch. Most [[Metal|metals]] can be worked when they are heated to a temperature above 50% of their melting point. [[Lead|Lead]] can be smithed at any temperature, [[Iron#Bloomery|iron blooms]] can be smithed at above 700°C. | |||
# '''Collect heated ingots''': {{Using|Remove}} the ingot from the [[Forge|forge]] | # '''Collect heated ingots''': {{Using|Remove}} the ingot from the [[Forge|forge]] | ||
| Line 25: | Line 35: | ||
Um einen Gegenstand zu formen, müssen die leeren blauen Voxel mit Metall gefüllt werden, und Metall von den orangenen Voxeln entfernt werden. Dazu muss das Metall mit einem Hammer in die richtige Form geschlagen werden. Der Hammer hat bestimmte Modi, die unten erklärt werden, mit denen der Spieler wählen kann, in welche Richtung sich das Metall bewegen soll, wenn es mit dem Hammer behauen wird. Wenn das Werkstück auskühlt, bevor es fertiggestellt ist, kann es in der Schmiede wieder erhitzt werden. Der Schmiedevortschritt geht dabei nicht verloren. Manche Gegenstände, wie Platten, benötigen zwei Barren. Um ein Werkstück fertigzustellen, das mehr Material benötigt, füge einen weiteren erhitzten Barren zum Amboss hinzu, wie wenn ein neues Werkstück begonnen wird. | Um einen Gegenstand zu formen, müssen die leeren blauen Voxel mit Metall gefüllt werden, und Metall von den orangenen Voxeln entfernt werden. Dazu muss das Metall mit einem Hammer in die richtige Form geschlagen werden. Der Hammer hat bestimmte Modi, die unten erklärt werden, mit denen der Spieler wählen kann, in welche Richtung sich das Metall bewegen soll, wenn es mit dem Hammer behauen wird. Wenn das Werkstück auskühlt, bevor es fertiggestellt ist, kann es in der Schmiede wieder erhitzt werden. Der Schmiedevortschritt geht dabei nicht verloren. Manche Gegenstände, wie Platten, benötigen zwei Barren. Um ein Werkstück fertigzustellen, das mehr Material benötigt, füge einen weiteren erhitzten Barren zum Amboss hinzu, wie wenn ein neues Werkstück begonnen wird. | ||
</div> | </div> | ||
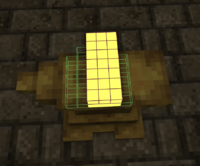
[[File:Smithing example.png|thumb|left|200px|Ingot being worked on an anvil]] | |||
Once the tool, weapon, or item is selected, two different colors of voxel outlines will appear, green and purple. To form the item, the empty green outlines must be filled with metal voxels, and the metal voxels must be removed from the purple outlines. This is done by hitting the metal with a hammer to move the metal from its current ingot shape into the shape of selected item. The hammer has specific modes, explained below, that allow players to choose which direction the metal will move when striking the work item with the hammer. Using the Right-mouse-button will turn the work item around, making it easier to hit certain parts. If the work item cools down too much during this process, use the forge to reheat the work item. Item progress will not be lost if the item is removed from the anvil and replaced. Some items, like plates, require two ingots to complete. To continue work shaping an item that needs more material, {{Using|add}} another heated ingot to the work item on the anvil as if placing a new ingot to work. | |||
<div class="mw-translate-fuzzy"> | <div class="mw-translate-fuzzy"> | ||
| Line 37: | Line 50: | ||
Um Metall in bestimmte Richtungen zu bewegen, wechsle den Hammermodus, indem du F drückst, wenn du den [[hammer|Hammer]] in der Schnellleiste ausgewählt hast. | Um Metall in bestimmte Richtungen zu bewegen, wechsle den Hammermodus, indem du F drückst, wenn du den [[hammer|Hammer]] in der Schnellleiste ausgewählt hast. | ||
</div> | </div> | ||
To move metal in specific directions, change the hammer mode. Press 'F' with a [[hammer]] in the active hand to view and change tool modes. | |||
[[File:Hammer_modes_screen.png|thumb|350px|Hammer modes screen.]] | |||
Hammer modes include three modes: | Hammer modes include three modes: | ||
| Line 49: | Line 65: | ||
=== Smithing List === | === Smithing List === | ||
Only certain items, weapons, and tool heads are available depending on the metal: | Only certain items, weapons, and tool heads are available depending on the metal: | ||
{|class="wikitable sortable" style="text-align:center; width: 90%;" | {|class="wikitable sortable" style="text-align:center; width: 90%;" | ||
Revision as of 20:37, 24 March 2023
Smithing is a powerful way to form metal ingots into crafting components, armor materials, tool and weapon heads.
Durch Schmieden können Metallbarren zu Craftingkomponenten, Rüstungsmaterialien und Werkzeug- und Waffenköpfen geschmiedet werden.
Erforderliche Materialien
Um Gegenstände zu schmieden, benötigt der Spieler Amboss, Hammer, Schmiede, Brennstoff (Kohle oder Holzkohle), und Metallbarren.
To smith items, a player needs an anvil, a hammer, a forge with fuel (such as coal or charcoal), and metal ingots.
In the case of Copper and Bronze Alloy, the metal must be casted to form ingots using the crucible and clay molds prior to working them in the anvil. Iron ingots require preparation using a bloomery.
Barren Vorbereiten
- Befülle die Schmiede: Füge zuerst Brennstoff (Kohle oder Holzkohle) mit Schleichen + rechte Maustaste hinzu, und dann bis zu vier Barren (Schleichen + rechte Maustaste).
- Die Schmiede anzünden: Schleichen + rechte Maustaste mit einer Fackel. Das Metall kann verarbeitet werden, wenn es eine Temperatur von über 60% seines Schmelzpunktes erreicht hat.
- Erhitzte Barren aufnehmen: Benutze die rechte Maustaste um den Barren von der Schmiede aufzunehmen.
- Das Werkzeug auswählen: Wenn ein Barren auf dem Amboss platziert wird (Schleichen + rechte Maustaste), öffnet sich ein Fenster, in dem der Spieler auswählen kann, welchen Gegenstand, Werkzeug oder Waffe er schmieden möchte.
- Load the Forge: Add fuel (coal or charcoal) to the forge, then add up to four ingots.
- Ignite the Forge: Ignite with a torch. Most metals can be worked when they are heated to a temperature above 50% of their melting point. Lead can be smithed at any temperature, iron blooms can be smithed at above 700°C.
- Collect heated ingots:
Remove the ingot from the forge
- Select the tool: Placing an ingot on the anvil, opens a dialog allowing the player to choose what tool, weapon, or item to craft.
Den Gegenstand Schmieden
Um einen Gegenstand zu formen, müssen die leeren blauen Voxel mit Metall gefüllt werden, und Metall von den orangenen Voxeln entfernt werden. Dazu muss das Metall mit einem Hammer in die richtige Form geschlagen werden. Der Hammer hat bestimmte Modi, die unten erklärt werden, mit denen der Spieler wählen kann, in welche Richtung sich das Metall bewegen soll, wenn es mit dem Hammer behauen wird. Wenn das Werkstück auskühlt, bevor es fertiggestellt ist, kann es in der Schmiede wieder erhitzt werden. Der Schmiedevortschritt geht dabei nicht verloren. Manche Gegenstände, wie Platten, benötigen zwei Barren. Um ein Werkstück fertigzustellen, das mehr Material benötigt, füge einen weiteren erhitzten Barren zum Amboss hinzu, wie wenn ein neues Werkstück begonnen wird.
Once the tool, weapon, or item is selected, two different colors of voxel outlines will appear, green and purple. To form the item, the empty green outlines must be filled with metal voxels, and the metal voxels must be removed from the purple outlines. This is done by hitting the metal with a hammer to move the metal from its current ingot shape into the shape of selected item. The hammer has specific modes, explained below, that allow players to choose which direction the metal will move when striking the work item with the hammer. Using the Right-mouse-button will turn the work item around, making it easier to hit certain parts. If the work item cools down too much during this process, use the forge to reheat the work item. Item progress will not be lost if the item is removed from the anvil and replaced. Some items, like plates, require two ingots to complete. To continue work shaping an item that needs more material, add another heated ingot to the work item on the anvil as if placing a new ingot to work.

|
Protip:
Während Kupfer- und Bronzegegenstände einfach wieder zu Barren eingeschmolzen werden können, müssen Eisengegenstände mit einem Hochofen geschmolzen werden. Sei vorsichtig mit ihnen! |
Hammermodi
Um Metall in bestimmte Richtungen zu bewegen, wechsle den Hammermodus, indem du F drückst, wenn du den Hammer in der Schnellleiste ausgewählt hast.
To move metal in specific directions, change the hammer mode. Press 'F' with a hammer in the active hand to view and change tool modes.
Hammer modes include three modes:
- Schwerer Schlag: Kein Effekt auf der unteren Ebene, auf den oberen Ebenen werden Voxel zur unteren Ebene hinzugefügt, das Werkstück wird also flach gehauen. Andernfalls werden die Voxel verteilt.
- Aufstauchen (Hoch, Runter, Rechts, Links): Auf der unteren Ebene angewandt, werden Voxel zur oberen Ebene geschoben; dies ist nur an den Kanten des Werkstückes möglich. Auf den oberen Ebenen angewandt, werden Voxel horizonal bewegt, oder an einer Kante auf die untere Ebene geschoben.
- Spalten: Entfernt einen Voxel endgültig.
Smithing List
Only certain items, weapons, and tool heads are available depending on the metal:
| Icon | Item | Ingots | Copper | Gold | Silver | Tin | Zinc | Bismuth | Lead | Bronze | Iron | Met. Iron | Steel |
|---|---|---|---|---|---|---|---|---|---|---|---|---|---|

|
Anvil Base | 5 | ❌ | ❌ | ❌ | ❌ | ❌ | ❌ | ❌ | ❌ | ✔️ | ✔️ | ❌ |

|
Anvil Head | 5 | ❌ | ❌ | ❌ | ❌ | ❌ | ❌ | ❌ | ❌ | ✔️ | ✔️ | ❌ |

|
Arrowhead | 1 (for 6 or 9 arrowheads) |
✔️ | ✔️ | ✔️ | ❌ | ❌ | ❌ | ❌ | ✔️ | ✔️ | ✔️ | ✔️ |

|
Axe Head | 1 | ✔️ | ✔️ | ✔️ | ❌ | ❌ | ❌ | ❌ | ✔️ | ✔️ | ✔️ | ✔️ |

|
Chisel | 1 | ✔️ | ✔️ | ✔️ | ❌ | ❌ | ❌ | ❌ | ✔️ | ✔️ | ✔️ | ✔️ |

|
Chute Section | 1 (or 1 plate for easier smithing) |
✔️ | ❌ | ❌ | ❌ | ❌ | ❌ | ❌ | ❌ | ❌ | ❌ | ❌ |

|
Cleaver | 1 | ✔️ | ✔️ | ✔️ | ❌ | ❌ | ❌ | ❌ | ✔️ | ✔️ | ✔️ | ✔️ |

|
Hammer Head | 1 | ✔️ | ✔️ | ✔️ | ❌ | ❌ | ❌ | ❌ | ✔️ | ✔️ | ✔️ | ✔️ |

|
Hoe Head | 1 | ✔️ | ✔️ | ✔️ | ❌ | ❌ | ❌ | ❌ | ✔️ | ✔️ | ✔️ | ✔️ |

|
Knife Blade | 1 | ✔️ | ✔️ | ✔️ | ❌ | ❌ | ❌ | ❌ | ✔️ | ✔️ | ✔️ | ✔️ |
| File:Longbladehead-copper.png | Longblade Head | 1 | ✔️ | ✔️ | ✔️ | ❌ | ❌ | ❌ | ❌ | ✔️ | ✔️ | ✔️ | ✔️ |

|
Chain | 2 | ✔️ | ✔️ | ✔️ | ❌ | ❌ | ❌ | ❌ | ✔️ | ✔️ | ✔️ | ✔️ |

|
Plate | 2 | ✔️ | ✔️ | ✔️ | ✔️ | ✔️ | ✔️ | ✔️ | ✔️ | ✔️ | ✔️ | ✔️ |

|
Scales | 2 | ✔️ | ❌ | ❌ | ❌ | ❌ | ❌ | ❌ | ✔️ | ✔️ | ✔️ | ✔️ |

|
Padlock | 1 | ❌ | ❌ | ❌ | ❌ | ❌ | ❌ | ❌ | ✔️ | ✔️ | ✔️ | ✔️ |

|
Pickaxe Head | 1 | ✔️ | ✔️ | ✔️ | ❌ | ❌ | ❌ | ❌ | ✔️ | ✔️ | ✔️ | ✔️ |

|
Pounder Cap | 1 | ❌ | ❌ | ❌ | ❌ | ❌ | ❌ | ❌ | ✔️ | ✔️ | ✔️ | ✔️ |

|
Prospecting Pick | 1 | ✔️ | ✔️ | ✔️ | ❌ | ❌ | ❌ | ❌ | ✔️ | ✔️ | ✔️ | ✔️ |

|
Saw Blade | 1 | ✔️ | ✔️ | ✔️ | ❌ | ❌ | ❌ | ❌ | ✔️ | ✔️ | ✔️ | ✔️ |

|
Scythe Head | 1 | ✔️ | ✔️ | ✔️ | ❌ | ❌ | ❌ | ❌ | ✔️ | ✔️ | ✔️ | ✔️ |

|
Shears | 1 | ✔️ | ✔️ | ✔️ | ❌ | ❌ | ❌ | ❌ | ✔️ | ✔️ | ✔️ | ✔️ |

|
Shovel Head | 1 | ✔️ | ✔️ | ✔️ | ❌ | ❌ | ❌ | ❌ | ✔️ | ✔️ | ✔️ | ✔️ |

|
Spear Head | 1 | ✔️ | ✔️ | ✔️ | ❌ | ❌ | ❌ | ❌ | ✔️ | ✔️ | ✔️ | ✔️ |

|
Shield's boss | 1 | ❌ | ✔️ | ✔️ | ❌ | ❌ | ❌ | ❌ | ✔️ | ✔️ | ✔️ | ✔️ |

|
Shield's hoop | 1 | ❌ | ✔️ | ✔️ | ❌ | ❌ | ❌ | ❌ | ✔️ | ✔️ | ✔️ | ✔️ |
Tutorialvideos zum Schmieden (Englisch)
| Wiki Navigation | |
|---|---|
| Vintage Story | Guides • Frequently Asked Questions • Soundtrack • Versions • Controls |
| Game systems | Crafting • Knapping • Clay forming • Smithing • Cooking • Temperature • Hunger • Mining • Temporal stability • Mechanical power • Trading • Farming • Animal husbandry |
| World | World generation • Biomes • Weather • Temporal storms |
| Items | Tools • Weapons • Armor • Clothing • Bags • Materials • Food |
| Blocks | Terrain • Plants • Decorative • Lighting • Functional • Ore |
| Entities | Hostile entities • Animals • NPCs • Players |
| Miscellaneous | List of client commands • List of server commands • Creative Starter Guide • Bot System • WorldEdit • Cinematic Camera • Adjustable FPS Video Recording • ServerBlockTicking |


