Stahlherstellung
This page was last verified for Vintage Story version 1.19.3.
Um Stahl herzustellen wird Eisen mit Kohlenstoff unter sehr hohen Temperaturen angereichert (Aufkohlung). Dafür benötigt man einen neuen größeren Ofen.
Erforderliche Ausstattung
Um Stahl herzustellen, benötigt der Spieler einen Amboss aus Eisen, eine Schmiede und einen feuerfesten Zementofen, für den zunächst ein Pulverisierer gebraucht wird.
Benötigte Materialien
Um einen funktionierenden Zementofen zu bauen, braucht der Spieler folgendes:
- 1 Eisentür
- 2 Steinsargteile
- 2 Steinsargdeckel
- 6 Feuerfeste Schamottgitter
- 53 Feuerfeste Schamottziegelblöcke
- Einige Erd- oder Steinblöcke, um den Heizungsraum für die Kohle unter dem Ofen zu bauen.
Eine genaue Liste der mindestens benötigten Materialien findest du in der folgenden Liste.
- 6 Eisenplatten (12 Eisenbarren)
- 8 Ganze Blöcke aus Granit, Andesit, Basalt oder Peridotit
- 456 Feuerton (8 Stapel)
- 29 Mörtel
- 228 von jeder benötigten Pulver Zutat, die für das jeweilige Level von Feuerfesten Ziegeln gebraucht wird (4 Stapel)
Herstellung von Feuerfesten Ziegeln
Feuerfeste Blöcke sind notwendig für die Stahlherstellung, da keine anderen verfügbaren Blöcke der extremen Hitze standhalten können, um Stahl zu produzieren. Feuerfeste Blöcke gibt es in drei verschiedenen Ausführungen, mit denen man den Zementofen bauen kann. Jede Ausführung hat eine unterschiedliche Chance dafür, ob sie während des Prozesses beschädigt werden. Je höher die Stufe der feuerfesten Blöcke, umso weniger können die Blöcke Schaden nehmen:
- Stufe 1: 90 % Hitzeresistent (1:10 Chance zu brechen)
- Stufe 2: 95 % Hitzeresistent (1:20 Chance zu brechen)
- Stufe 3: 99,9 % Hitzeresistent (1:1000 Chance zu brechen)
Um Feuerfeste Blöcke herzustellen zu können, müssen bestimmte Steine und Erze (Unten aufgelistet) im Pulverisierer zerkleinert werden. Diese Pulver werden im Handwerksmenü zusammen mit Feuerton kombiniert um feuerfeste Ziegel zu produzieren. Jede Stufe benötigt eine andere Zusammensetzung der Pulver.
| Material | Stein | Pulver | Minimale Stufe der Stampferkappen |
|---|---|---|---|
| Bauxit |  |
 |
Bronze |
| Quarz |  |
 |
Bronze |
| Olivin |  |
 |
Eisen |
| Ilmenit |  |
 |
Stahl |
Protip:
Ein Stück von ertragsarmen oder mittelmäßigem Ilmenit erzeugt ein zerkleinertes Ilmenit. Ertragreicher oder Üppiger stattdessen 2. |
Die Rezepte für rohe feuerfeste Ziegel von Stufe 1 bis 3 sind folgende:
| Ingredients | Crafting Recipe |
|---|---|
| 2x Feuerton 1x Zerkleinertes Quarz 1x Zerkleinertes Bauxit |
|
| Ingredients | Crafting Recipe |
|---|---|
| 2x Feuerton 1x Zerkleinertes Quarz 1x Zerkleinertes Bauxit 1x Zerkleinertes Olivin |
|
| Ingredients | Crafting Recipe |
|---|---|
| 2x Feuerton 1x Zerkleinertes Quarz 1x Zerkleinertes Bauxit 1x Zerkleinertes Olivin 1x Zerkleinertes Ilmenit |
|
Rohe feuerfeste Ziegel müssen im Grubenofen gebrannt werden, um feuerfeste Ziegel zu erhalten.
Gebrannte feuerfeste Ziegel werden dann für ihre Stufe spezifische Ziegelblöcke und Schamottgitter gebraucht. Hier ist das Rezept für Stufe 1:
| Ingredients | Crafting Recipe |
|---|---|
| 8x Feuerfester Ziegel (Stufe 1) 1x Mörtel |
|
| Ingredients | Crafting Recipe |
|---|---|
| 6x Feuerfester Ziegel (Stufe 1) 1x Mörtel |
|
Bau des Zementofens

Der Zementofen ist eine Struktur aus mehreren Blöcken, dass in einer bestimmten Art gebaut werden muss, um sicherzustellen, dass er funktioniert. Wenn der Spieler auf dem Steingrab Shift + ![]() drückt (mit leerer Hand oder mit Kohle), wird eine Blaupause des Ofens angezeigt, um den Bau zu vereinfachen. Bei erneutem drücken von Shift +
drückt (mit leerer Hand oder mit Kohle), wird eine Blaupause des Ofens angezeigt, um den Bau zu vereinfachen. Bei erneutem drücken von Shift + ![]() wird angezeigt, wie viele Blöcke noch fehlen oder falsch platziert wurden. Mit erneutem
wird angezeigt, wie viele Blöcke noch fehlen oder falsch platziert wurden. Mit erneutem ![]() auf das Steingrab, wird die Blaupause deaktiviert.
auf das Steingrab, wird die Blaupause deaktiviert.
Protip:
Von der Richtung wie der Spieler auf das Grab schaut wird beeinflusst, wie die Blaupause angezeigt wird. Der Ofen wird davon ausgehen, dass dort wo der Spieler steht die Seite mit der Ofentür ist - unabhängig davon, ob der Spieler mit der Seite oder dem Ende des Grabes interagiert hat. |
Andere benötigte Blöcke
Neben den Feuerfesten Ziegeln werden noch weitere, spezielle Blöcke benötigt, um einen funktionierenden Ofen zu bauen:
- eine Eisentür
- einen Steinsarg (gebaut aus 2 Steinsargteilen)
- einem Steinsargdeckel (gebaut aus 2 Steinsargdeckeln)
Die Eisentür kann aus 6 Eisenplatten hergestellt, oder in Ruinen gefunden werden. Der Sarg kann aus folgen Steinarten gebaut werden: Granit, Andesit, Basalt oder Peridotit.
| Ingredients | Crafting Recipe |
|---|---|
| 6x Eisenplatte |
|
| Ingredients | Crafting Recipe |
|---|---|
| 1x Hammer 1x Meißel 1x Stein 1x Boraxpulver |
|
Der Aufbau
- Zuerst werden die 6 Gitter auf dem Boden und darauf die 2 Sargteile platziert. Das ist der Kern des Ofens. Die Sargteile werden immer mit der offenen Seite zum Spieler hin platziert. Sobald der Sarg steht - ohne den Deckel - kann der Spieler mit Shift +
 die Blaupause anzeigen lassen.
 - Der Ofen braucht Platz von 5x5 und ist 6 Blöcke hoch. Zusätzlich wird noch eine Etage unter dem Gitter benötigt, in dem die Kohle verbrannt wird.
- Erhöhe die Wände um 2 Blöcke und vergiss nicht die Eisentür einzusetzen.
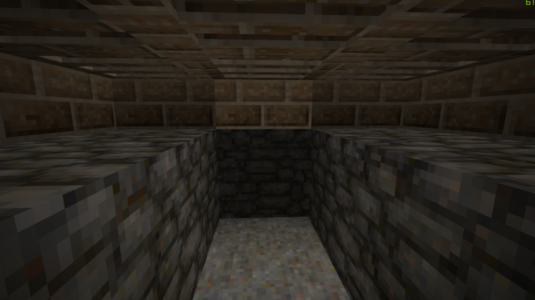
- Nun ist das Dach dran, in dem jeder offene Block nach oben im Treppenkonzept zugebaut wird. Der fertige Ofen hat, wie unten gezeigt, einen 2 Blöcke hohen Schornstein. Er muss nicht offen sein, aber wenn er zugebaut wird, gibt es keine Rauchanimation solange der Ofen läuft.
- Der verwirrende Teil beim Bau des Zementofen ist der Bereich unter dem Gitter. Damit der Ofen betrieben werden kann, brauch der Spieler Zugang zu den Blöcken unter den Gittern mit dem Sarg, damit dort 2 Kohleschichten gestapelt werden können. Dadurch das Kohle sich wie Schnee verhält und immer zur Seite rutscht, wenn man zu hoch baut, muss die Seite stabilisiert werden. Es ist nicht nötig den Bereich luftdicht zu verbauen. Es kann offen bleiben oder mit einer Koksofentür versehen werden. Beachte, dass die Schamottziegel nicht bearbeitet oder entfernt werden dürfen, sodass man nur darunter eine Öffnung einbauen darf.
- Wenn alles richtig platziert wurde, wird es keine weiteren Hinweise auf fehlende oder falsch platzierte Blöcke geben, wenn bei dem Sarg Shift + gedrückt wurde.


Kohle muss genau unter den beiden Sargteilen gestapelt werden.
Die Kohlestapel müssen seitlich stabilisiert werden, damit sie nicht kollabieren - hier kann man die Blöcke meißeln, um nachher richtig hantieren zu können.


Zementstahl herstellen
Blister steel is the first step of creating steel from iron, and functions the same way an iron bloom does. To heat iron up to the required temperatures to make carbonization possible, the player first needs to build a special furnace structure out of refractory blocks and other specialist blocks. Also, prepare a lot of charcoal, or collect a lot of black coal. One batch of steel will use 168 pieces of charcoal.
Smelting process
With a finished refractory furnace build, the next step requires the player to fill the coffin.
One stone coffin will hold a total of 16 iron ingots and 40 fuel pieces - either coke or charcoal. With the fuel in your active hand, target the inside the coffin and use Shift + ![]() to place one layer of fuel first, then one layer of iron ingots. Repeat until the coffin is full and will not accept any more items. The coffin should allow 5 layers of fuel with 8 pieces per layer, and 4 layers of iron ingots with 4 ingots per layer.
Once filled, the coffin tool tip will indicate that a coffin lid needs to be placed on top of the coffin. You can now place the 2 lid blocks. Note that the coffin needs to be filled completely, otherwise the process will not start even if the lid is placed and coal beneath ignited.
to place one layer of fuel first, then one layer of iron ingots. Repeat until the coffin is full and will not accept any more items. The coffin should allow 5 layers of fuel with 8 pieces per layer, and 4 layers of iron ingots with 4 ingots per layer.
Once filled, the coffin tool tip will indicate that a coffin lid needs to be placed on top of the coffin. You can now place the 2 lid blocks. Note that the coffin needs to be filled completely, otherwise the process will not start even if the lid is placed and coal beneath ignited.
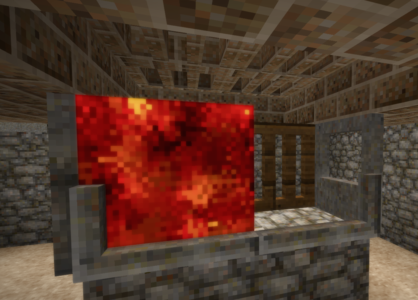
After the coffin is closed, the player should leave the burning chamber and close the door. It is not recommended to enter the chamber again in the middle of the smelting process, as the extreme heat inside will cause 5 HP damage per tick if inside while the bricks are still heated. The coffin tool tip will indicate that the process requires fuel to be placed and ignited below the two grates under the coffin. Access the underbelly of the furnace as shown above from the side or the back of the furnace. Place fuel in equal amounts on the two spaces directly below the coffin. Each fuel layer on one block takes 2 fuel items, meaning a full layer on both blocks requires 4 fuel items. Charcoal, black coal, anthracite and coke work as possible fuel items.
After the carburation process is 100% completed and the temperature has lowered, you can open the iron door and enter. Use a pickaxe to break the lid and the coffin to take the blister steel ingots and some of the remaining fuel. The coffin and lid sections can be used again for another carburation.
Damaged refractory brick blocks have to be broken and replaced. When you break them, they return some of their materials back, similar to a broken bloomery. Check carefully every block (some might be hidden under other blocks). If some damaged blocks remain, you will not be able to start another carburation process. Grate blocks do not get damaged at the moment, which means there is no sense in making them out of higher tier bricks. In addition, not all of the blocks on the cementation furnace building need to be of the same tier, allowing for use of refractory blocks of a different tier when replacing damaged ones.
When testing out the process in creative or survival, keep in mind that the coffin tooltip might take a few seconds to update correctly from one state to the next, specifically once the player ignites fuel below. The coffin will show the progress in percentages, but again it might take a tick until that progress info is shown correctly. A working furnace will have fire particles inside the burning chamber - which also indicates the danger of stepping inside at that time - as well as smoke rising from the chimney.
| Protip: |
One firing of 16 iron ingots will reward the player with an equal amount of blister steel ingots.
Making steel
Blister steel in itself is not yet workable steel, instead it behaves similar to iron blooms, and further refining is necessary. To turn blister steel into steel ingots, it needs to be processed on an iron anvil either by hand or with the help of a helve hammer.
Trivia
The design of the refractory furnace is a modified version of the Manuel de la métallurgie du Fer, from 1895 [1]
![[1]](https://upload.wikimedia.org/wikipedia/commons/2/23/Four_cementation_anglais.jpg)
Video tutorials
| Detailed guide on what to get for steelmaking to start | Guide on how to build and use the furnace | German full Guide on how to make steel |
|---|---|---|
| Erze, Metalle und Mineralien | |
|---|---|
| Guides | Erzansammlungen • Metalle |
| Nützliche Metalle | Kupfer • Eisen • Meteor Eisen • Gold • Silber • Blei • Zinn • Zink • Bismuth • Titanium (Ilmenite) |
| Nützliche Legierungen | Bronze (Zinnbronze, Bismuthbronze, Schwarzbronze) • Stahl • Messing • Lötkolben (Lötkolben aus Blei, Lötkolben aus Silber) • Molybdochalkos • Cupronickel • Electrum |
| Mineralien | Alaun • Borax • Zinnober • Kohle • Halit (Salz) • Lapislazuli • Quarz • Salpeter • Schwefel • Pottasche |
| Werkzeuge | Spitzhacke • Hammer • Geologenhammer • Crucible • Schmiede • Ore blasting bomb • Handmühle • Amboss • Hochofen • Stielhammer • Pulverisierer |
| Sonstiges | Edelsteine |
| Related mechanics | Schürfen • Erzabbau • Clay forming • Metallgießen • Schmieden • Stahl Herstellung |
| Wiki Navigation | |
|---|---|
| Vintage Story | Guides • Frequently Asked Questions • Soundtrack • Versions • Controls |
| Game systems | Crafting • Knapping • Clay forming • Smithing • Cooking • Temperature • Hunger • Mining • Temporal stability • Mechanical power • Trading • Farming • Animal husbandry |
| World | World generation • Biomes • Weather • Temporal storms |
| Items | Tools • Weapons • Armor • Clothing • Bags • Materials • Food |
| Blocks | Terrain • Plants • Decorative • Lighting • Functional • Ore |
| Entities | Hostile entities • Animals • NPCs • Players |
| Miscellaneous | List of client commands • List of server commands • Creative Starter Guide • Bot System • WorldEdit • Cinematic Camera • Adjustable FPS Video Recording • ServerBlockTicking |