Modding:Content Tutorial Complex Grid Recipes: Difference between revisions
(Finished tutorial.) |
Craluminum (talk | contribs) (→Going Further: add note for skipvariants that it won't work without name property) |
||
| Line 193: | Line 193: | ||
|To achieve this... | |To achieve this... | ||
|- | |- | ||
|Add the "''skipVariants''" property to the saw ingredient, with an array containing just "''copper''".<syntaxhighlight lang="json"> | |Add the "''skipVariants''" property to the saw ingredient, with an array containing just "''copper''". | ||
Note that it won't work without "name" property.<syntaxhighlight lang="json"> | |||
"S": { | "S": { | ||
"type": "item", | "type": "item", | ||
"code": "game:saw-*", | "code": "game:saw-*", | ||
"name": "material", | |||
"skipVariants": [ "copper" ], | "skipVariants": [ "copper" ], | ||
"isTool": true, | "isTool": true, | ||
Revision as of 09:16, 11 August 2024
This page was last verified for Vintage Story version 1.19.7.
Introduction
Objective
Recipes in Vintage Story are very versatile, and the grid recipe system has a number of features that have not yet been talked about. In this tutorial, you will find out how to create more complex recipes, including those with variants, different itemstack quantities, returned itemstacks, and some other smaller features.
Assets
Before starting, it is recommended you download the workspace and assets for this tutorial. The completed files can also be found here.
This tutorial starts with the following assets:
- Mod Setup & Folder Structure
- Simple 'Sleek Door' recipe
Prerequisites
This tutorial will assume you understand the following topics:
It is recommended to have completed the following tutorial:
- 4. Simple Recipes - This tutorial begins with a basic recipe.
It is recommended, but not necessary, to understand the following concept:
This tutorial is simply to create new recipes - The only file is recipes/grid/sleekdoor.json. This is a simple recipe, which inputs an oak solid door and outputs an oak sleek door.
{
	"ingredientPattern": "D",
	"width": 1,
	"height": 1,
	"ingredients": {
		"D": {
			"type": "block",
			"code": "game:door-solid-oak"
		}
	},
	"output": {
		"type": "block",
		"code": "game:door-sleek-windowed-oak"
	}
}
Variant-Based Recipes
The code that is given within the recipe file works to create an oak sleek door from an oak solid door. However, there exists a sleek door for every solid door, so let's go ahead and create 13 or so other recipes for the other wood types.
Of course, there's a much easier way of doing that, and it uses the variant system.
Firstly, let's add a wildcard into out ingredient's code to allow us to use a solid door of any type.
"D": {
	"type": "block",
	"code": "game:door-solid-*"
}
So, the recipe now inputs any type of solid door, but will always return an oak sleek door. There needs to be a way of copying the text from the wildcard ( * ) and using it within the output. By using the "name" property in the ingredient, you can achieve exactly that.
"D": {
	"type": "block",
	"code": "game:door-solid-*",
	"name": "wood"
}
This now marks the recipe as containing a variant called "wood". Note that this name can be anything, it does not have to match with the variant code used when the item or block was defined. To use this in the output, you can use a variant substitution ({ }) in the output code.
"output": {
	"type": "block",
	"code": "game:door-sleek-windowed-{wood}"
}
Make sure that you use the variant code you defined earlier (using "name") is the same as the substitution in your output.
Important: You cannot name more than one variant per ingredient.
If you test your recipe now, you'll find that you can create any sleek door from its appropriate solid door type.
More Tool-Usage
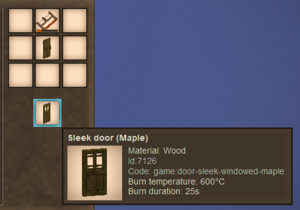
In the previous recipes tutorial, you used a hammer to create gold brick blocks. Add another ingredient to the sleek door recipe to make the recipe require a saw of any type.
{
	"ingredientPattern": "S,D",
	"width": 1,
	"height": 2,
	"ingredients": {
		"S": {
			"type": "item",
			"code": "game:saw-*",
			"isTool": true
		},
		"D": {
			"type": "block",
			"code": "game:door-solid-*",
			"name": "wood"
		}
	},
	"output": {
		"type": "block",
		"code": "game:door-sleek-windowed-{wood}"
	}
}
This is a fairly simple modification, it just changes the pattern, height, and adds the extra saw ingredient. The saw is marked as a tool, so it will lose a single durability point when the recipe is created. However, you may be aware that some recipes use more tool durability than others. To achieve this, you can add a "toolDurabilityCost" property to the tool ingredient.
"S": {
	"type": "item",
	"code": "game:saw-*",
	"isTool": true,
	"toolDurabilityCost": 10
},
If you test this, you will find that the door now requires a saw to make, which will lose 10 durability when the recipe is complete.
Shapeless Recipes
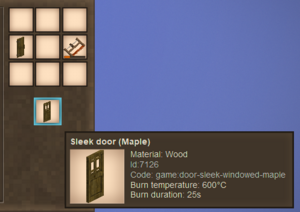
All the examples given so far have been shaped recipes, meaning that the ingredients must be placed in the order defined in the "ingredientPattern" property. However, there are some instances where we might now want to worry about the layout of the ingredients. To now make the sleek door recipe shapeless, add the "shapeless" property.
| Shapeless sleek door recipe... |
{
	"ingredientPattern": "S,D",
	"width": 1,
	"height": 2,
	"shapeless": true,
	"ingredients": {
		"S": {
			"type": "item",
			"code": "game:saw-*",
			"isTool": true,
			"toolDurabilityCost": 10
		},
		"D": {
			"type": "block",
			"code": "game:door-solid-*",
			"name": "wood"
		}
	},
	"output": {
		"type": "block",
		"code": "game:door-sleek-windowed-{wood}"
	}
}
|
Now, the saw and door can be arranged in any order in the crafting grid.
Extra-Outputs & Returned Stacks
In some recipes, ingredients can be turned into a different itemstack instead of being consumed.
The sleek door looks like a solid door with a couple of planks removed for a window, so you should return two wooden planks to the player when they create it.
To do this, you can use the "returnedStack" property on an ingredient.
"D": {
	"type": "block",
	"code": "game:door-solid-*",
	"name": "wood",
	"returnedStack": {
		"type": "item",
		"code": "game:plank-{wood}",
		"quantity": 2
	}
}
Notice that you can still use variant substitutions here, as well as a quantity value. If you test your recipe now, your recipe will give you two wooden planks when the sleek door is created. Note that you have to create the door for the returnedStacks to be created.
You can only have one returned stack per ingredient.
Conclusion
Congratulations, you now have an advanced recipe for every type of sleek door, all within one file! After this tutorial, you should have more of an understanding of how variants can be used within grid recipes, and how grid recipes have a lot more functionality.
Next Steps...
If you want to test your knowledge, consider doing the tasks under the Going Further section below.
Grid recipes are only one type of recipe in Vintage Story. Move on to the next tutorial, Further Recipes, for information on barrel, clayforming, cooking, knapping, and smithing recipes!
Going Further
Want to make some additional changes to this mod? Try and achieve the following things!
Create a new recipe that allows you to change any sleek door back into a solid door. What gameplay problem would arise from this, and how could you solve it?
| To achieve this... |
| Copy the appropriate recipe, however make the input a sleek door with a wood variant, and the output code a solid door using the defined wood variant.
The issue with this is the returned two planks when creating a sleek door - Which could result in an infinite number of wooden planks if the player kept exchanging between solid and sleek doors. To fix this, you could add another ingredient of two planks for the sleek to solid door recipe. |
Change the original recipe to stop the player from using a copper saw to make sleek doors. (Hint: The "skipVariants" property (which accepts an array) in an ingredient allows you to control what variants cannot be used in a wildcard.)
| To achieve this... |
Add the "skipVariants" property to the saw ingredient, with an array containing just "copper".
Note that it won't work without "name" property."S": {
"type": "item",
"code": "game:saw-*",
"name": "material",
"skipVariants": [ "copper" ],
"isTool": true,
"toolDurabilityCost": 10
},
|
| Content Modding | |||||||||
|---|---|---|---|---|---|---|---|---|---|
| Basics | Content Mods • Developing a Content Mod • Packaging & Release | ||||||||
| Tutorials |
|
||||||||
| Concepts | Modding Concepts • Modinfo • Variants • Domains • Patching • Remapping • World Properties | ||||||||
| Moddable Assets |
|
||||||||
| Uncategorized |
|
||||||||
Wondering where some links have gone?
The modding navbox is going through some changes! Check out Navigation Box Updates for more info and help finding specific pages.
| Modding | |
|---|---|
| Modding Introduction | Getting Started • Theme Pack |
| Content Modding | Content Mods • Developing a Content Mod • Basic Tutorials • Intermediate Tutorials • Advanced Tutorials • Content Mod Concepts |
| Code Modding | Code Mods • Setting up your Development Environment |
| Property Overview | Item • Entity • Entity Behaviors • Block • Block Behaviors • Block Classes • Block Entities • Block Entity Behaviors • Collectible Behaviors • World properties |
| Workflows & Infrastructure | Modding Efficiency Tips • Mod-engine compatibility • Mod Extensibility • VS Engine |
| Additional Resources | Community Resources • Modding API Updates • Programming Languages • List of server commands • List of client commands • Client startup parameters • Server startup parameters Example Mods • API Docs • GitHub Repository |

