Guide:Prospecting
While a regular pickaxe and hammer should be your first tools, a prospecting pick is a tremendous aid in finding larger quantities of ore, and deeper ore deposits.
If you press F while holding a prospecting pick, you should get a menu showing 1 or 2 options: Density mode and (if enabled) Node mode. Basically, use Density mode to help decide where to dig, and use Node mode while digging.
Rock strata
The in-game Handbook has a guide on Rock Strata that's worth going through a few times. Eventually, you can get used to which rocks are igneous type, and nearest the mantle of the world.
Limonite is an ore that can only generate in 3 types of rock: chert, shale, and basalt. You can use the Handbook to check which rocks can host which ores. If you're walking around on soil with small stones of chalk visible, it's not obviously a good place to dig for limonite. But rocks generate in layers, much like a parfait.

Visible "biome" indicators such as plants, animals, temperature, and rainfall give no indication of what rock types could be below. If you peek in a cave you might glimpse two or more rock types, but what's further down? Or you could examine the layers of distant mountains (even adjust your settings to a higher view distance), but that would only show the parfait's top "flavors." You can think of the prospecting pick's density mode as a drill that checks all the layers, from the surface to the world mantle. A few steps away, the rock layers are likely to be mostly the same types, but potentially different thicknesses/proportions.
Density mode does not tell you whether ore is below a spot you sampled. Rather, it indicates places where certain ores have the opportunity to generate, because the necessary host rock(s) are present to a greater or lesser degree.
Density mode
If you use density mode in an area that has only chert, shale, and basalt, the density reading could be "Ultra high" for limonite. It's possible that when that area generated for the first time, all of the triesPerChunk failed, but the opportunity for limonite to be present is as high as could be. If, however, there's an extra layer of chalk on top, expect the reading for limonite to drop to "Very high"; if the chalk layer is thick, maybe even just "High." If there's also a layer of sandstone, bauxite, or conglomerate, the density reading for limonite should drop further, as the layers of valid host rocks become thinner. The less chert, shale, and basalt an area contains, the lower the opportunity of limonite to generate there.
To take a node sample, select Node Mode from the prospecting pick's F menu, then break 1 block. No ore or stone will be dropped. Density Search mode allows players to sample three rock blocks within 4 blocks of each other to return the probability of ores in that chunk of the world. The report is returned in ‰, parts-per-thousand (not percent, as commonly assumed). Density Search mode is useful in telling players what ores to expect to find within a given area, but does not tell players exactly where the ore may be, nor its potential size or quality.
Node mode
Node mode tells players the number of ore blocks within range of the sampled/broken block. By comparing the strength of readings different directions, you can narrow down which directions takes you closer to the ore disc. Perhaps as a child you played the Hot Or Cold? game; typically you'd get verbal hints like "warmer" and "freezing" as you hunt for a hidden item. Using node mode is similar to playing Marco Polo with an immobile companion.
To take a node sample, select Node Mode from the prospecting pick's F menu, then break 1 block. No ore or stone will be dropped.
If you get any result other than "No ore node nearby" there is definitely at least a little ore within a range of 6 blocks from the location you dug; it could be above, below, or to any side. If your first sample reports "Verified trace amounts" and your next sample reports "Verified small amounts", you're getting closer to the ore deposit. See try it section below for guidance pinpointing an ore disc. See this table for what the descriptive terms "small" etc. actually mean.
I typically use Node mode on every 13th rock-block from surface to mantle, because I'm interested in any and all minerals that might be near my shaft. But the following section is written for a more precise (and hopefully more brief) hunt for a specific ore. For simplicity's sake, I'll assume a node radius of 6 and cassiterite (aka tin) as the target ore. Some ores generate in relation to surface level and others in relation to sealevel, both of which are a percentage of world height. For this guide, I'll use Y 110 as the elevation of "surface level" though the terrain is usually quite hilly.
Try it
Needed materials:
- regular pickaxe
- prospecting pick
- ladders (I prefer rope ladders; some people use waterfalls)
- light (I prefer oil lamps)
- dirt or other means of blocking off caves
- recommended: coordinate HUD toggled on (Ctrl + V)
- optional: food
- optional: pigment such as charcoal or chalk
- optional: loose stones in a variety of colors, for cheap note-taking
- optional: containers(s) such as crates for loose stones generated while digging
Recommended steps:
- Use the Handbook H to check which rocks can host the ore you're interested in.
- Dig straight down, zig-zagging if necessary to avoid caverns and quartz deposits.
- Place ladders as you go (can conserve resources by leaving a gap of 1 block between each ladder segment) and block off holes that drifters etc could use to reach you.
- When you've reached a rock type that can host your target ore, begin counting from 1 to 6.
- If you use Node mode on the 7th block, it will check the 6 Y levels above, as well as the 6 below (assuming a radius of 6 for your world config).
- If the Info tab of the chat overlay reports "No ore node nearby", count down 6 + 6 then use node mode again. Because the first 6 were already checked, you only need to use node mode on every 13th block. If your pick has plenty of durability, you might prefer to node-sample every 7th block instead of 13th, in which case you won't need to backtrack as much to eliminate possibilities.
- If the Info tab reports "Verified" detection of ore within the radius of the last sampled block, move back up 2 blocks and sample again, looking for the point where the Verified detection disappears.
- If node mode reports "No ore" at Y level 83 and "Verified traces" at Y level 82, then you have resolved 1 of the 3 compass variables: X (east/west) and Z (north/south) coordinates for the ore deposit still need to be figured out, but the Y coordinate is (in this case) Y 77 (83-6=77). Dig straight down to Y 77.
- Dig 4 blocks at eye level on each of the remaining cardinal directions: N, E, S, W.
- Use node mode on the 5th block (furthest you can reach). Mark the ones with higher readings than others. Maybe block off routes with low readings, as a reminder to not waste time those directions.
- Dig a passageway towards the strong reading, 6 or so blocks.
- Again, dig 4 blocks at eye level on each of the remaining cardinal directions, and node-sample the 5th block.
- Repeat steps 7-9 until you find a block of ore. Occasionally, the ore is so difficult to see in the host rock that you could be unaware of having already mined some. Check your inventory from time to time for new chunks of ore.

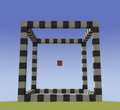
When you node-sample, you're checking a total of 2197 surrounding the sampled block. If 1-9 of the blocks contain ore, the prospecting pick will report "Verified trace" amounts in the Info tab of the chat overlay. The deposit could be huge; but only a few of its blocks are within range of the most recent node-sample. In the example image, 10 of the ore disc's blocks are within range of the first block sampled (the orange bauxite block in the center), so the Info tab would report "Verified small amounts" of the ore. If you branch out and sample a little further north, east, etc. the readings will become stronger or weaker. In the example image, node-sampling the west block (blue-ish Andesite) would result in a report of "Verified large amounts" of ore, while north or south would remain unchanged from "small." Node-sampling the east block (grayish Conglomerate) would result in a report of "No ore nearby" because it would move the radius frame eastwards far enough to leave the ore deposit with nothing within range of the prospecting pick's latest node-sample If you were to dig above and below the orange bauxite block and node-sample the 5th rockblock, what would you expect the report to say?
Strip mining
Because most ore generates in disc-shapes deposits just 1 or 2 blocks thick, strip mining in random caves/mountains it not likely to yield much. Each ore has a rather wide range of Y levels it could generate in, but many chunks won't have any at those levels, even in the ideal "host" rocks.
Vertical shafts are a much better strategy, to hit 1 or more discs along a shaft between surface and "mantle" (bedrock).

Once you've located a block of ore, digging methodically will help you 1) extract every piece with 2) minimal durability wasted on your pickaxe and 3) minimal chance of getting lost.
- Place a light source where the shaft leads up and out. Recommended: draw on the wall/floor, and/or place loose stones that contrast visually with the surrounding rock color.
- Dig a passage tall enough for yourself, in any direction. If you hit a block of ore, dig through it and continue making a passageway.
- Decide how often your passages should intersect. For example, after 12 blocks one direction, turn right and dig through the 13th. Dig 2 blocks, then turn right and dig through the 3rd. You should now be heading back towards the entrance shaft, digging a passage parallel to the first one.
- If you don't see any more ore, expand your passageways upwards and downwards: mine away the ceiling and floor blocks, especially if you can see that nearby ore trended that direction. A flat disc of ore can be significantly distorted, matching the hilly terrain of the surface.
- If you think you've reached the outer edges of an ore disc, dig a couple more blocks anyway.
- When you're fairly positive that you've extract the entire ore "disc", use node mode in strategic spots to check that no ore remains.
- You can use wall/floor drawings or loose stones to indicate which areas have already been cleared.
Limits
How deep to dig? This particular ore could generate almost anywhere between elevation (Y coordinate) 0 (the bedrock/"mantle") and 98% of the "surface level" (100% being whatever Y level you're standing on with grass around you). See below for a detailed examination of the data. How do you know when you've reached the end of the disc? It's generally useful to know that surface deposits are smaller than deep deposits, and iron deposits tend to be massive. Basically, remember to check a bit above and below the visible ore blocks for more hidden by distortion.
Detailed example
At a particular spot, no matter the latitude and longitude (X and Z coordinates), where the grass is at (for example) elevation (Y coordinate) 110, we can calculate the Y levels where the target ore might be present.
Cassiterite has a small chance (0.007 tries per chunk) of generating near enough to the surface to spawn nuggets of ore, between 92% and 98% of the surface level. The average radius of these shallow deposits is 3 ± 0.5 in a disc shape that can be distorted in the same way that the terrain above is distorted by hills and valleys.
| % of surface level | Hypothetical surface level | Limit of elevation range | |
|---|---|---|---|
| Min | 0.92 | x 110 | = 101.2 |
| Max | 0.98 | x 110 | = 107.8 |
So, a "surface deposit" of tin cannot exist deeper than Y 101.
However, cassiterite also gets 7.0 tries per chunk to generate deep deposits, between 40% and 75% of the surface level, and the average radius of these discs is significantly bigger: 5 ± 3.
| % of surface level | Hypothetical surface level | Limit of elevation range | |
|---|---|---|---|
| Min | 0.40 | x 110 | = 44 |
| Max | 0.75 | x 110 | = 82.5 |
Cassiterite also gets 0.1 tries per chunk to generate larger discs, 12 ± 3, between 0% and 60% of the surface level.
| % of surface level | Hypothetical surface level | Limit of elevation range | |
|---|---|---|---|
| Min | 0.0 | x 110 | = 101.2 |
| Max | 0.60 | x 110 | = 107.8 |
The only elevation tin could not generate is Y 83 - Y 101.
Configure
For Standard playstyle, Node mode is by default enabled with a radius of 6[1] blocks; for Exploration playstyle, the radius is 8[2] blocks; for Wilderness Survival and Homo Sapiens playstyles, Node mode is disabled[3]. It's also disabled for worlds created via vintagestoryserver.exe with default serverconfig settings.
You can enable or adjust the radius via a server command. By default, players have admin privileges for singleplayer worlds. Press Tab to open the chat overlay, type /worldconfig propickNodeSearchRadius and press Enter to check what the current radius is. To set a radius of 6, type /worldconfig propickNodeSearchRadius 6 and press Enter, then exit and relaunch the world for the change to take effect.
Radius 6 (default for Standard playstyle)

Radius 8 (default for Exploration playstyle)


Radius 6 checks a total of 2197 blocks. Its relatively high precision can make it quicker to locate an ore deposit once a verified reading is received. Radius 8 checks a total of 4913 blocks. Its relatively high range can make it quicker to get a verified reading of nearby ore, but slower to pinpoint the ore's location.
References
- ↑ Line 70 of [AssemblyInfo.cs]
- ↑ Line 104 of [AssemblyInfo.cs]
- ↑ Line 228 of [AssemblyInfo.cs] applies if no other value is assigned.
| Wiki Navigation | |
|---|---|
| Vintage Story | Guides • Frequently Asked Questions • Soundtrack • Versions • Controls |
| Game systems | Crafting • Knapping • Clay forming • Smithing • Cooking • Temperature • Hunger • Mining • Temporal stability • Mechanical power • Trading • Farming • Animal husbandry |
| World | World generation • Biomes • Weather • Temporal storms |
| Items | Tools • Weapons • Armor • Clothing • Bags • Materials • Food |
| Blocks | Terrain • Plants • Decorative • Lighting • Functional • Ore |
| Entities | Hostile entities • Animals • NPCs • Players |
| Miscellaneous | List of client commands • List of server commands • Creative Starter Guide • Bot System • WorldEdit • Cinematic Camera • Adjustable FPS Video Recording • ServerBlockTicking |