Mechanical power: Difference between revisions
No edit summary |
(added a guide and moved the private one to last position) |
||
| (107 intermediate revisions by 22 users not shown) | |||
| Line 1: | Line 1: | ||
''The mechanical work horse is the path to prosperity.'' < | <languages/><translate> | ||
<!--T:53--> | |||
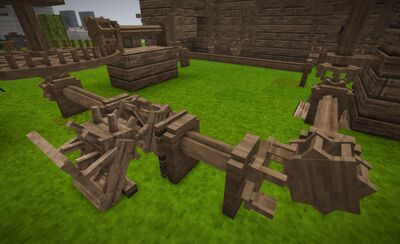
[[File:Powertrain.jpg|400px|right|thumb|Simple power train configuration.]] | |||
<!--T:105--> | |||
'''''The mechanical work horse is the path to prosperity.''''' | |||
<!--T:92--> | |||
Mechanical power is a mechanic that allows for the powering of different machinery through the harnessing of renewable energy (such as wind) via structures such as the windmill. Currently, it can be used to automate querns for milling, helve hammers to work iron blooms or smith metal plates, and pulverizers to crush materials into their powdered form. | |||
Although it can be used to power a single machine, with a series of axle and gear connections, you can make what’s called a power train. This allows for the connection of multiple machinery at a time, working in tandem. | |||
</translate> | |||
__TOC__ | __TOC__ | ||
Mechanical power can be used to | <translate> | ||
== Mechanical Power Sources == <!--T:54--> | |||
=== The windmill === <!--T:55--> | |||
<!--T:229--> | |||
A {{ll|windmill|windmill}} is a multi-block structure used to harness wind power and transform it into mechanical power. There are many possible designs for a windmill but factors to consider include: | |||
* Location windspeed | |||
* Height - for wind and clearance for sails | |||
* Accommodation of various power train designs and equipment | |||
* Amount of power needed to drive attached equipment | |||
Detailed information on the windmill can be found on the {{ll|Windmill|windmill page}}. | |||
<!--T:91--> | |||
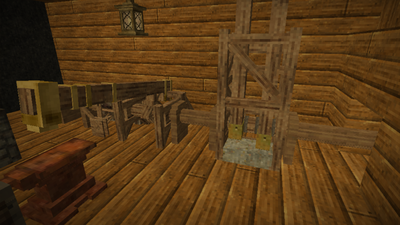
[[File:Example Power Train.png|400px|right|thumb|Example of working power train connecting to both a helve hammer and pulverizer.]] | |||
=== Other === <!--T:97--> | |||
<!--T:106--> | |||
Other sources include the {{ll|Auto rotor|Auto rotor}} (Creative mode only). | |||
==Power train== <!--T:56--> | |||
<!--T:107--> | |||
A series of interconnected axles, gears, brakes and other mechanisms that allow for an uninterrupted flow of mechanical energy through multiple machines at the same time. | |||
=== Components required for a power train === <!--T:98--> | |||
====Wooden axle==== <!--T:99--> | |||
<!--T:108--> | |||
Used to transmit the wind power in a straight line. These may be placed vertically or horizontally in any of the cardinal directions. | |||
</translate> | |||
{{Crafting | |||
|Ingredients= 1x {{ll|Hammer|<translate><!--T:109--> Hammer</translate>}}<br>1x {{ll|Chisel|<translate><!--T:110--> Chisel</translate>}}<br>1x {{ll|Log|<translate><!--T:111--> Log</translate>}}<br>1x {{ll|Fat|<translate><!--T:112--> Fat</translate>}} | |||
|Grid/CraftingCode={{Grid/Crafting | |||
|A1=Copper hammer|A1-link=Special:MyLanguage/Hammer|A1_name=<translate><!--T:113--> Hammer</translate> | |||
|A2=Copper Chisel|A2-link=Special:MyLanguage/Chisel|A2_name=<translate><!--T:114--> Chisel</translate> | |||
|A3=Log (Oak)|A3-link=Special:MyLanguage/Log|A3_name=<translate><!--T:115--> Log</translate> | |||
|B3=Fat|B3-link=Special:MyLanguage/Fat|B3_name=<translate><!--T:116--> Fat</translate> | |||
|Output=Wooden Axle|OA=2|Output_name=<translate><!--T:117--> Wooden axle</translate> | |||
}}}} | |||
<translate> | |||
====Angled gears==== <!--T:100--> | |||
<!--T:118--> | |||
Allow the mechanical power to make a right angle turn by connecting a horizontal axle to a vertical one. Often needed depending on the design of the power train. ''Note: if you're unable to add an angled gear to an axle, try placing a block under the axle as a temporary support, then try again with the gear.'' | |||
</translate> | |||
{{Crafting | |||
|Ingredients=1x {{ll|Hammer|<translate><!--T:119--> Hammer</translate>}}<br>1x {{ll|Saw|<translate><!--T:120--> Saw</translate>}}<br>2x {{ll|Stick|<translate><!--T:121--> Stick</translate>}}<br>1x {{ll|Chisel|<translate><!--T:122--> Chisel</translate>}}<br>1x {{ll|Resin|<translate><!--T:123--> Resin</translate>}}<br>1x {{ll|Log|<translate><!--T:124--> Log</translate>}}<br>1x {{ll|Fat|<translate><!--T:125--> Fat</translate>}} | |||
|Grid/CraftingCode={{Grid/Crafting | |||
|A1=Copper hammer|A1-link=Special:MyLanguage/Hammer|A1_name=<translate><!--T:126--> Hammer</translate> | |||
|B1=Copper Saw|B1-link=Special:MyLanguage/Saw|B1_name=<translate><!--T:127--> Saw</translate> | |||
|A2=Stick|A2-link=Special:MyLanguage/Stick|A2_name=<translate><!--T:128--> Stick</translate> | |||
|B2=Copper Chisel|B2-link=Special:MyLanguage/Chisel|B2_name=<translate><!--T:129--> Chisel</translate> | |||
|C2=Stick|C2-link=Special:MyLanguage/Stick|C2_name=<translate><!--T:130--> Stick</translate> | |||
|A3=Resin|A3-link=Special:MyLanguage/Resin|A3_name=<translate><!--T:131--> Resin</translate> | |||
|B3=Log (Oak)|B3-link=Special:MyLanguage/Log|B3_name=<translate><!--T:132--> Log</translate> | |||
|C3=Fat|C3-link=Special:MyLanguage/Fat|C3_name=<translate><!--T:133--> Fat</translate> | |||
|Output=Angled Gears|Output_name=<translate><!--T:134--> Angled gears</translate> | |||
}}}} | |||
<translate> | |||
=== Optional components for a power train === | |||
A '''brake''' can be {{using|used}} to completely stop a power train. A '''transmission''' instead interrupts a power train temporarily or separates two parts of the power train (for example, to disable one machine to free up power for another machine). To use a transmission, a '''clutch''' needs to be placed beside it, functioning similar to the brake. | |||
A '''large gear''' can be used to exchange speed for torque, or vice versa, similar to changing gears on a bicycle or car. | |||
====Brake==== <!--T:101--> | |||
<!--T:135--> | |||
Can be used to apply a lot of resistance to the mechanism in order to bring the entire train to a halt. | |||
</translate> | |||
{{Crafting | |||
|Ingredients=1x {{ll|Hammer|<translate><!--T:136--> Hammer</translate>}}<br>1x {{ll|Chisel|<translate><!--T:137--> Chisel</translate>}}<br>1x {{ll|Log|<translate><!--T:138--> Log</translate>}}<br>1x {{ll|Wooden axle|Wooden axle}}<br>2x {{ll|Resin|<translate><!--T:139--> Resin</translate>}} | |||
|Grid/CraftingCode={{Grid/Crafting | |||
|A1= Copper hammer|A1-link=Special:MyLanguage/Hammer|A1_name=<translate><!--T:140--> Hammer</translate> | |||
|A2= Copper Chisel|A2-link=Special:MyLanguage/Chisel|A2_name=<translate><!--T:141--> Chisel</translate> | |||
|A3= Oak log|A3-link=Special:MyLanguage/Log|A3_name=<translate><!--T:142--> Log</translate> | |||
|B3= Wooden Axle|B3-link=Special:MyLanguage/Wooden axle|B3_name=<translate><!--T:143--> Wooden axle</translate> | |||
|C3= Resin|C3N=2|C3-link=Special:MyLanguage/Resin|C3_name=<translate><!--T:144--> Resin</translate> | |||
|Output=Brake|Output_name=<translate><!--T:145--> Brake</translate> | |||
}}}} | |||
<translate> | |||
====Clutch and transmission==== <!--T:57--> | |||
<!--T:146--> | |||
When placed together can be used to interrupt flow of energy to a specific branch of the power train. | |||
</translate> | |||
<div style="display:flex;flex-wrap:wrap;"> | |||
<div style="margin-right:10px"> | |||
{{Crafting | |||
|Ingredients=1x {{ll|Hammer|<translate><!--T:147--> Hammer</translate>}}<br>1x {{ll|Chisel|<translate><!--T:148--> Chisel</translate>}}<br>1x {{ll|Saw|<translate><!--T:149--> Saw</translate>}}<br>8x {{ll|Board|<translate><!--T:150--> Board</translate>}}<br>1x {{ll|Log|<translate><!--T:151--> Log</translate>}}<br>8x {{ll|Stick|<translate><!--T:152--> Stick</translate>}}<br>2x {{ll|Resin|<translate><!--T:153--> Resin</translate>}}<br>2x {{ll|Fat|<translate><!--T:154--> Fat</translate>}} | |||
|Grid/CraftingCode={{Grid/Crafting | |||
|A1= Copper hammer|A1-link=Special:MyLanguage/Hammer|A1_name=<translate><!--T:155--> Hammer</translate> | |||
|B1= Copper Chisel|B1-link=Special:MyLanguage/Chisel|B1_name=<translate><!--T:156--> Chisel</translate> | |||
|C1= Copper Saw|C1-link=Special:MyLanguage/Saw|C1_name=<translate><!--T:157--> Saw</translate> | |||
|A2= Oak Board|A2N=8|A2-link=Special:MyLanguage/Board|A2_name=<translate><!--T:158--> Board</translate> | |||
|B2= Oak log|B2-link=Special:MyLanguage/Log|B2_name=<translate><!--T:159--> Log</translate> | |||
|C2= Stick|C2N=8|C2-link=Special:MyLanguage/Stick|C2_name=<translate><!--T:160--> Stick</translate> | |||
|A3= Resin|A3N=2|A3-link=Special:MyLanguage/Resin|A3_name=<translate><!--T:161--> Resin</translate> | |||
|B3= Fat|B3N=2|B3-link=Special:MyLanguage/Fat|B3_name=<translate><!--T:162--> Fat</translate> | |||
|Output=Clutch|Output_name=<translate><!--T:163--> Clutch</translate> | |||
}}}} | |||
</div> | |||
<!--T:58--> | |||
<div style="margin-right:10px"> | |||
{{Crafting | |||
|Ingredients=1x {{ll|Hammer|<translate><!--T:164--> Hammer</translate>}}<br>1x {{ll|Chisel|<translate><!--T:165--> Chisel</translate>}}<br>1x {{ll|Saw|<translate><!--T:166--> Saw</translate>}}<br>2x {{ll|Angled gears|<translate><!--T:167--> Angled gears</translate>}}<br>8x {{ll|Board|<translate><!--T:168--> Board</translate>}}<br>2x {{ll|Resin|<translate><!--T:169--> Resin</translate>}}<br>1x {{ll|Fat|<translate><!--T:170--> Fat</translate>}} | |||
|Grid/CraftingCode={{Grid/Crafting | |||
|A1= Copper hammer|A1-link=Special:MyLanguage/Hammer|A1_name=<translate><!--T:171--> Hammer</translate> | |||
|B1= Copper Chisel|B1-link=Special:MyLanguage/Chisel|B1_name=<translate><!--T:172--> Chisel</translate> | |||
|C1= Copper Saw|C1-link=Special:MyLanguage/Saw|C1_name=<translate><!--T:173--> Saw</translate> | |||
|A2= Angled Gears|A2-link=Special:MyLanguage/Angled gears|A2_name=<translate><!--T:174--> Angled gears</translate> | |||
|B2= Oak Board|B2N=8|B2-link=Special:MyLanguage/Board|B2_name=<translate><!--T:175--> Board</translate> | |||
|C2= Angled Gears|C2-link=Special:MyLanguage/Angled gears|C2_name=<translate><!--T:176--> Angled gears</translate> | |||
|A3= Resin|A3N=2|A3-link=Special:MyLanguage/Resin|A3_name=<translate><!--T:177--> Resin</translate> | |||
|B3= Fat|B3-link=Special:MyLanguage/Fat|B3_name=<translate><!--T:178--> Fat</translate> | |||
|Output=Transmission|Output_name=<translate><!--T:179--> Transmission</translate> | |||
}}}} | |||
</div> | |||
</div> | |||
<translate> | |||
====Large wooden gear==== <!--T:95--> | |||
<!--T:180--> | |||
Allows to combine power from multiple sources, or distribute power from single source to multiple consumers. Can also be used to increase rotational speed at the cost of decreasing the torque, and vice-versa. | |||
</translate> | |||
<div style="display:flex;flex-wrap:wrap;"> | |||
<div style="margin-right:10px"> | |||
{{Crafting | |||
|Ingredients=1x {{ll|Hammer|<translate><!--T:181--> Hammer</translate>}}<br>1x {{ll|Chisel|<translate><!--T:182--> Chisel</translate>}}<br>1x {{ll|Saw|<translate><!--T:183--> Saw</translate>}}<br>5x {{ll|Board|<translate><!--T:184--> Board</translate>}}<br>2x {{ll|Resin|<translate><!--T:185--> Resin</translate>}}<br>12x {{ll|Stick|<translate><!--T:186--> Stick</translate>}} | |||
|Grid/CraftingCode={{Grid/Crafting | |||
|A1= Copper hammer|A1-link=Special:MyLanguage/Hammer|A1_name=<translate><!--T:187--> Hammer</translate> | |||
|B1= Copper Chisel|B1-link=Special:MyLanguage/Chisel|B1_name=<translate><!--T:188--> Chisel</translate> | |||
|C1= Copper Saw|C1-link=Special:MyLanguage/Saw|C1_name=<translate><!--T:189--> Saw</translate> | |||
|A2= Oak Board|A2N=2|A2-link=Special:MyLanguage/Board|A2_name=<translate><!--T:190--> Board</translate> | |||
|B2= Resin|B2N=2|B2-link=Special:MyLanguage/Resin|B2_name=<translate><!--T:191--> Resin</translate> | |||
|C2= Stick|C2N=12|C2-link=Special:MyLanguage/Stick|C2_name=<translate><!--T:192--> Stick</translate> | |||
|A3= Oak Board|A3-link=Special:MyLanguage/Board|A3_name=<translate><!--T:193--> Board</translate> | |||
|B3= Oak Board|B3-link=Special:MyLanguage/Board|B3_name=<translate><!--T:194--> Board</translate> | |||
|C3= Oak Board|C3-link=Special:MyLanguage/Board|C3_name=<translate><!--T:195--> Board</translate> | |||
|Output=large gear section|Output_name=<translate><!--T:196--> Large gear section</translate> | |||
}}}} | |||
</div> | |||
<div style="margin-right:10px"> | |||
{{Crafting | |||
|Ingredients=4x {{ll|Large gear section|<translate><!--T:233--> Large gear section</translate>}}<br>24x {{ll|Board|<translate><!--T:197--> Board</translate>}}<br>1x {{ll|Wooden axle|<translate><!--T:234--> Wooden axle</translate>}} | |||
|Grid/CraftingCode={{Grid/Crafting | |||
|A1= large gear section|A1-link=Special:MyLanguage/Large gear section|A1_name=<translate><!--T:198--> Large gear section</translate> | |||
|B1= Oak Board|B1N=6|B1-link=Special:MyLanguage/Board|B1_name=<translate><!--T:199--> Board</translate> | |||
|C1= large gear section|C1-link=Special:MyLanguage/Large gear section|C1_name=<translate><!--T:200--> Large gear section</translate> | |||
|A2= Oak Board|A2N=6|A2-link=Special:MyLanguage/Board|A2_name=<translate><!--T:201--> Board</translate> | |||
|B2= Wooden Axle|B2-link=Special:MyLanguage/Wooden axle|B2_name=<translate><!--T:202--> Wooden axle</translate> | |||
|C2= Oak Board|C2N=6|C2-link=Special:MyLanguage/Board|C2_name=<translate><!--T:203--> Board</translate> | |||
|A3= large gear section|A3-link=Special:MyLanguage/Large gear section|A3_name=<translate><!--T:204--> Large gear section</translate> | |||
|B3= Oak Board|B3N=6|B3-link=Special:MyLanguage/Board|B3_name=<translate><!--T:205--> Board</translate> | |||
|C3= large gear section|C3-link=Special:MyLanguage/Large gear section|C3_name=<translate><!--T:206--> Large gear section</translate> | |||
|Output=largegear3|Output_name=<translate><!--T:207--> Large wooden gear</translate> | |||
}}}} | |||
</div> | |||
</div> | |||
<translate> | |||
==Input and output== <!--T:59--> | |||
<!--T:60--> | |||
Input and output is handled using chutes, hoppers and optionally {{ll|Chest|chests}}. Hoppers accept multiple stacks of input items, which are then transported via chutes towards the input slot of an eligible block. Chutes can also grab items directly from chests. A special type of chute, the Archimedes screw, can transport items upward provided it is powered. | |||
====Hopper ''(optional)''==== <!--T:61--> | |||
== | <!--T:208--> | ||
Used for material input/output. Crafted directly from copper plates. | |||
</translate> | |||
{{Crafting | |||
|Ingredients=3x {{ll|Metal plate|<translate><!--T:230--> Copper plate</translate>}} | |||
|Grid/CraftingCode={{Grid/Crafting | |||
|A1=Copper plate|A1-link=Special:MyLanguage/Metal plate|A1_name=<translate><!--T:209--> Copper plate</translate> | |||
|C1= Copper plate|C1-link=Special:MyLanguage/Metal plate|C1_name=<translate><!--T:210--> Copper plate</translate> | |||
|B2= Copper plate|B2-link=Special:MyLanguage/Metal plate|B2_name=<translate><!--T:211--> Copper plate</translate> | |||
|Output=hopper|Output_name=<translate><!--T:212--> Hopper</translate> | |||
}}}} | |||
<translate> | |||
====Chute ''(optional)''==== <!--T:62--> | |||
{{Grid/Crafting | <!--T:213--> | ||
|A1=| | Used to transfer materials between hoppers, chests, other containers and various machinery. These blocks can be placed directionally, with the output facing away from the player. Chutes are crafted from chute sections, which need to be crafted on an anvil with 1 copper ingot per section. As even the straight chute needs at least two sections, a minimum of two copper ingots is necessary for one chute.<br> | ||
| | ''Note'': Chutes can be rotated using a {{ll|wrench|wrench}}. | ||
| | </translate> | ||
| | <div style="display:flex;flex-wrap:wrap;"> | ||
| | <div style="margin-right:10px"> | ||
| | {{Crafting | ||
|Output= | |Ingredients=2x {{ll|Chute section|<translate><!--T:231--> Chute section</translate>}} | ||
|Grid/CraftingCode={{Grid/Crafting | |||
|A1=Chutesection-copper|A1-link=Special:MyLanguage/Chute section|A1_name=<translate><!--T:214--> Chute section</translate> | |||
|B1=Chutesection-copper|B1-link=Special:MyLanguage/Chute section|B1_name=<translate><!--T:215--> Chute section</translate> | |||
|Output=Chute-straight|Output_name=<translate><!--T:216--> Straight chute</translate> | |||
}}}} | |||
</div> | |||
<div style="margin-right:10px"> | |||
{{Crafting | |||
|Ingredients=2x {{ll|Chute section|<translate><!--T:232--> Chute section</translate>}} | |||
|Grid/CraftingCode={{Grid/Crafting | |||
|A1=Chutesection-copper|A1-link=Special:MyLanguage/Chute section|A1_name=<translate><!--T:217--> Chute section</translate> | |||
|B2=Chutesection-copper|B2-link=Special:MyLanguage/Chute section|B2_name=<translate><!--T:218--> Chute section</translate> | |||
|Output=elbow chute|Output_name=<translate><!--T:219--> Elbow chute</translate> | |||
}}}} | |||
</div> | |||
</div> | |||
<translate> | |||
==Advanced power trains== <!--T:96--> | |||
<!--T:102--> | |||
| | [[File:Large_gear_setup_1.png|400px|thumb|right|Simple large gear setup that combines torque from three power sources into a single output. 1, 2 and 3 are {{ll|Auto rotor|creative auto rotors}} which provide power, 4 is the output.]] | ||
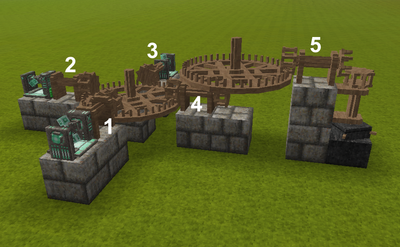
| | [[File:Large_gear_setup_3.png|400px|thumb|right|More complex setup with two large gears. Torque from sources 1, 2 and 3 is combined by lower gear into a single output (4), which then goes through the upper gear (5) to increase rotational speed at the cost of reducing torque.]] | ||
| | |||
| | |||
<!--T:220--> | |||
To build complex and efficient power trains it's important to understand relation between ''speed'' and ''torque'', and how they are affected by ''resistance'' of a given mechanical system. | |||
* | *'''Resistance''' defines how much rotational energy the system needs in order to continuously operate. If there is not enough torque to counteract resistance, entire power train will lose speed or even come to a complete halt. Each element of the system, such as axles, gears and transmissions, has some resistance. However, machinery doing useful work tends to contribute the most. | ||
*'''Torque''' is a measure of rotational force and directly counteracts resistance. Adding more torque to the system can help it overcome the resistance of connected machinery, allowing faster operation. However, as soon as resistance is completely overcome - there is no point in further increasing the torque. | |||
* | *'''Speed''' defines the rate at which machines in the system perform their job. Increasing the speed allows for faster operation, but only if there is enough torque to sustain it; otherwise most of the speed will be lost to resistance. | ||
===Large wooden gear=== <!--T:103--> | |||
<!--T:221--> | |||
Conversion of torque to speed and vice-versa can be achieved with the help of large wooden gear. Central shaft and rim of the gear can both be used for input or output. Direction of the power flow defines the conversion. | |||
* Using shaft as input and rim as the output allows to increase the speed by a factor of 5, at the cost of reducing the torque by the same factor; | |||
* Using rim as input and shaft as the output allows to achieve the opposite effect, increasing the torque by a factor of 5 and decreasing speed by the same factor; | |||
* Using rim as input for multiple power sources allows to combine the torque from those sources, while resulting speed will be defined by the fastest input; | |||
* Using rim as input for single power source allows to distribute that energy to multiple outputs, conserving speed and torque. | |||
As evident from example of complex gear setup on this page, multiple gears can be used together to achieve desired conversion and distribution of energy. | |||
==== | ==Automated machinery== <!--T:64--> | ||
===Milling=== <!--T:104--> | |||
{{ | <!--T:222--> | ||
:''See also {{ll|quern|Quern}}.'' | |||
| | |||
<!--T:223--> | |||
Mechanized or not, querns enable the player to grind grain, as well as some minerals and stones into their processed forms. For mechanized milling, the quern must be attached to a functioning power train.<br> | |||
Querns can be automated further with the use of hoppers, chutes and chests. | |||
===Smithing=== <!--T:70--> | |||
<!--T:224--> | |||
:''See also {{ll|helve hammer|Helve hammer}}.'' | |||
<!--T:225--> | |||
A helve hammer can help the player in processing iron blooms and blister steel, as well as making plates of any metal type. It requires mechanical power to operate and there is no practical way to automate the in- and output of materials, since it adheres to the same principles as manual smithing. | |||
=== Crushing === <!--T:77--> | |||
{{ | <!--T:93--> | ||
:''See also {{ll|Pulverizer|Pulverizer}}.'' | |||
| | |||
{{ | <!--T:94--> | ||
| | The pulverizer allows players to crush certain stones and minerals into fine powder to be used for {{ll|Steel Making|steel making}} or {{ll|Dye|dyes}}. There is no other way to obtain these materials. A full pulverizer setup requires a significant investment of boards and metal for the frame, toggle, pounders and caps. | ||
| | |||
==== | == Video tutorials == <!--T:87--> | ||
</translate> | |||
{| class="wikitable" | |||
|- | |||
! <translate> Simple and speedy helve hammer with room to add more rotors</translate> !! <translate><!--T:227--> General guide on mechanical power</translate> !! <translate><!--T:228--> How to build a windmill and helve hammer in 1.13</translate> !! <translate><!--T:226--> Explanation of large gear usage</translate> | |||
|- | |||
| <youtube width="240" height="240">6dvmc71enYA</youtube> || <youtube width="400" height="240">okhOui01wR0</youtube> || <youtube width="400" height="240">h2Pjg2u4LVo</youtube> || <youtube width="400" height="240">ppsP5speLX4</youtube> | |||
|} | |||
<translate> | |||
{{ | </translate> | ||
{{Game navbox}} | |||
[[Category:Mechanisms{{#translation:}}]] | |||
[[Category:Guides{{#translation:}}]] | |||
Latest revision as of 01:05, 7 September 2024
The mechanical work horse is the path to prosperity.
Mechanical power is a mechanic that allows for the powering of different machinery through the harnessing of renewable energy (such as wind) via structures such as the windmill. Currently, it can be used to automate querns for milling, helve hammers to work iron blooms or smith metal plates, and pulverizers to crush materials into their powdered form. Although it can be used to power a single machine, with a series of axle and gear connections, you can make what’s called a power train. This allows for the connection of multiple machinery at a time, working in tandem.
Mechanical Power Sources
The windmill
A windmill is a multi-block structure used to harness wind power and transform it into mechanical power. There are many possible designs for a windmill but factors to consider include:
- Location windspeed
- Height - for wind and clearance for sails
- Accommodation of various power train designs and equipment
- Amount of power needed to drive attached equipment
Detailed information on the windmill can be found on the windmill page.
Other
Other sources include the Auto rotor (Creative mode only).
Power train
A series of interconnected axles, gears, brakes and other mechanisms that allow for an uninterrupted flow of mechanical energy through multiple machines at the same time.
Components required for a power train
Wooden axle
Used to transmit the wind power in a straight line. These may be placed vertically or horizontally in any of the cardinal directions.
| Ingredients | Crafting Recipe |
|---|---|
| 1x Hammer 1x Chisel 1x Log 1x Fat |
Angled gears
Allow the mechanical power to make a right angle turn by connecting a horizontal axle to a vertical one. Often needed depending on the design of the power train. Note: if you're unable to add an angled gear to an axle, try placing a block under the axle as a temporary support, then try again with the gear.
| Ingredients | Crafting Recipe |
|---|---|
| 1x Hammer 1x Saw 2x Stick 1x Chisel 1x Resin 1x Log 1x Fat |
Optional components for a power train
A brake can be used to completely stop a power train. A transmission instead interrupts a power train temporarily or separates two parts of the power train (for example, to disable one machine to free up power for another machine). To use a transmission, a clutch needs to be placed beside it, functioning similar to the brake.
A large gear can be used to exchange speed for torque, or vice versa, similar to changing gears on a bicycle or car.
Brake
Can be used to apply a lot of resistance to the mechanism in order to bring the entire train to a halt.
| Ingredients | Crafting Recipe |
|---|---|
| 1x Hammer 1x Chisel 1x Log 1x Wooden axle 2x Resin |
Clutch and transmission
When placed together can be used to interrupt flow of energy to a specific branch of the power train.
Large wooden gear
Allows to combine power from multiple sources, or distribute power from single source to multiple consumers. Can also be used to increase rotational speed at the cost of decreasing the torque, and vice-versa.
| Ingredients | Crafting Recipe |
|---|---|
| 4x Large gear section 24x Board 1x Wooden axle |
Input and output
Input and output is handled using chutes, hoppers and optionally chests. Hoppers accept multiple stacks of input items, which are then transported via chutes towards the input slot of an eligible block. Chutes can also grab items directly from chests. A special type of chute, the Archimedes screw, can transport items upward provided it is powered.
Hopper (optional)
Used for material input/output. Crafted directly from copper plates.
| Ingredients | Crafting Recipe |
|---|---|
| 3x Copper plate |
Chute (optional)
Used to transfer materials between hoppers, chests, other containers and various machinery. These blocks can be placed directionally, with the output facing away from the player. Chutes are crafted from chute sections, which need to be crafted on an anvil with 1 copper ingot per section. As even the straight chute needs at least two sections, a minimum of two copper ingots is necessary for one chute.
Note: Chutes can be rotated using a wrench.
| Ingredients | Crafting Recipe |
|---|---|
| 2x Chute section |
| Ingredients | Crafting Recipe |
|---|---|
| 2x Chute section |
Advanced power trains
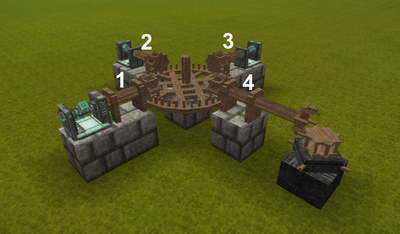
To build complex and efficient power trains it's important to understand relation between speed and torque, and how they are affected by resistance of a given mechanical system.
- Resistance defines how much rotational energy the system needs in order to continuously operate. If there is not enough torque to counteract resistance, entire power train will lose speed or even come to a complete halt. Each element of the system, such as axles, gears and transmissions, has some resistance. However, machinery doing useful work tends to contribute the most.
- Torque is a measure of rotational force and directly counteracts resistance. Adding more torque to the system can help it overcome the resistance of connected machinery, allowing faster operation. However, as soon as resistance is completely overcome - there is no point in further increasing the torque.
- Speed defines the rate at which machines in the system perform their job. Increasing the speed allows for faster operation, but only if there is enough torque to sustain it; otherwise most of the speed will be lost to resistance.
Large wooden gear
Conversion of torque to speed and vice-versa can be achieved with the help of large wooden gear. Central shaft and rim of the gear can both be used for input or output. Direction of the power flow defines the conversion.
- Using shaft as input and rim as the output allows to increase the speed by a factor of 5, at the cost of reducing the torque by the same factor;
- Using rim as input and shaft as the output allows to achieve the opposite effect, increasing the torque by a factor of 5 and decreasing speed by the same factor;
- Using rim as input for multiple power sources allows to combine the torque from those sources, while resulting speed will be defined by the fastest input;
- Using rim as input for single power source allows to distribute that energy to multiple outputs, conserving speed and torque.
As evident from example of complex gear setup on this page, multiple gears can be used together to achieve desired conversion and distribution of energy.
Automated machinery
Milling
- See also Quern.
Mechanized or not, querns enable the player to grind grain, as well as some minerals and stones into their processed forms. For mechanized milling, the quern must be attached to a functioning power train.
Querns can be automated further with the use of hoppers, chutes and chests.
Smithing
- See also Helve hammer.
A helve hammer can help the player in processing iron blooms and blister steel, as well as making plates of any metal type. It requires mechanical power to operate and there is no practical way to automate the in- and output of materials, since it adheres to the same principles as manual smithing.
Crushing
- See also Pulverizer.
The pulverizer allows players to crush certain stones and minerals into fine powder to be used for steel making or dyes. There is no other way to obtain these materials. A full pulverizer setup requires a significant investment of boards and metal for the frame, toggle, pounders and caps.
Video tutorials
| Simple and speedy helve hammer with room to add more rotors | General guide on mechanical power | How to build a windmill and helve hammer in 1.13 | Explanation of large gear usage |
|---|---|---|---|
| Wiki Navigation | |
|---|---|
| Vintage Story | Guides • Frequently Asked Questions • Soundtrack • Versions • Controls |
| Game systems | Crafting • Knapping • Clay forming • Smithing • Cooking • Temperature • Hunger • Mining • Temporal stability • Mechanical power • Trading • Farming • Animal husbandry |
| World | World generation • Biomes • Weather • Temporal storms |
| Items | Tools • Weapons • Armor • Clothing • Bags • Materials • Food |
| Blocks | Terrain • Plants • Decorative • Lighting • Functional • Ore |
| Entities | Hostile entities • Animals • NPCs • Players |
| Miscellaneous | List of client commands • List of server commands • Creative Starter Guide • Bot System • WorldEdit • Cinematic Camera • Adjustable FPS Video Recording • ServerBlockTicking |
