Modding:Creating A Code Mod: Difference between revisions
m (Finished) |
|||
| Line 19: | Line 19: | ||
* [https://www.youtube.com/watch?v=iC3CJcYxkl0 Starting with Visual Studio (YouTube)] | * [https://www.youtube.com/watch?v=iC3CJcYxkl0 Starting with Visual Studio (YouTube)] | ||
* [https://learn.microsoft.com/en-gb/dotnet/core/tutorials/with-visual-studio?pivots=dotnet-7-0 Create a .NET console application using Visual Studio (Microsoft.com)] | * [https://learn.microsoft.com/en-gb/dotnet/core/tutorials/with-visual-studio?pivots=dotnet-7-0 Create a .NET console application using Visual Studio (Microsoft.com)] | ||
As well as these, the "[https://www.youtube.com/watch?v=9THmGiSPjBQ&list=PLdo4fOcmZ0oULFjxrOagaERVAMbmG20Xe&index=1 C# for beginners]" tutorial set on YouTube is great for learning the basics of C# and dotnet. Please keep in mind that this series uses ''Visual Studio Code'', which is a different IDE to ''Visual Studio''. | |||
== Creating a New Mod == | == Creating a New Mod == | ||
Latest revision as of 05:43, 28 May 2024
This page was last verified for Vintage Story version 1.19.8.
Prerequisites
Before creating a code mod, you need to have completed the Preparing For Code Mods tutorial. This will show you how to setup your development environment, install dotnet, and install the modding template. If you have done that, you can carry on with this tutorial.
This tutorial is suitable for modders using Visual Studio. If you have chosen to use a different IDE, please refer to the older Setting up your Development Environment tutorial.
Updating the Templates
Before creating your mod, it is important to check for any updates to the Vintage Story template. Open Windows PowerShell or the command prompt, and enter the following command:
dotnet new update
This will check for updates for all templates, and install them if needed.
Recommended Knowledge
Before continuing, it is highly advisable to have some knowledge of Visual Studio and the C# programming language. These topics are out of the scope of this tutorial, however if you can understand the following tutorials, you should be okay:
- Starting with Visual Studio (YouTube)
- Create a .NET console application using Visual Studio (Microsoft.com)
As well as these, the "C# for beginners" tutorial set on YouTube is great for learning the basics of C# and dotnet. Please keep in mind that this series uses Visual Studio Code, which is a different IDE to Visual Studio.
Creating a New Mod
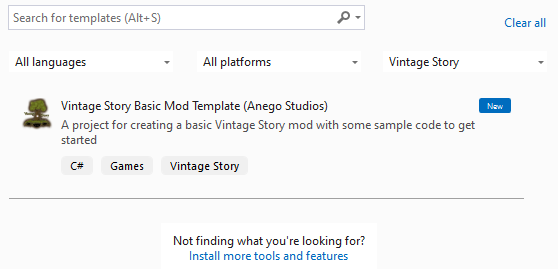
To create a new code mod, launch Visual Studio, and select 'Create a new project'. In the create menu, select Vintage Story from the dropdown furthest to the right. This will filter the list of templates, to only show ones with the "Vintage Story" project type.
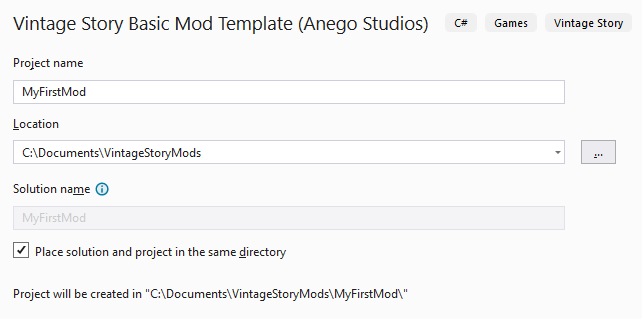
Select the 'Vintage Story Basic Mod Template' and click next. This will load a new menu asking for a project name, location, and solution name.
Your project name should follow these requirements:
- Not contain any spaces or punctuation.
- Be formatted in PascalCase.
- Not be abbreviated (Use MyFirstMod instead of MFM).
- Be unique to any other mod on the VS Mod DB.
Your project name will also determine your Mod ID, however this can be altered later.
Your project can be created anywhere, and it is recommended to check the "Place solution and project in the same directory" checkbox.
When you have entered your details, click 'Create'. Your project will be created and Visual Studio will open.
Project Setup
Solution Explorer
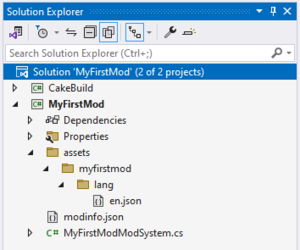
When your project loads, you should see the Solution Explorer on the right-hand-side of Visual Studio. If not, you can open the Solution Explorer by clicking View and Solution Explorer from the top Visual Studio menu bar.
The Solution Explorer is a list of every file for your mod, and this is how you will create, open, and delete mod files. You can double left-click any file or folder to open it. Right clicking a file or folder will give you options to rename, delete, copy, and other file management tasks.
Note that any reference to 'MyFirstMod' will be replaced with whatever your project name is, and 'myfirstmod' will be your lowercase project name.
Mod Info
Double click on the modinfo.json file to open it, and you will see the following JSON code:
{
    "type": "code",
    "modid": "myfirstmod",
    "name": "MyFirstMod",
    "authors": [
        "Unknown"
    ],
    "description": "To be added",
    "version": "1.0.0",
    "dependencies": {
        "game": ""
    }
}
This is the same modinfo file that is in content mods. As this mod is a code mod, this needs to be specified in the type property. To begin, set the name, authors, and description properties to more appropriate values. It is not recommended to change the modid property after creating a mod, as you will also have to rename the assets subfolder and any code that references your mod's domain or id.
Testing your Mod
To run your mod, look for the run menu immediately below the menu bar. Ensure the dropdown list on the right has your project name selected, and not "CakeBuild", and that the run button/dropdown next to that says "Client" and not "Server". To test your mod, either press the "Client" button, or press F5.
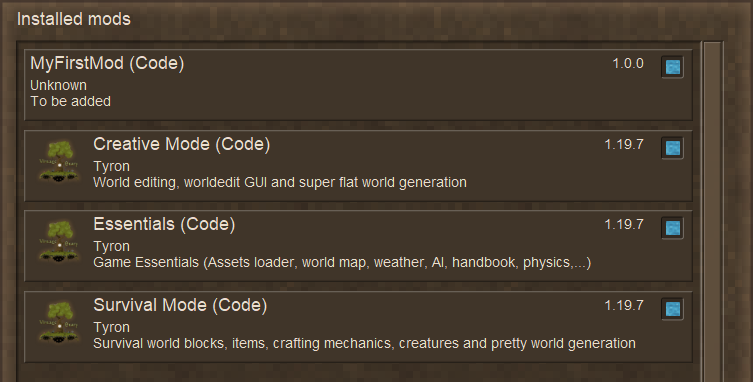
Visual Studio will build your mod, and launch Vintage Story with the mod attached. Vintage Story will load to the main menu, so select the Mod Manager menu and you should see your mod.
If you can see your mod in this list, congratulations! Note that any changes made in your modinfo file will take effect here.
What's Next?
Now your mod has been created, it may be time to go through the Basic Code Tutorials. These will show you how to create advanced block functionality, advanced item functionality, and your very own command.
| Code Modding | |||||||
|---|---|---|---|---|---|---|---|
| Basics | Code Mods • Preparing For Code Mods • Creating A Code Mod | ||||||
| Tutorials |
|
||||||
| Advanced | Server-Client Considerations • Setting up your Development Environment • Advanced Blocks • Advanced Items • Block and Item Interactions • Block Behavior • Block Entity • Particle Effects • World Access • Inventory Handling • Commands • GUIs • Network API • Monkey patching (Harmony) | ||||||
| Data Management | VCDBS format • Savegame Moddata • ModConfig File • Chunk Moddata • Serialization Formats • TreeAttribute | ||||||
| Worldgen | WorldGen API • NatFloat • EvolvingNatFloat | ||||||
| Rendering | Shaders and Renderers | ||||||
Wondering where some links have gone?
The modding navbox is going through some changes! Check out Navigation Box Updates for more info and help finding specific pages.
| Modding | |
|---|---|
| Modding Introduction | Getting Started • Theme Pack |
| Content Modding | Content Mods • Developing a Content Mod • Basic Tutorials • Intermediate Tutorials • Advanced Tutorials • Content Mod Concepts |
| Code Modding | Code Mods • Setting up your Development Environment |
| Property Overview | Item • Entity • Entity Behaviors • Block • Block Behaviors • Block Classes • Block Entities • Block Entity Behaviors • Collectible Behaviors • World properties |
| Workflows & Infrastructure | Modding Efficiency Tips • Mod-engine compatibility • Mod Extensibility • VS Engine |
| Additional Resources | Community Resources • Modding API Updates • Programming Languages • List of server commands • List of client commands • Client startup parameters • Server startup parameters Example Mods • API Docs • GitHub Repository |


