Modding:Content Tutorial Simple Item/en: Difference between revisions
(Updating to match new version of source page) |
(No difference)
|
Latest revision as of 13:14, 28 March 2024
This page was last verified for Vintage Story version 1.19.4.
Introduction
Objective
In this tutorial, you will create an item - A simple wand! Although this item will have no real functionality, it will demonstrate how to create assets in json, as well as how to use shapes, textures, and lang files.
Assets
Before starting, it is recommended you download the workspace and assets for this tutorial. The completed files can also be found here.
This tutorial starts with the following assets:
- Mod Setup & Folder Structure
- Empty item file
- Template lang file
- Item shape file
- Item texture file
Prerequisites
This tutorial will assume you understand the following topics:
Using the downloaded workspace, have a look at the files that currently exist.
- modinfo.json - The mod info file, which registers your mod with the ID 'simpleitem'.
- modicon.png - The mod icon file, which will be displayed on the mod manager menu.
- assets/simpleitem/itemtypes/simplewand.json - An empty file, this is where you shall put the code for your item.
- assets/simpleitem/lang/en.json - A sample language file, which is where you will add your translation values.
- assets/simpleitem/shapes/item/simplewand.json - A shape file for the wand.
- assets/simpleitem/textures/item/simplewand.png - A texture file for the wand.
Creating the Item
In order to create an item, a file must be created inside the itemtypes folder. If using the provided workspace, there already exists an item file called simplewand. Open this file in your IDE.
The most important property when creating an asset is the code, also known as an ID. To begin, copy and paste this into the opened simplewand file.
{
  "code": "simplewand"
}
Remember that json files are a set of keys to values. The key, in this example, is "code", and the value is "simplewand". Note that the item file starts and ends in curly brackets ({ }), meaning it is a single object. Now that your itemtype file has a code, it will now be created and registered in game. However, you need a way of accessing the item. To do this, add a new property:
{
  "code": "simplewand",
  "creativeinventory": {
    "general": [ "*" ]
  }
}
Notice that each property is seperated using a comma. The new property, "creativeinventory" tells the game what creative tab this item will be placed in. The syntax of this particular property is a little bit more complex, but don't worry about it for now. All this does is add the item into the "general" creative tab.
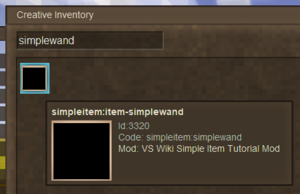
If you were to launch Vintage Story and enable your mod, you will see the item in the creative menu!
Ideally, you do not want your item to be a large black box.
Adding the Shape & Texture
The shape and texture files exist in the assets, so why isn't the item being rendered correctly?
If an asset wishes to use a certain shape or texture, then it must specify this within its json file. Replace your current itemtype json with the following:
{
  "code": "simplewand",
  "creativeinventory": {
    "general": [ "*" ]
  },
  "texture": {
    "base": "item/simplewand"
  },
  "shape": {
    "base": "item/simplewand"
  }
}
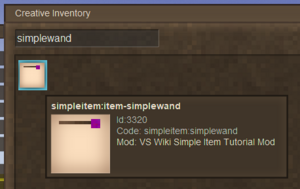
Two new properties have been added - texture and shape. Remember that the shape is a 3D representation of our item, and the texture is a 2D image that is mapped onto our shape, and we should include both to ensure our item is rendered correctly. It may seem confusing that both the texture and shape values appear to be the same, but the game looks for these in different places. To find shapes, the game automatically looks in the mod's shapes folder, whereas for textures it looks in the mod's textures folder.
If you run the game again, you'll notice some changes.
Now, that certainly looks closer to what we wanted, but the position of the item is wrong.
Positioning the Item
Your item is nearly complete, however the 3d object does not have the correct transformation. A transformation, in 3d graphics, refers to an object's position, rotation, and scale.
Using the Transform Editor
To allow modders to easily position items and blocks correctly, Vintage Story utilises a transform editor that can be accessed in game. When in game, hold the item you wish to position and use the command '.tfedit' to open the transform editor.
The transform editor allows you to select where the object is rendered, and adjust its transformation directly. The best part about this is the generated json code at the bottom of this editor, which you can copy and paste straight into your item file.
It is recommend to learn how to use the transform editor, since it is an invaluable tool for transforming items and blocks.
Changes made within the transform editor do not modify any files, and will therefore not save. For each item you create, it is recommended to set positions for ground, main hand, and gui. These use the properties groundTransform, tpHandTransform, and guiTransform respectively.
To transform your wand correctly, add the following properties. Don't forget to add a comma after the final curly bracket on the previous shape element.
"guiTransform": {
    "translation": {
      "x": 0,
      "y": 0,
      "z": 0
    },
    "rotation": {
      "x": -89,
      "y": 41,
      "z": 33
    },
    "origin": {
      "x": 0.48,
      "y": 0,
      "z": 0.38
    },
    "scale": 1.78
  },
"groundTransform": {
    "translation": {
      "x": 0,
      "y": 0,
      "z": 0
    },
    "rotation": {
      "x": 0,
      "y": 0,
      "z": 0
    },
    "origin": {
      "x": 0.5,
      "y": 0,
      "z": 0.5
    },
    "scale": 3.4
  },
"tpHandTransform": {
    "translation": {
      "x": -0.45,
      "y": 0.03,
      "z": -0.66
    },
    "rotation": {
      "x": 90,
      "y": 0,
      "z": 0
    },
    "origin": {
      "x": 0.5,
      "y": 0,
      "z": 0.5
    },
    "scale": 0.8
  }
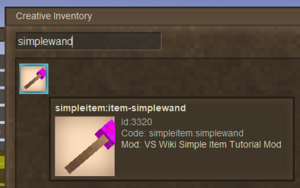
To see if the changes are correct, you can simply reload the world. Hopefully, if everything worked correctly, you should find that your wand now fits better in the player's hand, as well as appearing in the gui more appropriately.
There is one final change before the item is complete.
Renaming the Item
Currently, every instance of the item is called 'simpleitem:item-simplewand'. To fix this, you need to add an entry to the lang file. Open up the provided en.json language file, found in assets/simpleitem/lang.
This sample lang file contains two premade translations, to show you how the file works.
{
  "template-lang-1": "Template Lang 1",
  "template-lang-2": "Template Lang 2"
}
On the left is the translation key, and on the right is the translated string. Add a new entry to this file by adding a comma after the second sample translation, and a new line. In this case, the translation key is 'item-simplewand'. Note that this is how the game is currently displaying the name, minus the mod domain prefix. The translated string for this should be 'Simple Wand'.
{
  "template-lang-1": "Template Lang 1",
  "template-lang-2": "Template Lang 2",
  "item-simplewand": "Simple Wand"
}
Both sample translations are not used, and can be deleted if you want to.
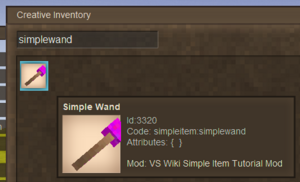
To speed up testing, if you still have Vintage Story open, you can use the command '.reload lang' to reload all lang files. Hovering over your item should show that our lang file has taken effect.
Conclusion
Congratulations, you have now created your first item! This tutorial should have given you some understanding of items, textures, shapes and language files, as well as the basics of modding for Vintage Story!
Next Steps...
If you want to test your knowledge, consider doing the tasks under the Going Further section below.
When you're ready, try out the next tutorial: Simple Block. This will show you how to create a new block with a texture.
Going Further
Want to make some additional changes to this mod? Try and achieve the following things!
Change the color of the wand
| To achieve this... |
| Modify the simplewand.png texture to a different color. |
Change your modid and domain to something else
| To achieve this... |
| Modify both the modid entry in modinfo.json, and change the name of the 'simpleitem' folder in 'assets'. |
Rename your 'Simple Wand'
| To achieve this... |
| Change the entry for simplewand in your en.json lang file. |
Create another wand with a different color
| To achieve this... |
| Create a copy of the texture with a different name and color, and a duplicate itemtype file. In the new itemtype file, change the item code and change the texture property to your new texture path. Don't forget to add new lang translation entries! |
| Content Modding | |||||||||
|---|---|---|---|---|---|---|---|---|---|
| Basics | Content Mods • Developing a Content Mod | ||||||||
| Tutorials |
|
||||||||
| Concepts | Modding Concepts • Variants • Domains • Patching • Remapping • World Properties | ||||||||
| Uncategorized |
|
||||||||
Wondering where some links have gone?
The modding navbox is going through some changes! Check out Navigation Box Updates for more info and help finding specific pages.
| Modding | |
|---|---|
| Modding Introduction | Getting Started • Theme Pack |
| Content Modding | Content Mods • Developing a Content Mod • Basic Tutorials • Intermediate Tutorials • Advanced Tutorials • Content Mod Concepts |
| Code Modding | Code Mods • Setting up your Development Environment |
| Property Overview | Item • Entity • Block • Block Behaviors • Block Classes • Block Entities • Block Entity Behaviors • World properties |
| Workflows & Infrastructure | Modding Efficiency Tips • Mod-engine compatibility • Mod Extensibility • VS Engine |
| Additional Resources | Community Resources • Modding API Updates • Programming Languages • List of server commands • List of client commands • Client startup parameters • Server startup parameters Example Mods • API Docs • GitHub Repository |


