Простой блок
Пожалуйста, сначала прочитайте руководство Система активов, если вы этого еще не сделали. Это руководство познакомит вас с основами добавления блоков в игру, используя JSON файлы. Если вы хотите добавить функциональный блок, то вам необходимо изучить руководство по Продвинутым блокам. С полным списком свойств которые вы можете использовать в json файлах, вы можете ознакомиться здесь.
Простой блок
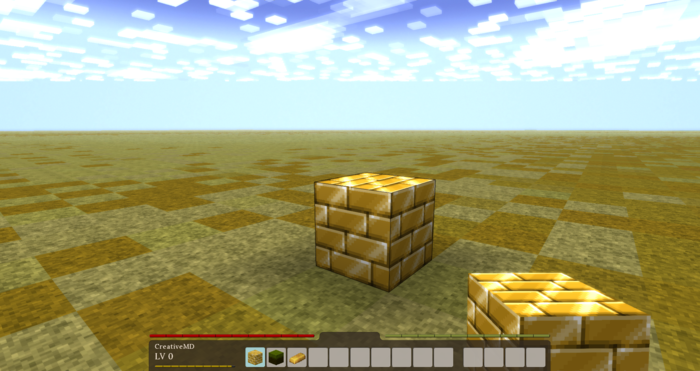
Для начала давайте создадим что-то простое. В нашем примере мы добавим в игру обычный золотой блок (будет только для декоративного использования). Итак, давайте назовем этот мод MyGoldBlock.
Рабочее пространство
Прежде всего полезно создать новую папку, чтобы все было красиво и чисто. Внутри этого рабочего пространства мы создадим сам мод, а затем поместим его в zip-файл, чтобы мы могли его протестировать и распространить среди других людей.
Текстуры
Мы будем использовать эту текстуру для нашего блока: ![]() .
.
Теперь нам нужно поместить текстуру в нужное место, чтобы мы могли использовать ее позже. Поэтому вам необходимо переименовать текстуру в mygoldtexture.png и поместить ее в assets/mygoldblock/textures/block/ в вашем рабочем пространстве (сначала вы должны создать эти папки). mygoldblock будет нашим доменом.
Файл блока
Следующее, что нам понадобится, это файл json, который определит свойства блока. Пока мы будем делать это просто и будем работать только с простыми свойствами. Если вы хотите сделать что-то более сложное, вы можете взглянуть на Обзор свойств блока.
Теперь вам нужно создать новый файл json в вашем редакторе (мы рекомендуем использовать редактор с подсветкой синтаксиса, такой как Notepad++ или Visual Studio).
{
	code: "mygoldblock",
	creativeinventory: { "general": ["*"] },
	blockmaterial: "Stone",
	drawtype: "Cube",
	textures: {
		all: { base: "block/mygoldtexture" }
	},
	resistance: 3.5,
	sounds: {
		"place": "game:block/anvil",
		"walk": "game:walk/stone"
	}
}
Краткое объяснение каждой строки:
- code: уникальный идентификатор вашего блока
- creativeinventory: вкладки творческого инвентаря, в которых должен отображаться блок (в настоящее время доступна только 1 вкладка)
- shape: какую модель должен использовать блок
- drawtype: определяет систему рисования, например, используйте «куб» для нормальных полных кубов или «json» для пользовательских фигур
- textures: Какие текстуры применять. Для простых блоков вы можете определить одну единственную текстуру для «всех» граней или одну для каждой облицовки («север», «восток», «запад», «юг», «вверх», «вниз»)
- resistance: сколько секунд реального времени требуется, чтобы сломать блок без инструментов
- sounds: звуки, которые будут воспроизводиться при помещении/разбивании или хождении по блоку. Необходимо добавить префикс
game, поскольку наш блок имеет доменmygoldblock. В противном случае он попытался бы найти эти звуки внутри нашего домена.
Теперь сохраните файл в своем рабочем пространстве внутри assets/mygoldblock/blocktypes/ и назовите его mygoldblock.json.
Наименования блока
Чтобы дать блоку правильное имя, нам нужно создать еще один файл json и сохранить его по следующему пути: assets/mygoldblock/lang/en.json
{
	"block-mygoldblock": "Block of Gold"
}
Тестирование / Распространение
Последнее, что нам нужно сделать, - это создать zip-файл папки assets внутри нашего рабочего пространства. Либо вы используете внешнюю программу (например, WinRAR или 7Zip), либо щелкаете правой кнопкой мыши папку assets и нажимаете кнопку Отправить -> Сжатая (сжатая) папка. В конце концов вы можете переименовать zip-файл в MyGoldBlockMod.zip. Этот zip-файл можно использовать либо для тестирования, либо вы можете отправить его другим людям, чтобы они тоже могли его использовать.
Кроме того, вам нужно добавить файл modinfo.json, посмотрите это руководство.
Чтобы установить мод, перейдите к папке Vintage Story и поместите его в папку модов.
Подсказка: используйте клиентскую команду .tfedit , если вы хотите отрегулировать положение, вращение и масштаб блока в руках, в графическом интерфейсе, при падении на землю или в режиме от третьего лица.
Продвинутые параметры
Теперь мы делаем более продвинутые вещи с нашим прекрасным золотым блоком. Мы добавим случайные текстуры, различные варианты и пользовательские формы. Итак, начнем.
Случайная текстура
Итак, прежде всего нам нужно больше текстур. Я создал несколько вариантов золотого блока ![]()
![]()
![]()
![]() .
Для простоты названия текстур я добавил число к каждому имени текстуры (
.
Для простоты названия текстур я добавил число к каждому имени текстуры (mygoldtexture.png,mygoldtexture1.png,mygoldtexture2.png,mygoldtexture3.png)
Теперь нам нужно добавить эти новые текстуры в файл json.
	textures: {
		all: {
			base: "block/mygoldtexture",
			alternates: [{base: "block/mygoldtexture1" }, {base: "block/mygoldtexture2" }, {base: "block/mygoldtexture3" }],
		},
	},
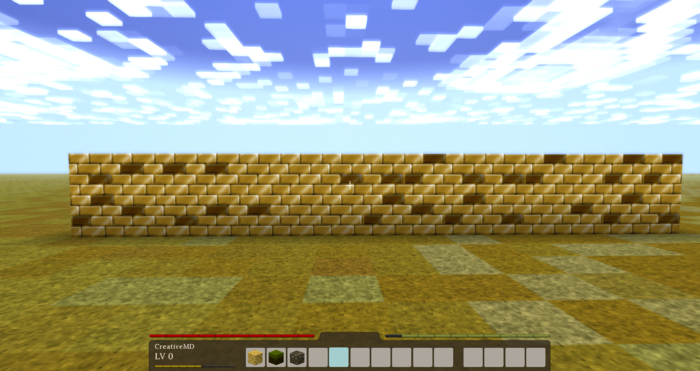
Теперь сохраните его и снова запустите Vintagestory. Теперь вы должны увидеть такой результат:
Конечно, вы можете добавить больше текстур, если хотите.
Вариации
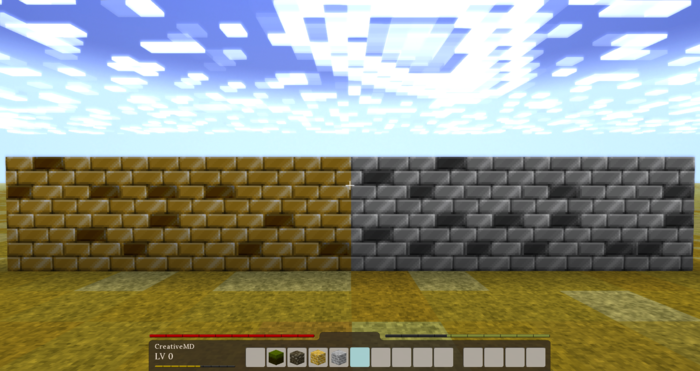
Золото самое хорошо, но железо тоже потрясающее... так что же нам делать? Давайте добавим еще одну вариацию этого блока, потому что мы все любим железо.
Вы можете продублировать blocktype файл и переименовать серебро в золото во всех местах, или вы можете просто добавить другую вариацию к существующему blocktype.
Вариантгруппа: Тип
Итак, прежде всего нам снова понадобятся новые текстуры: ![]()
![]()
![]()
![]()
Now we need to change a few things in our json file. We can add all kinds of different groups, but for now we keep it simple. We are adding group called type, with the states gold and iron. You can use any group code you want.
	variantgroups: [
		{ code: "type", states: ["gold", "iron"] }
	],
The next thing we need to do is set textures by type. So we remove our texture property and replace it with a new property texturesbytype, which will allow us to set different textures for each type.
	texturesbytype: {
		"*-gold": {
			all: {
				base: "block/mygoldtexture",
				alternates: [{base: "block/mygoldtexture1" }, {base: "block/mygoldtexture2" }, {base: "block/mygoldtexture3" }],
			},
		},
		"*-iron": {
			all: {
				base: "block/myirontexture",
				alternates: [{base: "block/myirontexture1" }, {base: "block/myirontexture2" }, {base: "block/myirontexture3" }],
			},
		}
	},
Every group will be added after each other to the blocks code myblockname-mygroup-mysecondgroup. In our example we can save ourselves writing a few extra letters by using the wild card *.
You can also use a more compact definition. Due to way we named our textures we can use the placeholder {type} to determine the texture name, so instead of handling every case individually we can write it like this:
	textures: {
		all: {
			base: "block/my{type}texture",
			alternates: [{base: "block/my{type}texture1" }, {base: "block/my{type}texture2" }, {base: "block/my{type}texture3" }],
		},
	},
The full blocktype definition could then look like this:
{
	code: "myshinyblock",
	creativeinventory: { "general": ["*"] },
	variantgroups: [
		{ code: "type", states: ["gold", "iron"] }
	],
	blockmaterial: "Stone",
	drawtype: "cube",
	textures: {
		all: {
			base: "block/my{type}texture",
			alternates: [{base: "block/my{type}texture1" }, {base: "block/my{type}texture2" }, {base: "block/my{type}texture3" }],
		},
	},
	resistance: 3.5,
	sounds: {
		"place": "game:block/anvil",
		"walk": "game:walk/stone"
	}
}
Variantgroup: Condition
Let's at another group to our block, which will determine the condition of this block. There will be two states good and used. We can add this group by adding another property inside variantgroups[].
	variantgroups: [
		{ code: "type", states: ["gold", "iron"] },
		{ code: "condition", states: ["good", "used"]}
	],
To finish implementing this second group we need to take care of every case. We want the good blocks to only use the base texture and the used blocks to also use their random textures:
	texturesbytype: {
		"*-good": {
			all: {
				base: "block/my{type}texture",
			},
		},
		"*-used": {
			all: {
				base: "block/my{type}texture",
				alternates: [{base: "block/my{type}texture1" }, {base: "block/my{type}texture2" }, {base: "block/my{type}texture3" }],
			},
		},
	},
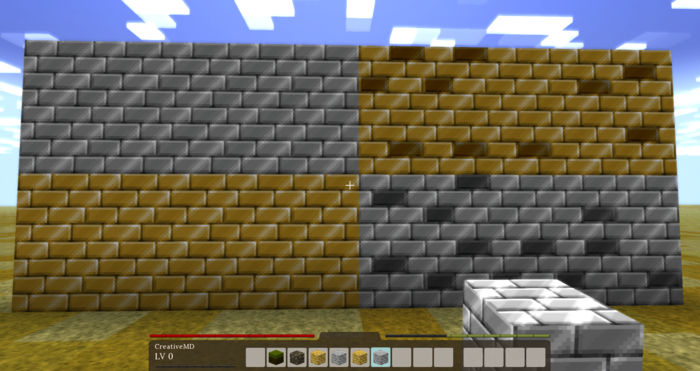
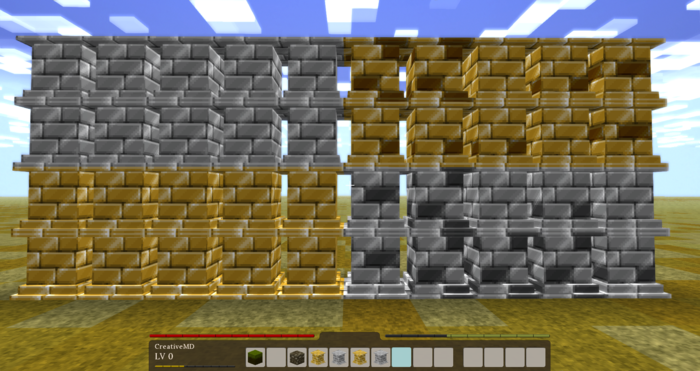
The blocks in a good condition or on the left side, while the used ones are on the right:
Custom Shapes
In order to use a custom shape we need to create one first. The engine only supports the model/shape format that's created by the VS Model Creator.
Once you have created your own shape you need to export it as a json file, create a new folder assets/myshinyblock/shapes/block/ and save the file in there. In our example we will use this model Myshinymodel.json and move it to assets/myshinyblock/shapes/block/myshinymodel.json.
Now we need to specify the model inside our block type json file.
Therefore we will change the drawtype from cube to json:
drawtype: "json",
and the shape to myshinymodel
shape: { base: "block/myshinymodel" },
Although this would be enough theoretically, we also should determine this block as being non-solid, to prevent graphical glitches.
	sidesolid: {
		all: "false"
	},
	sideopaque: {
		all: "false"
	},
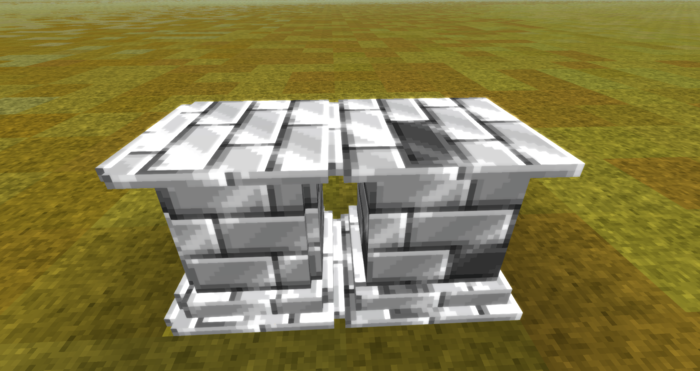
So let's run the game. This is how it should look like:
Variants of Custom Shapes
I created another model for the blocks in good condition (myshinymodel1.json), because they should look more awesome, than the ones in used conditions. Therefore we need to copy the json file to assets/myshinyblock/shapes/block/ as well.
In order to specify the shape by type we need to remove the property shape and replace it with shapebytype:
	shapebytype: {
		"*-good": {
			base: "block/myshinymodel1",
		},
		"*-used": {
			base: "block/myshinymodel",
		},
	},
Mod Download
You can find the complete mod here for reference:
Moving Forward
The example shown here, while seemingly complex, only scratches the surface of what blocktypes are capable of in Vintage Story. It's highly suggested that you experiment with or at least familiarize yourself with all the known block properties before moving onto code mods. The best way to do this is to peruse the Block Properties page, which contains an ongoing list of all the usable JSON block properties currently incorporated into the game. Most properties in the list also have referenced files you can search for in the Vintage Story Assets folder. If you don't know where this is, you can find tutorials for each operating system at the Asset System page.
If you haven't yet, it's suggested you also check out the Basic Item and Basic Entity pages to learn how simple JSON items and entities are added to the game.
However, if you're feeling like making the jump to code mods then you'll want to start by setting up your Development Environment.
Wondering where some links have gone?
The modding navbox is going through some changes! Check out Navigation Box Updates for more info and help finding specific pages.
| Modding | |
|---|---|
| Modding Introduction | Getting Started • Пакет тем |
| Content Modding | Content Mods • Developing a Content Mod • Basic Tutorials • Intermediate Tutorials • Advanced Tutorials • Content Mod Concepts |
| Code Modding | Code Mods • Setting up your Development Environment |
| Property Overview | Item • Entity • Entity Behaviors • Block • Block Behaviors • Block Classes • Block Entities • Block Entity Behaviors • Collectible Behaviors • World properties |
| Workflows & Infrastructure | Modding Efficiency Tips • Mod-engine compatibility • Mod Extensibility • VS Engine |
| Additional Resources | Community Resources • Modding API Updates • Programming Languages • List of server commands • List of client commands • Client startup parameters • Server startup parameters Example Mods • API Docs • GitHub Repository |
