Modding:Setting up your Linux Development Environment/ru: Difference between revisions
Mirotworez (talk | contribs) (Created page with "== Установить MonoDevelop == Теперь пришло время установить MonoDevelop, а с FlatPak это всего одна команда. Просто откройте терминал и выполните следующую команду. <br /> <code>flatpak install --user --from https://download.mono-project.com/repo/monodevelop.flatpakref</code> <br /> Это может занять несколько минут в зависимост...") Tags: Mobile edit Mobile web edit |
Mirotworez (talk | contribs) (Created page with "== Создание решения (проектная группа) == * Откройте MonoDevelop и создайте новое решение с помощью: '''Файл -> Новое решение...''' (в верхнем левом углу). * Выберите '''.NET -> Library''' в качестве шаблона. 800px * Нажмите "Далее. * Задайте свое '''Имя проекта''', см. пример н...") |
||
| Line 23: | Line 23: | ||
Примеры модов доступны на Github: [https://github.com/tyronx/vsmodexamples] | Примеры модов доступны на Github: [https://github.com/tyronx/vsmodexamples] | ||
== Создание решения (проектная группа) == | |||
* Откройте MonoDevelop и создайте новое решение с помощью: '''Файл -> Новое решение...''' (в верхнем левом углу). | |||
* | * Выберите '''.NET -> Library''' в качестве шаблона. | ||
* | |||
[[File:mono_new_library.png|800px]] | [[File:mono_new_library.png|800px]] | ||
* | * Нажмите "Далее. | ||
* | * Задайте свое '''Имя проекта''', см. пример ниже, не меняйте путь, если хотите продолжить, оставьте его в покое. | ||
[[File:mono_new_library_2.png|800px]] | [[File:mono_new_library_2.png|800px]] | ||
* | * Нажмите Создать. Теперь вы должны получить экран, который выглядит примерно так: | ||
[[File:mono_new_cs_file.png|800px]] | [[File:mono_new_cs_file.png|800px]] | ||
* | * Щелкните правой кнопкой мыши проект (выделенный ниже) и выберите «Параметры». | ||
[[File:mono_project_menu.png]] | [[File:mono_project_menu.png]] | ||
* | * Нажмите «Выполнить» -> «Конфигурации» -> «По умолчанию» (выделено ниже). | ||
[[File:mono_run_config_menu.png]] | [[File:mono_run_config_menu.png]] | ||
* | * Установите значения, как показано ниже, но замените «cynthia» на ваше имя пользователя и «MyCoolMod» на имя вашего проекта и нажмите «ОК». | ||
[[File:mono_run_config.png]] | [[File:mono_run_config.png]] | ||
* | * Щелкните проект правой кнопкой мыши еще раз и выберите "Добавить -> Новый файл...". | ||
* | * Нажмите «Разное -> Пустой текстовый файл» и установите «launchmod.sh» в качестве имени, нажмите «Новый». | ||
[[File:mono_new_file.png]] | [[File:mono_new_file.png]] | ||
* | * Вставьте содержимое раздела '''launchmod.sh''' этой страницы в новый файл ''launchmod.sh'' и сохраните его. | ||
* | * Щелкните правой кнопкой мыши "Ссылки" и выберите "Редактировать ссылки...". | ||
* | * Щелкните вкладку '''.Net Assembly''' и щелкните '''Обзор...'''. | ||
* | * Перейдите по пути установки Vintage Story (<code>/home/yourusernamehere/ApplicationData/vintagestory</code>) и щелкните файл <code>VintagestoryAPI.dll</code>. | ||
* | * Нажмите «Открыть». | ||
* | * Нажмите «ОК». | ||
<div lang="en" dir="ltr" class="mw-content-ltr"> | <div lang="en" dir="ltr" class="mw-content-ltr"> | ||
Revision as of 06:20, 17 October 2022
Этот туториал посвящен продвинутому моддингу. Он должен научить вас, как настроить среду разработки, и познакомить вас с основами Mono Develop, этот учебник был написан для Linux, если вы используете Windows, вы можете использовать Visual Studio.
Установить VintageStory
В первую очередь скачайте VintageStory и убедитесь, что у вас установлена самая новая версия игры, иначе могут возникнуть ошибки.
Установить FlatPak
Мы будем использовать FlatPak для установки MonoDevelop, поэтому, если у вас уже есть FlatPak, вы можете пропустить этот шаг. У FlatPak есть собственные руководства для многих дистрибутивов здесь.
Установить MonoDevelop
Теперь пришло время установить MonoDevelop, а с FlatPak это всего одна команда.
Просто откройте терминал и выполните следующую команду.
flatpak install --user --from https://download.mono-project.com/repo/monodevelop.flatpakref
Это может занять несколько минут в зависимости от вашего интернет-соединения. (Последняя версия на момент написания статьи весила около 275 МБ.)
Чтобы открыть MonoDevelop, запустите в терминале flatpak run com.xamarin.MonoDevelop.
Обзор API
Интерфейс API в основном задокументирован, но если вам нужна справочная документация, она доступна по адресу [1].
Примеры модов доступны на Github: [2]
Создание решения (проектная группа)
- Откройте MonoDevelop и создайте новое решение с помощью: Файл -> Новое решение... (в верхнем левом углу).
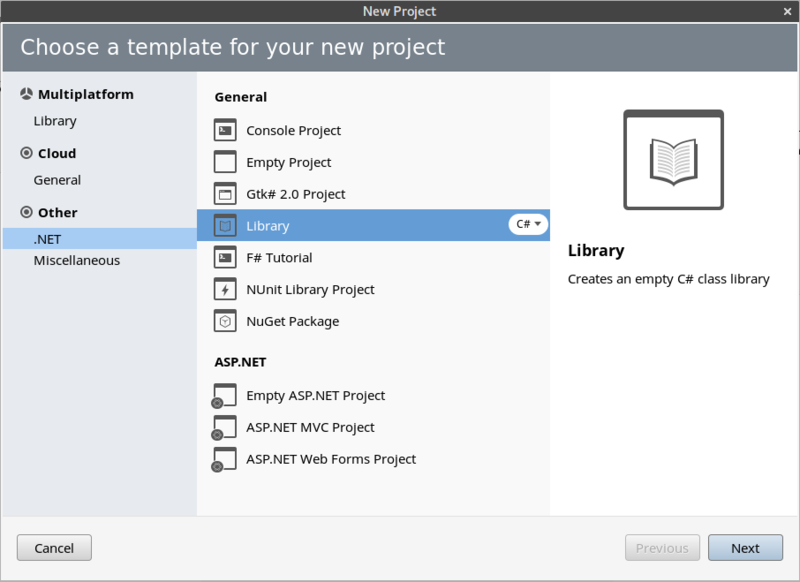
- Выберите .NET -> Library в качестве шаблона.
- Нажмите "Далее.
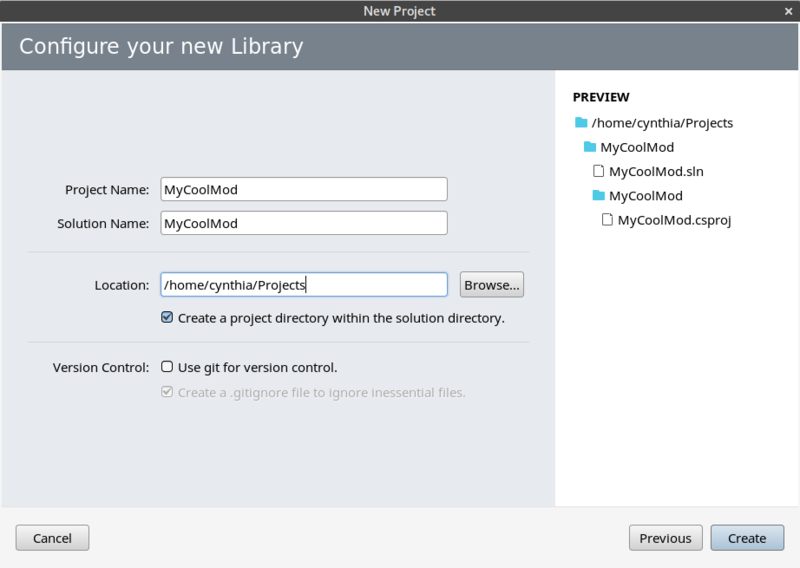
- Задайте свое Имя проекта, см. пример ниже, не меняйте путь, если хотите продолжить, оставьте его в покое.
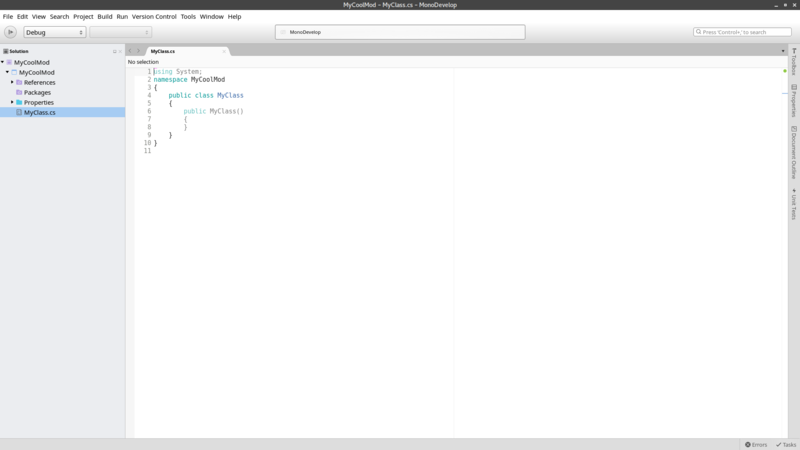
- Нажмите Создать. Теперь вы должны получить экран, который выглядит примерно так:
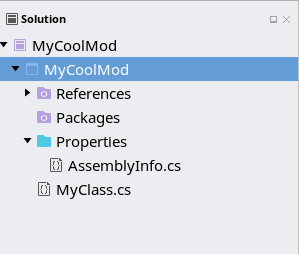
- Щелкните правой кнопкой мыши проект (выделенный ниже) и выберите «Параметры».
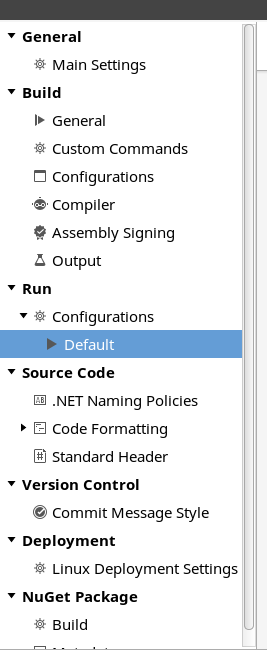
- Нажмите «Выполнить» -> «Конфигурации» -> «По умолчанию» (выделено ниже).
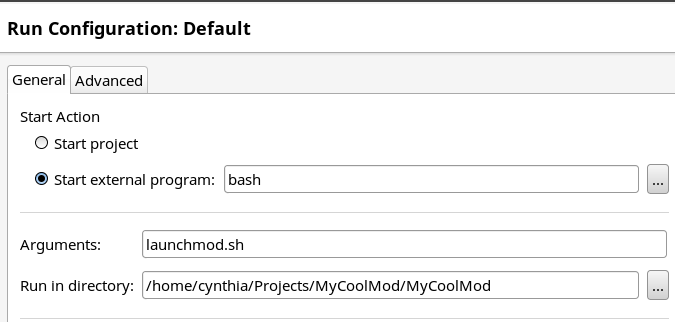
- Установите значения, как показано ниже, но замените «cynthia» на ваше имя пользователя и «MyCoolMod» на имя вашего проекта и нажмите «ОК».
- Щелкните проект правой кнопкой мыши еще раз и выберите "Добавить -> Новый файл...".
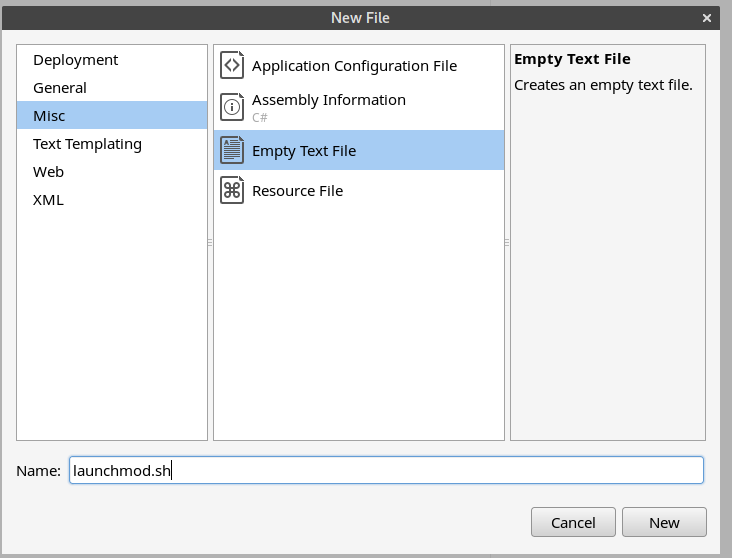
- Нажмите «Разное -> Пустой текстовый файл» и установите «launchmod.sh» в качестве имени, нажмите «Новый».
- Вставьте содержимое раздела launchmod.sh этой страницы в новый файл launchmod.sh и сохраните его.
- Щелкните правой кнопкой мыши "Ссылки" и выберите "Редактировать ссылки...".
- Щелкните вкладку .Net Assembly и щелкните Обзор....
- Перейдите по пути установки Vintage Story (
/home/yourusernamehere/ApplicationData/vintagestory) и щелкните файлVintagestoryAPI.dll. - Нажмите «Открыть».
- Нажмите «ОК».
Testing
- Click on Run -> Start Without Debugging or press CTRL + F5.
- Vintage Story should now start.
launchmod.sh
#!/bin/bash

VINTAGE_PATH="${HOME}/ApplicationData/vintagestory/"

MOD_PATH="${VINTAGE_PATH}Mods/"

cd ${VINTAGE_PATH}

mono Vintagestory.exe -oTestworld -pcreativebuilding
Hook up logging
If you want to you can download File:RedirectLogs.cs and add it to your project, which will allow to see the log of Vintagestory in MonoDevelop. Once you have downloaded the file you can just add it to the project by right clicking on the project and clicking on Add -> Add Files... then navigating to the file and click Open then Copy the file to the directory. and OK.
Additional command line arguments when debugging
- -oFoobar open a world named "foobar", if it doesn't exists it will create a new one
- -pcreativebuilding new worlds are created with given playstyle ("surviveandbuild" or "creativebuilding" by default)
- --rndWorld always creates a new world with an incrementing file name
Wondering where some links have gone?
The modding navbox is going through some changes! Check out Navigation Box Updates for more info and help finding specific pages.
| Modding | |
|---|---|
| Modding Introduction | Getting Started • Пакет тем |
| Content Modding | Content Mods • Developing a Content Mod • Basic Tutorials • Intermediate Tutorials • Advanced Tutorials • Content Mod Concepts |
| Code Modding | Code Mods • Setting up your Development Environment |
| Property Overview | Item • Entity • Block • Block Behaviors • Block Classes • Block Entities • Block Entity Behaviors • World properties |
| Workflows & Infrastructure | Modding Efficiency Tips • Mod-engine compatibility • Mod Extensibility • VS Engine |
| Additional Resources | Community Resources • Modding API Updates • Programming Languages • List of server commands • List of client commands • Client startup parameters • Server startup parameters Example Mods • API Docs • GitHub Repository |
