Modding:Server-Client Considerations/ru: Difference between revisions
Mirotworez (talk | contribs) (Created page with "Как описано в документации по API ([https://apidocs.vintagestory.at/api/Vintagestory.API.Common.ModSystem.html VintageStory.API.Common.ModSystem]), <code>ModSystem</code> включает номер виртуальных методов, которые ваш мод может переопределить. Возможно, чаще всего используется метод <code>ModSystem.Start(ICoreAPI)</code>. Вы можете испол...") |
Mirotworez (talk | contribs) (Created page with "== Тестирование разделенного сервера и клиента == Легко проверить, как ваш мод будет работать на многопользовательском сервере, даже если вы работаете только на одной локальной машине!") Tags: Mobile edit Mobile web edit |
||
| Line 29: | Line 29: | ||
Легко проверить, как ваш мод будет работать на многопользовательском сервере, даже если вы работаете только на одной локальной машине! | Легко проверить, как ваш мод будет работать на многопользовательском сервере, даже если вы работаете только на одной локальной машине! | ||
«Следующие инструкции предназначены для Windows, но другие операционные системы должны работать аналогично». | |||
<div lang="en" dir="ltr" class="mw-content-ltr"> | <div lang="en" dir="ltr" class="mw-content-ltr"> | ||
Revision as of 06:24, 17 October 2022
Эта страница проверялась в последний раз для версии Vintage Story 1.15.
Разработка модов на основе кода для Vintage Story требует понимания разницы между сервером и клиентом, особенно для более сложных приложений.
Понимание разделения задач между серверными и клиентскими потоками облегчит устранение неполадок и создание хорошо спроектированных систем модов, особенно если вы планируете, чтобы ваш мод работал на многопользовательских серверах.
Основы
Ядром типичного мода является ModSystem, более подробно описанная на странице Advanced Blocks.
public class ExampleMod : ModSystem
Как описано в документации по API (VintageStory.API.Common.ModSystem), ModSystem включает номер виртуальных методов, которые ваш мод может переопределить. Возможно, чаще всего используется метод ModSystem.Start(ICoreAPI). Вы можете использовать этот метод для определения кода инициализации, который должен запускаться при первой загрузке игры. Однако важно понимать, что по умолчанию игра создает один экземпляр вашей ModSystem на сервере и один дополнительный экземпляр ModSystem на каждом клиенте. В случае однопользовательской игры на одном компьютере будут работать один сервер и один клиент. В результате любой код, который вы поместите в ModSystem.Start, будет выполняться два или более раз — один раз в потоке сервера и один раз в каждом потоке клиента.
Is My Mod Server-Side, Client-Side, or Both?
TBA
Общие "подводные камни"
- В одиночной игре сервер и клиент используют один и тот же путь к данным. Это важно иметь в виду, особенно если вы сохраняете/читаете какие-либо настройки мода из пути к данным игры, например, используя встроенные методы ModConfig. Например, ваш мод может работать нормально в одиночной игре, если серверный поток читает ваш файл настроек, но затем не работает должным образом на многопользовательском сервере, где клиентский поток должен был читать настройки игрока.
Полезные советы
- В большинстве случаев мод может быть разработан для работы как в одиночной, так и в многопользовательской игре без какой-либо специальной логики. Однако если вам по какой-то причине нужно проверить состояние сеанса, вы можете использовать свойство
ICoreClientAPI.IsSinglePlayer, чтобы проверить, является ли текущая игра однопользовательской игрой. - Если у вас есть какие-либо сомнения или опасения по поводу работы вашего мода на многопользовательском сервере, рассмотрите возможность настройки локального сервера на своем компьютере, чтобы проверить его!
Тестирование разделенного сервера и клиента
Легко проверить, как ваш мод будет работать на многопользовательском сервере, даже если вы работаете только на одной локальной машине!
«Следующие инструкции предназначены для Windows, но другие операционные системы должны работать аналогично».
- Before getting started, remove any mods that you've put directly in your Vintage Story program directory (such as
C:\Program Files\Vintagestory). Mods in this directory will be shared by the server and client with the setup described below.- Instead, move these mods into the data directory (on windows, that is
%appdata%/Vintagestory/Mods/by default).
- Instead, move these mods into the data directory (on windows, that is
- Set up a shortcut to the game's VintageStoryServer.exe file in your existing Vintage Story program directory. You'll use this shortcut to launch your test server. You will need to give it a custom data path using a run parameter to ensure that the server uses a different data path than the default data path. For example, on Windows your shortcut might have a target of
C:\Program Files\Vintagestory\VintagestoryServer.exe --dataPath "%appdata%/VintagestoryData_Server"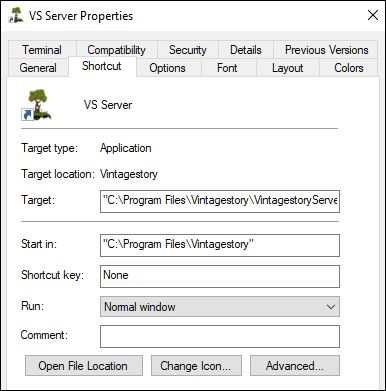
- Double-click the shortcut to launch the server.
- At this point, the server will generate new folders and content in the
--dataPathdirectory you specified. For example, you can now visit that path and add a copy of your mod to the /Mods subdirectory if you'd like the server to load your mod (after which you'd need to restart the server). The server will also output logs to the/Logssubdirectory here. - If you'd like load a copy of your mod on the client side, make sure to add your mod to the normal data path directory (on windows, that is
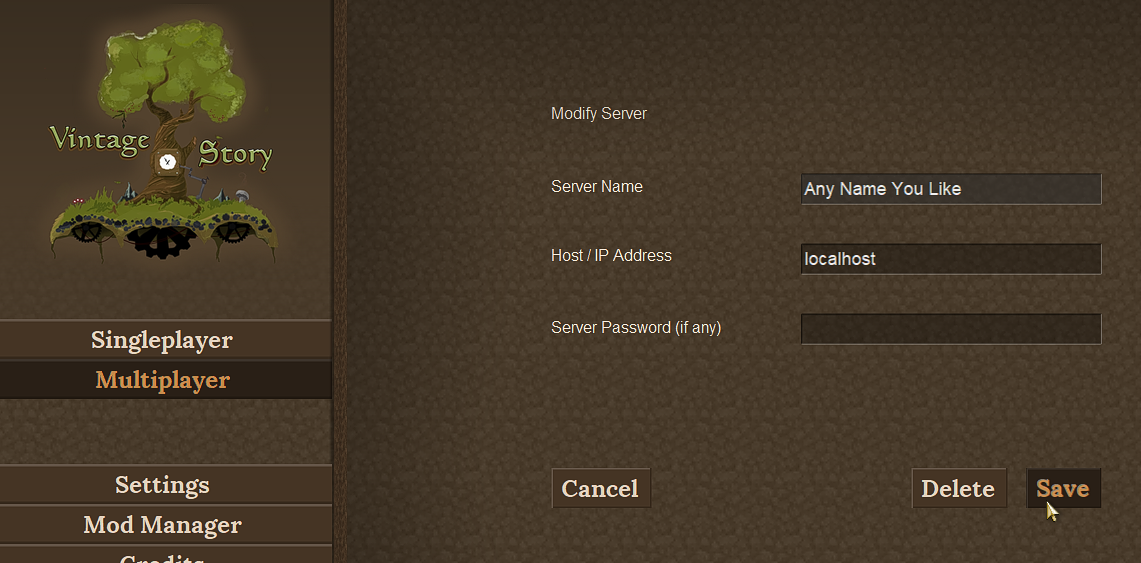
%appdata%/Vintagestory/Mods/by default). - Launch the normal game client, and select "Multiplayer" from the main menu. Add a new server and configure it with a Host / IP Address value of "localhost". Then click "Save".
- You can now select your server from the Multiplayer menu to connect! All mods, settings, and logs should be separated, and you can test whether the mod will work as expected on a multiplayer server.


Notes
- If for some reason you'd like to have a completely separate install for your test server, you can do that too. Either install a full version of the game in a separate directory and run your server from there, or download the "(server only)" TAR file from the Vintage Story download site. Keep in mind that you'll still need to set a custom data path to ensure the server files are separate from the normal game client.
- You can also configure additional custom path(s) for your server using other run parameters, such as
--addModPath. For more info, check out the Client startup parameters page. - If you're unfamiliar with server setup, you may also want to check out the Server Config page. For example, you might want to set the
"AdvertiseServer"config value to "false" if you're only using this server to test mods locally.
Wondering where some links have gone?
The modding navbox is going through some changes! Check out Navigation Box Updates for more info and help finding specific pages.
| Modding | |
|---|---|
| Modding Introduction | Getting Started • Пакет тем |
| Content Modding | Content Mods • Developing a Content Mod • Basic Tutorials • Intermediate Tutorials • Advanced Tutorials • Content Mod Concepts |
| Code Modding | Code Mods • Setting up your Development Environment |
| Property Overview | Item • Entity • Block • Block Behaviors • Block Classes • Block Entities • Block Entity Behaviors • World properties |
| Workflows & Infrastructure | Modding Efficiency Tips • Mod-engine compatibility • Mod Extensibility • VS Engine |
| Additional Resources | Community Resources • Modding API Updates • Programming Languages • List of server commands • List of client commands • Client startup parameters • Server startup parameters Example Mods • API Docs • GitHub Repository |