Modding:VS Model Creator tutorials: Difference between revisions
(Added entire section on how to use the step-parenting system in the model creator, probably need some cleaning up and to be referenced in related pages.) |
(First pass on formatting and grammar tweaks.) |
||
| (2 intermediate revisions by 2 users not shown) | |||
| Line 2: | Line 2: | ||
<translate> | <translate> | ||
<!--T:6--> | <!--T:6--> | ||
Vintage Story has its own model creator called VS Model Creator that allows anyone to create, texture, and animate custom shapes for use in Vintage Story mods. The newest version can be downloaded [https://github.com/tyronx/vsmodelcreator/releases here]. | ''[[Vintage Story]]'' has its own model creator called [[Modding:VS Model Creator|VS Model Creator]] that allows anyone to create, texture, and animate custom [[Modding:Asset Type - Shapes|shapes]] for use in ''Vintage Story'' mods. The newest version can be downloaded [https://github.com/tyronx/vsmodelcreator/releases here]. | ||
<!--T:7--> | <!--T:7--> | ||
Below | Below can be found modified versions of a modeling tutorial and an animation tutorial created by [https://www.vintagestory.at/profile/252-balduranne/ Balduranne] and [https://www.vintagestory.at/profile/76-luk/ Luk], respectively. Click [https://www.vintagestory.at/forums/topic/505-vs-model-creator-basics/ here] to visit the original forum thread where these tutorials were originally posted. | ||
<!--T:8--> | <!--T:8--> | ||
[[File:Vsmc_1.png| | [[File:Vsmc_1.png|right|600px]] | ||
<!--T:9--> | <!--T:9--> | ||
__TOC__ | __TOC__ | ||
== Modeling == <!--T:10--> | ==Modeling== <!--T:10--> | ||
===Modeling | ===Modeling basics=== <!--T:11--> | ||
<!--T:12--> | <!--T:12--> | ||
The model creator only allows working with cubes or parts of cubes, which | The model creator only allows working with cubes or parts of cubes, which can be created by clicking the Red/Green/Blue icon below the selection window. Once something is selected, the modeling can begin. Voxel Size determines the shape and size of the object, Position moves it around the grid, while Origin is from where the model is supposed to 'start' from. This mostly comes into play when rotating the object. | ||
[[File:Vsmc_2.jpg|thumb|center|800px]] | [[File:Vsmc_2.jpg|thumb|center|800px]] | ||
| | ||
<!--T:13--> | <!--T:13--> | ||
When adding more cubes, it's important to keep in mind what | When adding more cubes, it's important to keep in mind what cube is selected. In this case, Cube2 is docked under Cube1, so if the latter is moved, Cube2 will end up moving along with Cube1. Cube 3 in this example is sitting on its own and is unaffected by the other two. | ||
[[File:Vsmc_3.png|thumb|center|800px]] | [[File:Vsmc_3.png|thumb|center|800px]] | ||
| | ||
<!--T:14--> | <!--T:14--> | ||
After a little fiddling, | After a little fiddling, a model is created. In this case, it's a candle holder with a candle: | ||
[[File:Vsmc_4.png|thumb|center|800px]] | [[File:Vsmc_4.png|thumb|center|800px]] | ||
| | ||
===Model | ===Model duplication=== <!--T:15--> | ||
Duplicating an element and moving it around can speed up the modeling process. It's less time-consuming than making a fresh object and moving it in the correct place and shape: | |||
[[File:Vsmc_10.png|thumb|center|800px]] | [[File:Vsmc_10.png|thumb|center|800px]] | ||
| | ||
| Line 75: | Line 75: | ||
<!--T:24--> | <!--T:24--> | ||
Once you have the hang of it, you can use Render Passes. An explanation of the different modes can be found by clicking [http://apidocs.vintagestory.at/api/Vintagestory.API.Client.EnumChunkRenderPass.html here], but | Once you have the hang of it, you can use Render Passes. An explanation of the different modes can be found by clicking [http://apidocs.vintagestory.at/api/Vintagestory.API.Client.EnumChunkRenderPass.html here], but in layman's terms, they determine how a block will behave visually (Think - Glass, Ice, etc): | ||
[[File:Vsmc_17.png|thumb|center|600px]] | [[File:Vsmc_17.png|thumb|center|600px]] | ||
| | ||
== Texturing == <!--T:5--> | ==Texturing== <!--T:5--> | ||
Once we have our model, we can slap some textures on: | Once we have our model, we can slap some textures on: | ||
[[File:Vsmc_5.png|thumb|center|800px]] | [[File:Vsmc_5.png|thumb|center|800px]] | ||
| Line 104: | Line 104: | ||
| | ||
== Parenting == <!--T:29--> | == Parenting == <!--T:29--> | ||
The parenting system allows you to attach models to the individual parts of a set backdrop model. This | The parenting system allows you to attach models to the individual parts of a set backdrop model. This is how armor models stay attached to the arms and legs of the player model while that model is performing its own set of animations like running or crouching. This tutorial will cover how to use this system to implement armor models onto the player, but the same method can be used to implement custom clothing models or hairstyles for the player. If you use a different backdrop you can add custom accessories to any animated model of your choice. | ||
[[File:Vsmc 19.png|thumb|center|800px]] | [[File:Vsmc 19.png|thumb|center|800px]] | ||
| | ||
| Line 117: | Line 116: | ||
<!--T:31--> | <!--T:31--> | ||
'''For method #1:''' | '''For method #1:''' | ||
Start by importing the shape json of an item that is similar to what you want to add | Start by importing the shape json of an item that is similar to what you want to add. Here we will be using the "legs.json" file located in your game directory and nested in <code>Vintagestory/assets/survival/shapes/entity/humanoid/seraph/armor/plate</code>. Go ahead and import this model into the Model Creator by dragging and dropping it into the window. This should usually prompt you with a window asking to import a backdrop shape: | ||
[[File:Vsmc_20.png|thumb|center|800px]] | [[File:Vsmc_20.png|thumb|center|800px]] | ||
| | ||
<!--T:32--> | <!--T:32--> | ||
Sometimes it will not prompt you with an import window and you will need to manually set the backdrop. You can do this by going to the tab "project" at the top of the window and | Sometimes it will not prompt you with an import window and you will need to manually set the backdrop. You can do this by going to the tab "project" at the top of the window and selecting "Set Backdrop...": | ||
[[File:Vsmc_21.png|thumb|center|800px]] | [[File:Vsmc_21.png|thumb|center|800px]] | ||
| | ||
<!--T:33--> | <!--T:33--> | ||
In the import backdrop pop up window navigate to the following location for the appropriate seraph shape | In the import backdrop pop-up window navigate to the following location for the appropriate seraph shape JSON to import, you should use seraph-hairless.json located in <code>Vintagestory/assets/game/shapes/entity/humanoid/seraph-hairless</code> for most things as it's the cleanest model to work with, but you can always create your own custom backdrop version with certain elements removed like the clothing tiles to strip the model down even more. You can also delete the face cubes if they are in the way. If you edit the seraph shape JSON be sure to save it as your own version and try not to mess with the naming of the major body parts, preferably name it something like "seraph-backdrop" and place it in an easily accessible location so you can easily import the file again. | ||
[[File:Vsmc_22.png|thumb|center|800px]] | [[File:Vsmc_22.png|thumb|center|800px]] | ||
| | ||
<!--T:34--> | <!--T:34--> | ||
With the backdrop set your model workspace should look like the first image, note the leg armor model is still bunched up in the corner, sometimes the model will update itself and automatically fix itself, but most of the time you will need to update it manually. You can update the model by selecting any piece of the leg armor model and moving its position once in any direction, then just press | With the backdrop set your model workspace should look like the first image, note the leg armor model is still bunched up in the corner, sometimes the model will update itself and automatically fix itself, but most of the time you will need to update it manually. You can update the model by selecting any piece of the leg armor model and moving its position once in any direction, then just press <span class="key"><span>Ctrl</span></span> + <span class="key"><span>Z</span></span> and undo the move. This should update the model and then it will look like the second image: | ||
[[File:Vsmc_23.png|thumb|center|800px]] | [[File:Vsmc_23.png|thumb|center|800px]] | ||
[[File:Vsmc_24.png|thumb|center|800px]] | [[File:Vsmc_24.png|thumb|center|800px]] | ||
| Line 138: | Line 137: | ||
<!--T:35--> | <!--T:35--> | ||
Now that you have the model and backdrop loaded into the model creator you are free to edit the shape however you'd like, just be sure to make your edited/added shapes branch off the original parts, the original parts are pre-parented to the backdrop so any newly added voxels must be attached to the tree of that part. Note how in the image "ArmorKneeSide9" is attached to and under the tree of "ArmorLowerLegL", Most major shapes at the start of trees or under the root are usually parented to the backdrop already. Just export the finished shape | Now that you have the model and backdrop loaded into the model creator you are free to edit the shape however you'd like, just be sure to make your edited/added shapes branch off the original parts, the original parts are pre-parented to the backdrop so any newly added voxels must be attached to the tree of that part. Note how in the image "ArmorKneeSide9" is attached to and under the tree of "ArmorLowerLegL", Most major shapes at the start of trees or under the root are usually parented to the backdrop already. Just export the finished shape JSON and use it as normal, and be sure to edit the texture locations in the exported JSON to their correct locations. | ||
[[File:Vsmc_25.png|thumb|center|800px]] | [[File:Vsmc_25.png|thumb|center|800px]] | ||
| | ||
| Line 149: | Line 148: | ||
<!--T:37--> | <!--T:37--> | ||
Navigate up to the tab "project" at the top of the window and select "Set Backdrop...", as mentioned in method #1 you should use the seraph-hairless.json shape located in | Navigate up to the tab "project" at the top of the window and select "Set Backdrop...", as mentioned in method #1 you should use the seraph-hairless.json shape located in <code>Vintagestory/assets/game/shapes/entity/humanoid/seraph-hairless</code>, or a custom stripped down version. Select your backdrop shape of choice and then press the "Import backdrop" button on the pop-up window. | ||
[[File:Vsmc_27.png|thumb|center|800px]] | [[File:Vsmc_27.png|thumb|center|800px]] | ||
| | ||
<!--T:38--> | <!--T:38--> | ||
Your model creator window should now show an un-textured seraph model | Your model creator window should now show an un-textured seraph model in the center like this: | ||
[[File:Vsmc_28.png|thumb|center|800px]] | [[File:Vsmc_28.png|thumb|center|800px]] | ||
| | ||
<!--T:39--> | <!--T:39--> | ||
Next select the part of your shape that you want to have attached to the backdrop model, here we are selecting the right boot main cube (it's the main cube because all the detail cubes are attached to it in the element tree), next scroll down on the left side of the model creator window and at the bottom you will see a "Not set" button under "Stepparrent element", press this button and you will see the following pop up window: | Next, select the part of your shape that you want to have attached to the backdrop model, here we are selecting the right boot main cube (it's the main cube because all the detail cubes are attached to it in the element tree), next scroll down on the left side of the model creator window and at the bottom you will see a "Not set" button under "Stepparrent element", press this button and you will see the following pop up window: | ||
[[File:Vsmc_29.png|thumb|center|800px]] | [[File:Vsmc_29.png|thumb|center|800px]] | ||
| | ||
<!--T:40--> | <!--T:40--> | ||
Now in this pop-up window you will need to select the part of the backdrop model you want this cube you selected to be attached to, in this case I selected the right boot's main cube so I want it attached to the lower part of the right leg which in this case is all the way at the bottom of the "Element" drop down list. Once you select the right element go ahead and press the "Apply" button. | Now in this pop-up window, you will need to select the part of the backdrop model you want this cube you selected to be attached to, in this case I selected the right boot's main cube so I want it attached to the lower part of the right leg which in this case is all the way at the bottom of the "Element" drop down list. Once you select the right element go ahead and press the "Apply" button. | ||
'''Note:''' | '''Note:''' The element names under this drop-down menu correspond to the exact names on the player model used in the game. This is why it's important to not rename them if you use a custom backdrop model. Also, if you don't know what an element corresponds to name-wise, simply open up the backdrop shape file your using in a separate model creator window and select the element you want to know the name of and it should show in the left window under the "New element" button and tree window. | ||
[[File:Vsmc_30.png|thumb|center|800px]] | [[File:Vsmc_30.png|thumb|center|800px]] | ||
| | ||
| Line 176: | Line 175: | ||
<!--T:42--> | <!--T:42--> | ||
Now repeat this process for each element you want attached to the backdrop model, you may need to modify the position of each model to properly align it to the backdrop. Also, when creating armor/clothing models be sure to separate the model up into several major cubes so they are easy to parent to the seraph model, | Now repeat this process for each element you want attached to the backdrop model, you may need to modify the position of each model to properly align it to the backdrop. Also, when creating armor/clothing models be sure to separate the model up into several major cubes so they are easy to parent to the seraph model. For instance, break up the leg armor into two major sections, the upper and lower leg, then add your detail cubes under the tree/ attached to one of these major parts. Nearly every single shape that shows up on the player model can be imported/parented/and edited this way, and you can also extend this process to create armor models for other entities like adding trader clothing. | ||
[[File:Vsmc_32.png|thumb|center|800px]] | [[File:Vsmc_32.png|thumb|center|800px]] | ||
| | ||
Latest revision as of 19:46, 30 August 2024
Vintage Story has its own model creator called VS Model Creator that allows anyone to create, texture, and animate custom shapes for use in Vintage Story mods. The newest version can be downloaded here.
Below can be found modified versions of a modeling tutorial and an animation tutorial created by Balduranne and Luk, respectively. Click here to visit the original forum thread where these tutorials were originally posted.
Modeling
Modeling basics
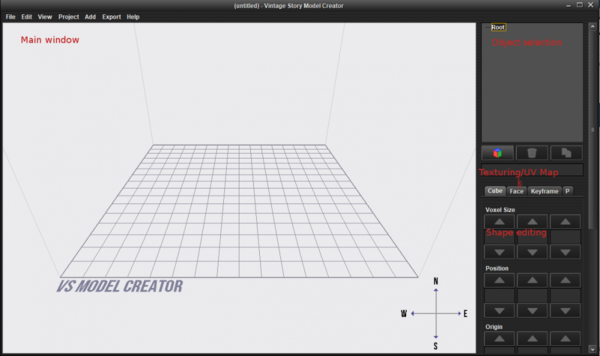
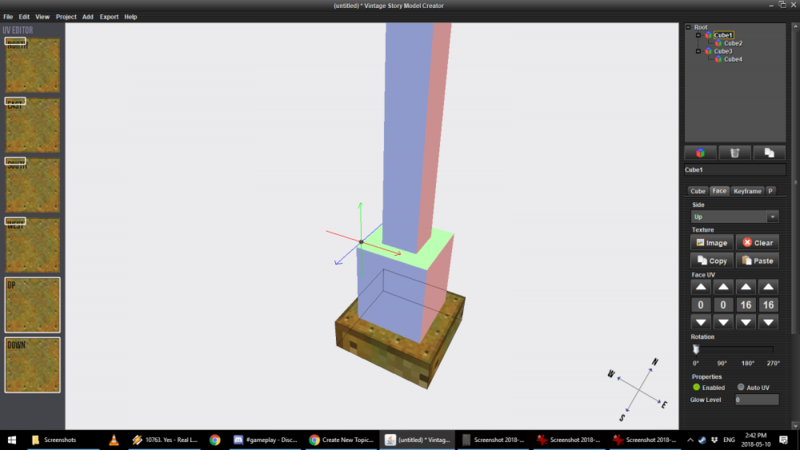
The model creator only allows working with cubes or parts of cubes, which can be created by clicking the Red/Green/Blue icon below the selection window. Once something is selected, the modeling can begin. Voxel Size determines the shape and size of the object, Position moves it around the grid, while Origin is from where the model is supposed to 'start' from. This mostly comes into play when rotating the object.
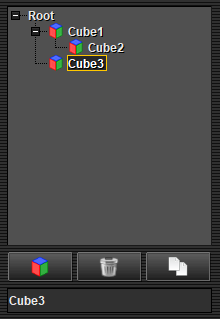
When adding more cubes, it's important to keep in mind what cube is selected. In this case, Cube2 is docked under Cube1, so if the latter is moved, Cube2 will end up moving along with Cube1. Cube 3 in this example is sitting on its own and is unaffected by the other two.
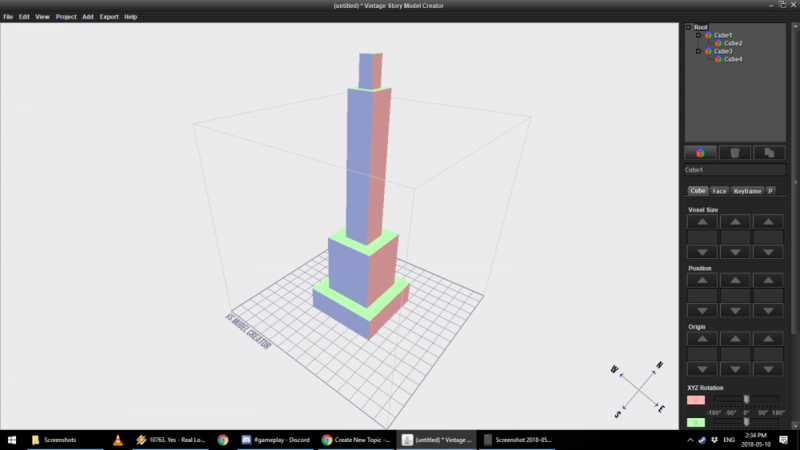
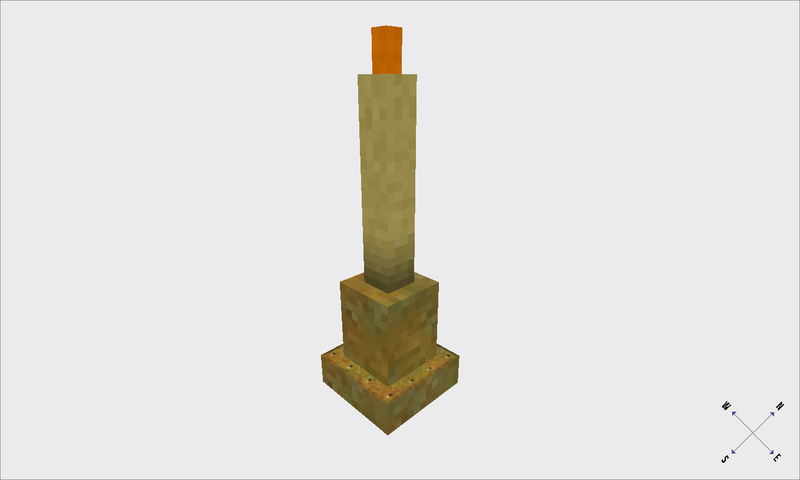
After a little fiddling, a model is created. In this case, it's a candle holder with a candle:
Model duplication
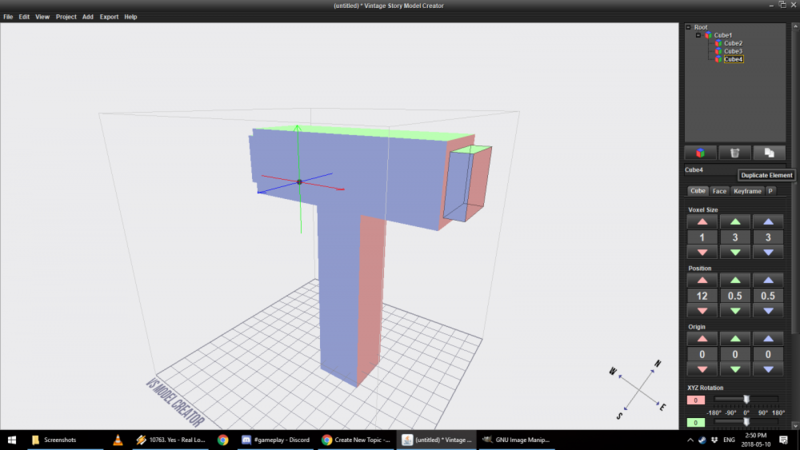
Duplicating an element and moving it around can speed up the modeling process. It's less time-consuming than making a fresh object and moving it in the correct place and shape:
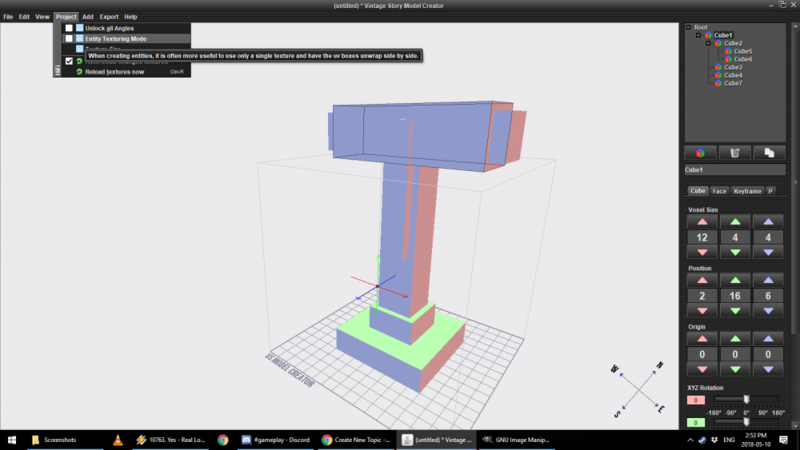
I'm sure very often you'll find yourself just applying the same texture to the entire object. This is where the Entity Texturing Mode comes into play:
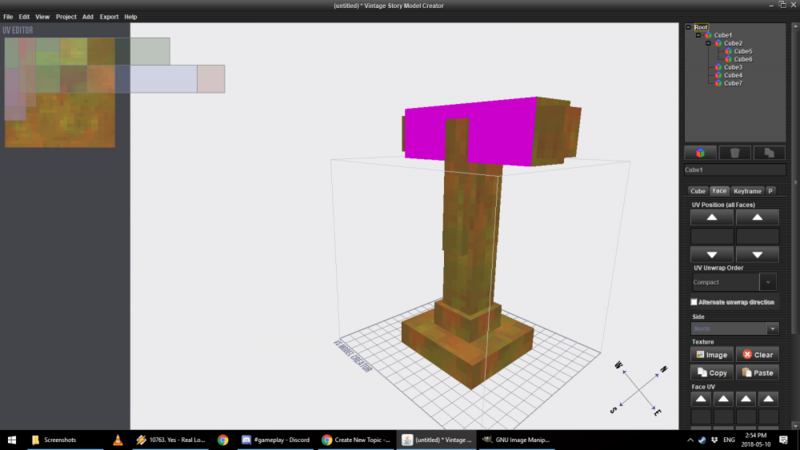
Once clicked, the entire model will be assigned one texture. It's handy, but we still need to tweak it by hand. While the mode is on, you can only move an entire object around in the UV map editor (Left), that's hardly ideal in some cases. That's why we want to disable the Entity Texturing Mode (Don't worry, the texture will stay on), and go back to the Face menu and manually move the texture around.
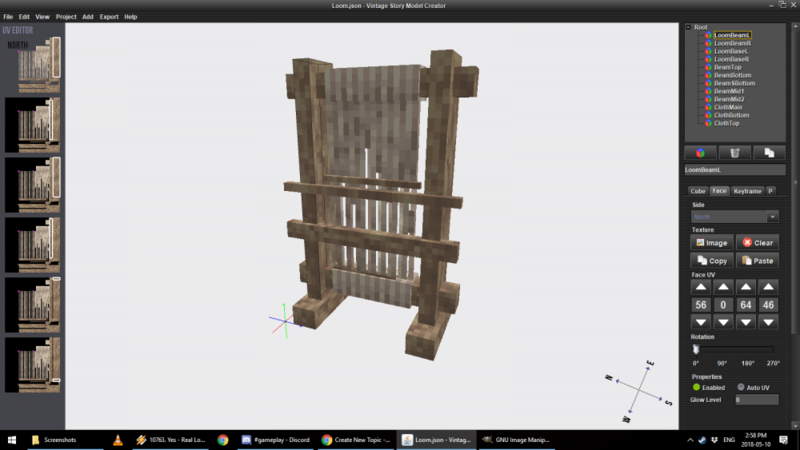
This is especially important in cases where we want to use a single texture for a model, as is the case with my Loom model, or the NPC models (Including the player one):
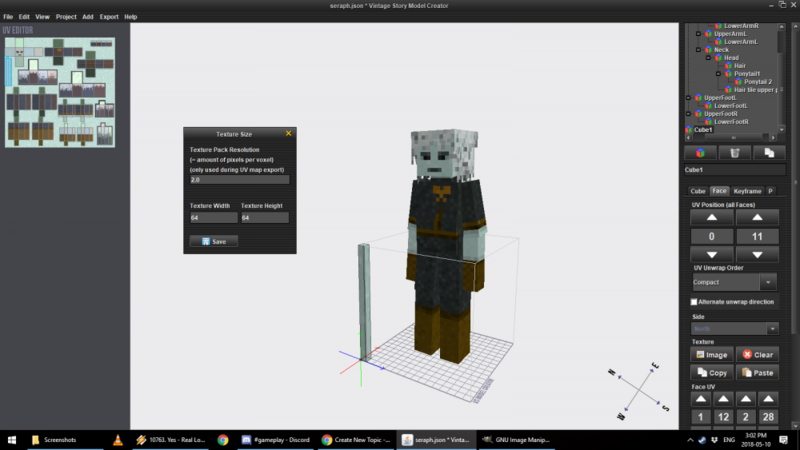
Furthermore, if you're using one texture, you can tweak the texture size for larger objects:
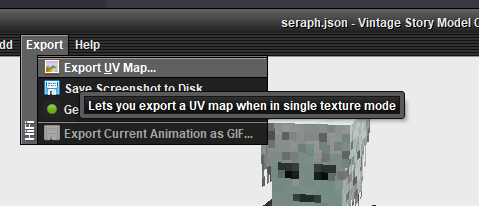
Another useful trick is exporting the UV map of your model. Once you have it unwrapped (That is, spread around your texture sheet), you can export the UV map to make a proper texture for it, or in the case of the player model - Make your own skin for it:
That should about cover the basics. One important thing to keep in mind is that one block is 16x16x16 (The size of the grid) in the editor.
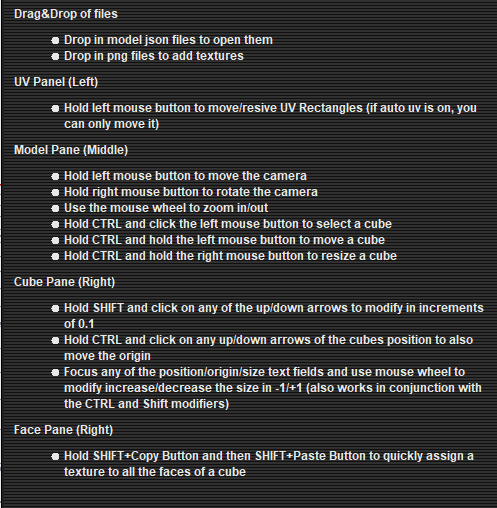
Model Editor controls, for reference - They're in the Help submenu (It really helps to memorize them!):
Once you have the hang of it, you can use Render Passes. An explanation of the different modes can be found by clicking here, but in layman's terms, they determine how a block will behave visually (Think - Glass, Ice, etc):
Texturing
Once we have our model, we can slap some textures on:
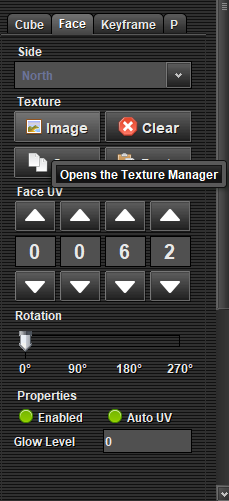
Let's look at this interface - Textures are assigned separately for each side of the model, which we need to apply manually. We can speed it up by clicking Copy and then Paste for every side. If a side is not going to be visible in game, you can deselect "Enabled", which will make that side invisible.
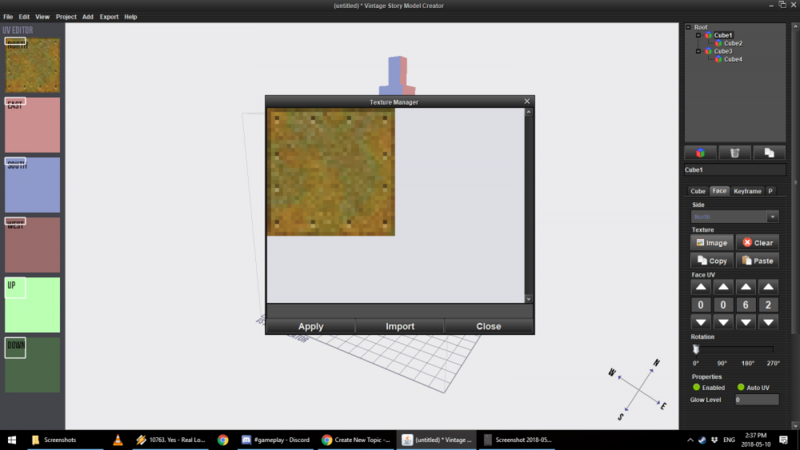
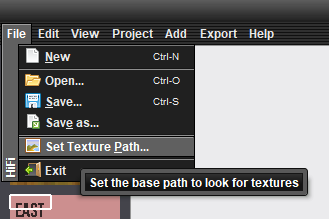
But first we need to click Image and import a texture we want to use. To make life easier, you can set the default texture path to take textures from. This is useful if you're going to use vanilla textures. Once a texture is imported - Click on it and select Apply. Please note that if your texture is outside of the game folder when Imported, you will need to tweak the model's shape (.json) file to reflect its location for the game. You will have to do this most of the time.
If we want to fine tune our UV Mapping (Aka how the texture is lined up on the model), we can use the Face UV controls to change the shape of the face. In this case, we stretch it out so that all the rivets are visible. One should also drag and move around the individual faces in the leftmost menu for best effect:
Once we're satisfied with the effect, we can save the model and use it in a mod:
Parenting
The parenting system allows you to attach models to the individual parts of a set backdrop model. This is how armor models stay attached to the arms and legs of the player model while that model is performing its own set of animations like running or crouching. This tutorial will cover how to use this system to implement armor models onto the player, but the same method can be used to implement custom clothing models or hairstyles for the player. If you use a different backdrop you can add custom accessories to any animated model of your choice.
Now there are two ways to start, the first method starts with an existing parented model from the game, this is far easier than the second method, but it's not as flexible. This will help you learn how the models in the base game are parented so you can eventually create your own from scratch. The second method shows you how to parent any shape to any backdrop element, which gives you far more freedom.
For method #1:
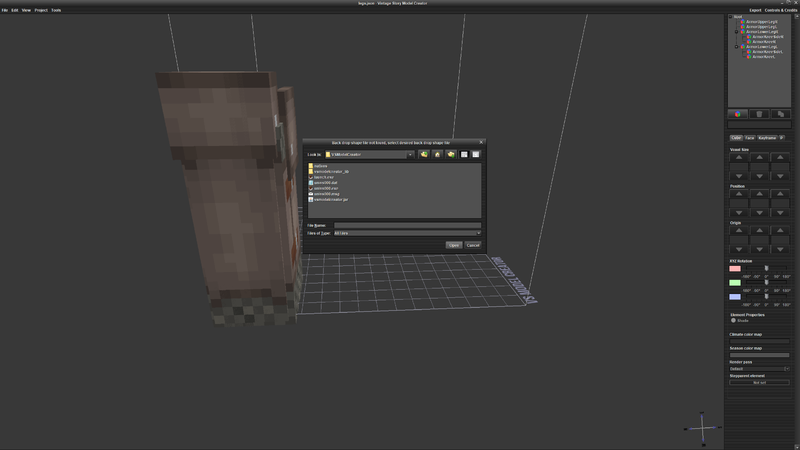
Start by importing the shape json of an item that is similar to what you want to add. Here we will be using the "legs.json" file located in your game directory and nested in Vintagestory/assets/survival/shapes/entity/humanoid/seraph/armor/plate. Go ahead and import this model into the Model Creator by dragging and dropping it into the window. This should usually prompt you with a window asking to import a backdrop shape:
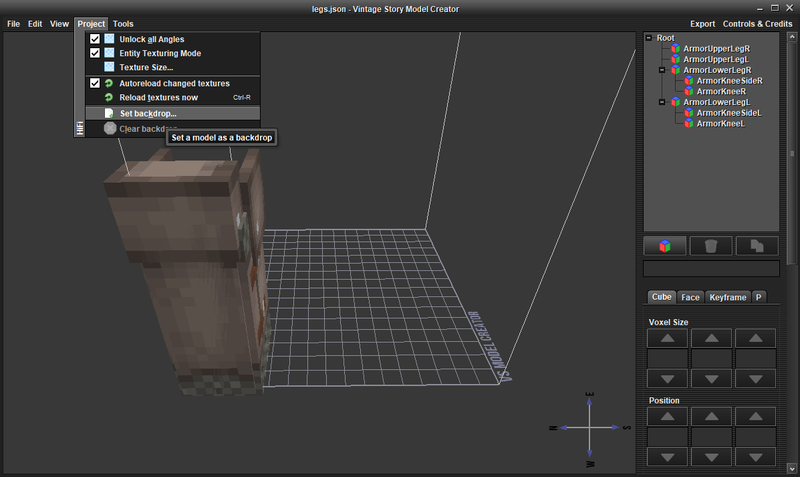
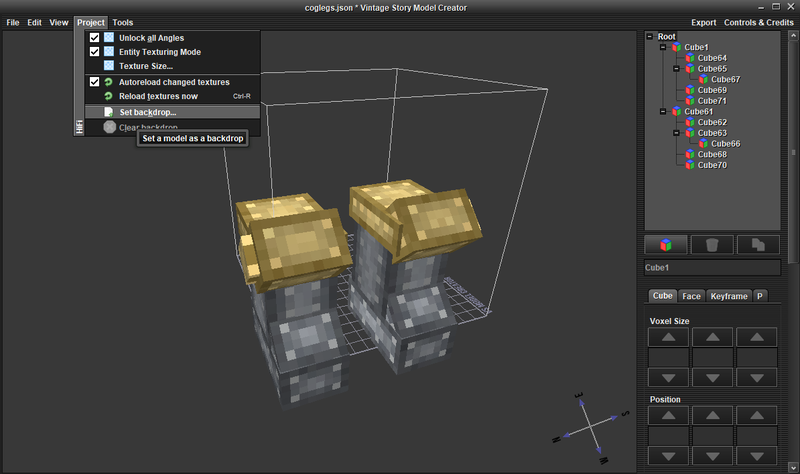
Sometimes it will not prompt you with an import window and you will need to manually set the backdrop. You can do this by going to the tab "project" at the top of the window and selecting "Set Backdrop...":
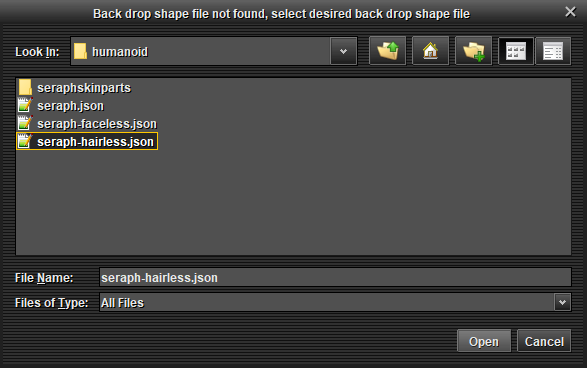
In the import backdrop pop-up window navigate to the following location for the appropriate seraph shape JSON to import, you should use seraph-hairless.json located in Vintagestory/assets/game/shapes/entity/humanoid/seraph-hairless for most things as it's the cleanest model to work with, but you can always create your own custom backdrop version with certain elements removed like the clothing tiles to strip the model down even more. You can also delete the face cubes if they are in the way. If you edit the seraph shape JSON be sure to save it as your own version and try not to mess with the naming of the major body parts, preferably name it something like "seraph-backdrop" and place it in an easily accessible location so you can easily import the file again.
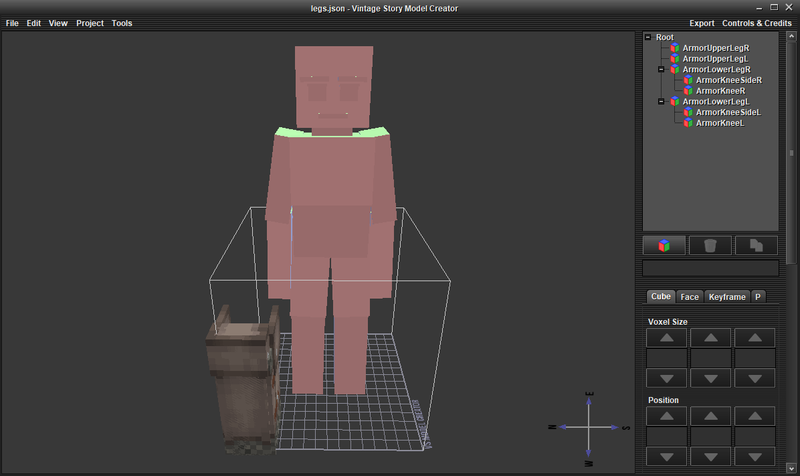
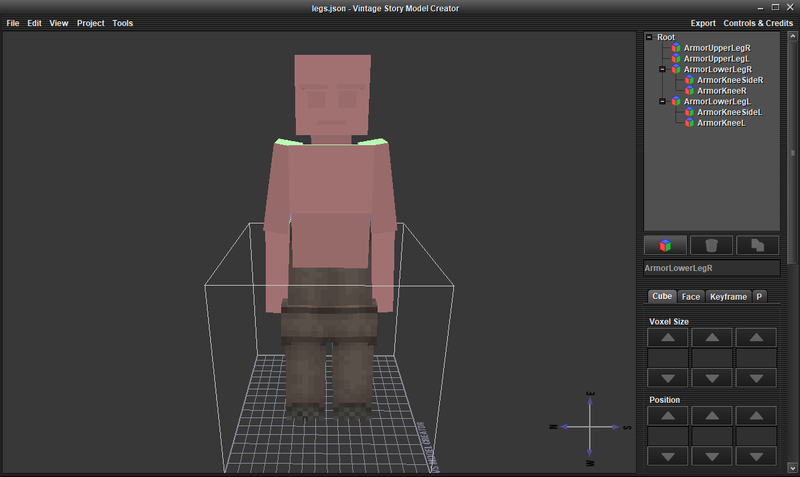
With the backdrop set your model workspace should look like the first image, note the leg armor model is still bunched up in the corner, sometimes the model will update itself and automatically fix itself, but most of the time you will need to update it manually. You can update the model by selecting any piece of the leg armor model and moving its position once in any direction, then just press Ctrl + Z and undo the move. This should update the model and then it will look like the second image:
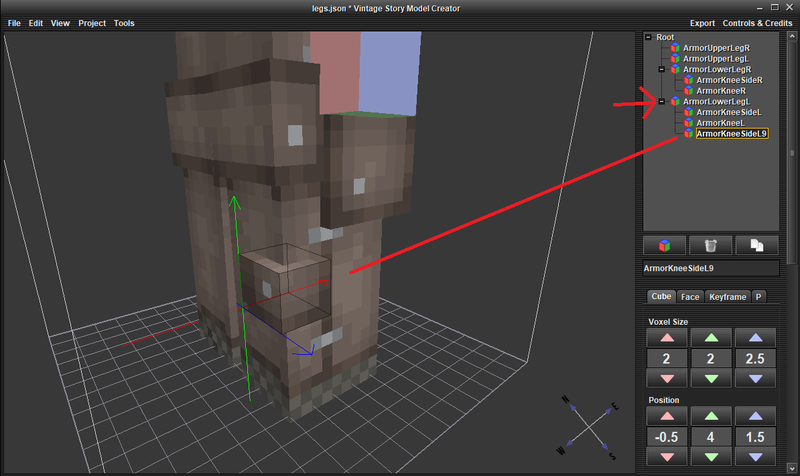
Now that you have the model and backdrop loaded into the model creator you are free to edit the shape however you'd like, just be sure to make your edited/added shapes branch off the original parts, the original parts are pre-parented to the backdrop so any newly added voxels must be attached to the tree of that part. Note how in the image "ArmorKneeSide9" is attached to and under the tree of "ArmorLowerLegL", Most major shapes at the start of trees or under the root are usually parented to the backdrop already. Just export the finished shape JSON and use it as normal, and be sure to edit the texture locations in the exported JSON to their correct locations.
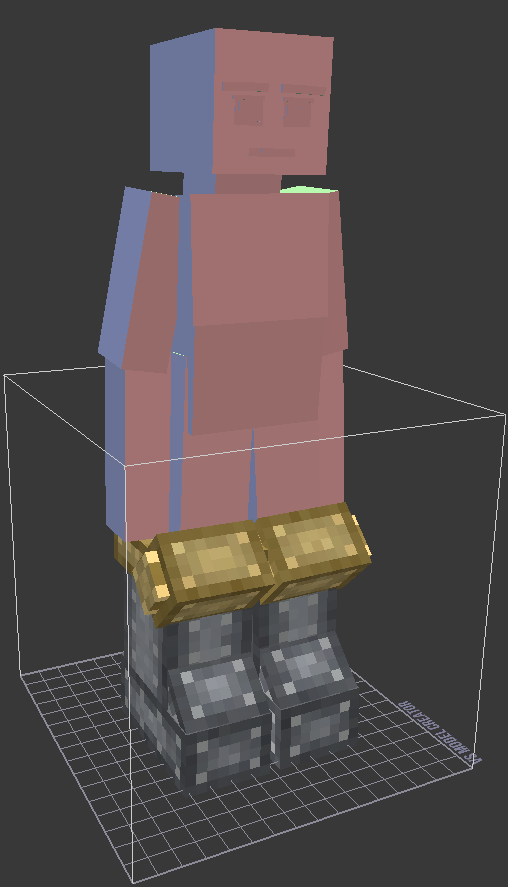
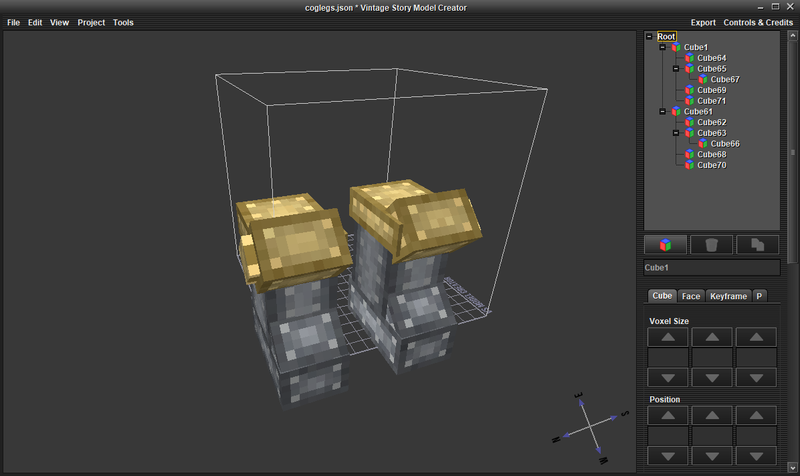
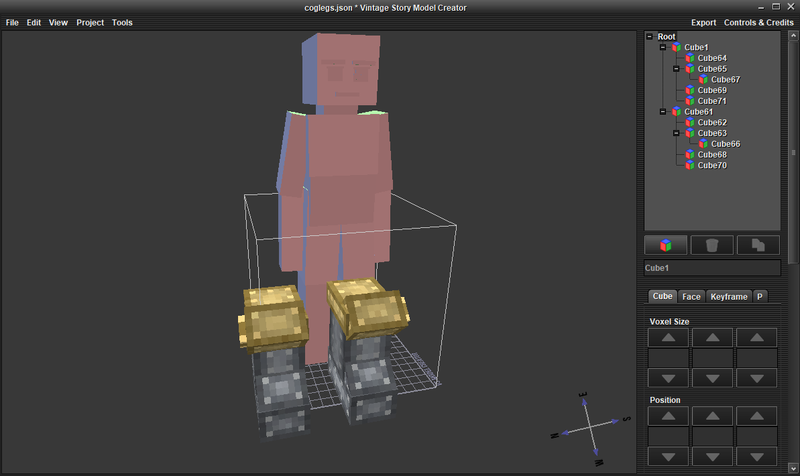
For method #2: This method should be used if you already have a model created and want to parent it to the appropriate part of the body. We will start with these boots, which I want to attach to the bottom of each leg on the player model.
Navigate up to the tab "project" at the top of the window and select "Set Backdrop...", as mentioned in method #1 you should use the seraph-hairless.json shape located in Vintagestory/assets/game/shapes/entity/humanoid/seraph-hairless, or a custom stripped down version. Select your backdrop shape of choice and then press the "Import backdrop" button on the pop-up window.
Your model creator window should now show an un-textured seraph model in the center like this:
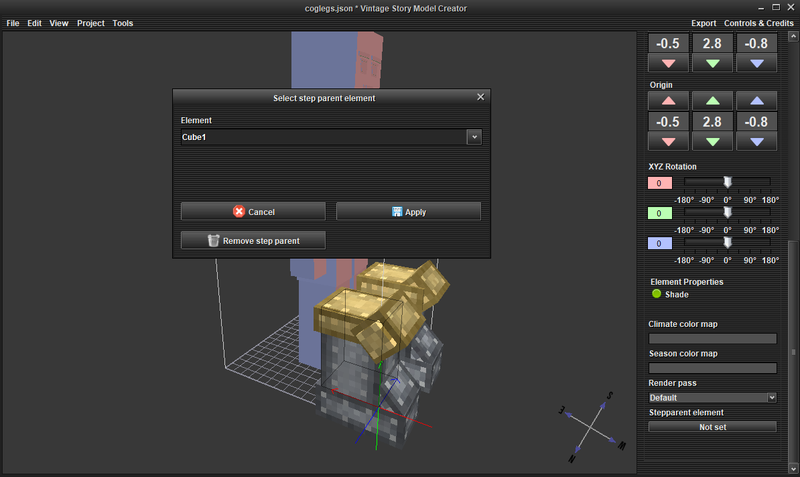
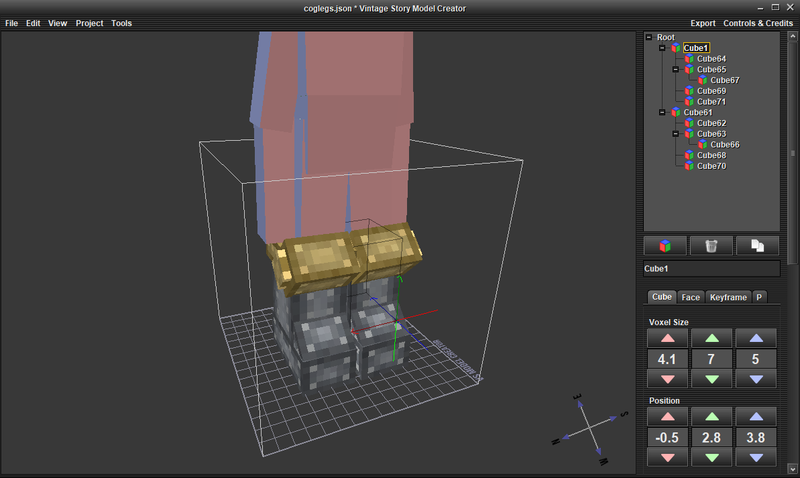
Next, select the part of your shape that you want to have attached to the backdrop model, here we are selecting the right boot main cube (it's the main cube because all the detail cubes are attached to it in the element tree), next scroll down on the left side of the model creator window and at the bottom you will see a "Not set" button under "Stepparrent element", press this button and you will see the following pop up window:
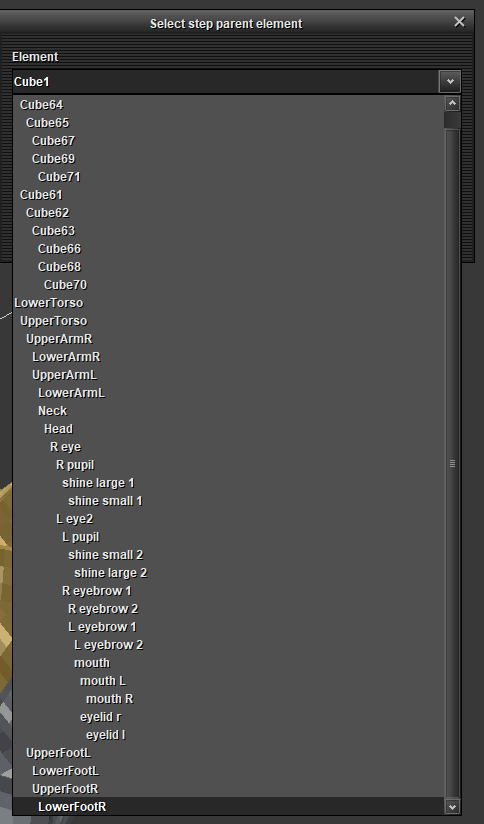
Now in this pop-up window, you will need to select the part of the backdrop model you want this cube you selected to be attached to, in this case I selected the right boot's main cube so I want it attached to the lower part of the right leg which in this case is all the way at the bottom of the "Element" drop down list. Once you select the right element go ahead and press the "Apply" button.
Note: The element names under this drop-down menu correspond to the exact names on the player model used in the game. This is why it's important to not rename them if you use a custom backdrop model. Also, if you don't know what an element corresponds to name-wise, simply open up the backdrop shape file your using in a separate model creator window and select the element you want to know the name of and it should show in the left window under the "New element" button and tree window.
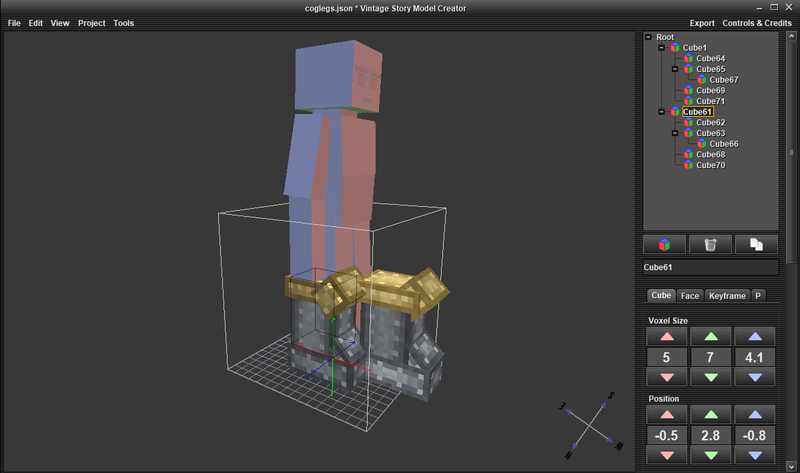
After pressing the "Apply" button in the window it should close and then attach that cube to the backdrop element you selected in the list:
Now repeat this process for each element you want attached to the backdrop model, you may need to modify the position of each model to properly align it to the backdrop. Also, when creating armor/clothing models be sure to separate the model up into several major cubes so they are easy to parent to the seraph model. For instance, break up the leg armor into two major sections, the upper and lower leg, then add your detail cubes under the tree/ attached to one of these major parts. Nearly every single shape that shows up on the player model can be imported/parented/and edited this way, and you can also extend this process to create armor models for other entities like adding trader clothing.
Wondering where some links have gone?
The modding navbox is going through some changes! Check out Navigation Box Updates for more info and help finding specific pages.
| Modding | |
|---|---|
| Modding Introduction | Getting Started • Theme Pack |
| Content Modding | Content Mods • Developing a Content Mod • Basic Tutorials • Intermediate Tutorials • Advanced Tutorials • Content Mod Concepts |
| Code Modding | Code Mods • Setting up your Development Environment |
| Property Overview | Item • Entity • Entity Behaviors • Block • Block Behaviors • Block Classes • Block Entities • Block Entity Behaviors • Collectible Behaviors • World properties |
| Workflows & Infrastructure | Modding Efficiency Tips • Mod-engine compatibility • Mod Extensibility • VS Engine |
| Additional Resources | Community Resources • Modding API Updates • Programming Languages • List of server commands • List of client commands • Client startup parameters • Server startup parameters Example Mods • API Docs • GitHub Repository |
