Survival Guide - Your first day/pt-br: Difference between revisions
RodolfoClash (talk | contribs) (Created page with ":'''Dica''': Cestas de mão são a melhor primeira opção para expandir seu Inventário. Colha Juncos, que gera...") Tags: Mobile edit Mobile web edit |
RodolfoClash (talk | contribs) (Created page with "=== Comida ===") Tags: Mobile edit Mobile web edit |
||
| Line 108: | Line 108: | ||
{{-}} | {{-}} | ||
=== | === Comida === | ||
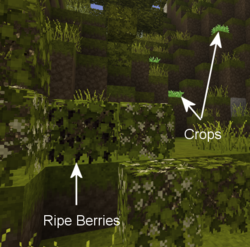
[[File:Black currant and wild crops.png|250px|thumb|Food scavenging time!]] | [[File:Black currant and wild crops.png|250px|thumb|Food scavenging time!]] | ||
Revision as of 18:11, 6 July 2022
Este guia é uma colaboração entre muitos e pode ter problemas. Um maravilhoso membro da comunidade, copygirl, que contribui para o código do Vintage Story, compilou um guia de sobrevivência mais conciso e potencialmente mais amigável em sua própria página. Tal como acontece com a wiki, não há garantia sobre a precisão do conteúdo e está correto de acordo com o conhecimento do autor guia de sobrevivência na página dela.
Controles
Esta é a combinação de teclas padrão, lembre-se de que, ao alterar, por exemplo, a Shift para se esgueirar, para uma tecla diferente todas as combinações que usavam a tecla Shift também mudarão para sua nova configuração de tecla.
Personagem
| W A S D | Para se movimentar |
| Espaço | Pular |
| E | Inventário da mochila (Acessa Grade de Criação) |
| C | Inventário do Personagem (Roupas e outros equipamentos) |
| Shift | Agacha (usado para colocar itens ativos em blocos) |
| Ctrl + W | Corre |
| G | Sentar-se |
| Q | Solta o item segurado |
| F5 | Alterna entre os modos de câmera (primeira pessoa, terceira pessoa, por trás da cabeça) |
Interface de usuário
| tab | Exibe/Oculta a sobreposição do chat |
| T | Comece a digitar na sobreposição de bate-papo |
| F4 | Exibe/Oculta interface pessoal |
| F6 | Exibe/Oculta o mini mapa pessoal |
| B | Exibe/Oculta informações do bloco |
| H | Manual de Sobrevivência - também pode ser usado ao passar o mouse sobre um item no inventário |
| SHIFT + H | Manual de Sobrevivência enquanto olha para um bloco ou item no mundo |
| M | Exibir/Ocultar worldmap |
| N | Exibir/Ocultar ajuda de interação do bloco block |
| V | Exibir/Ocultar coordenadas |
| F12 | Faz uma captura de tela |
| esc | Sair/fechar qualquer interface |
Seu primeiro dia
Surgimento do Jogador
Os jogadores aparecem no mundo no "local de surgimento(spawn)". Se um jogador morrer no jogo, o jogador reaparecerá (respawn) no local se spawn inicial, até que o ponto de spawn seja redefinido (uma maneira de redefinir o local de spawn do jogador pode ser encontrada mais tarde no jogo.) É uma boa idéia configurar um marcador para esse local de spawn assim que o jogador aparecer pela primeira vez no mundo. Clique com o botão direito no mapa ou através do comando /waypoint add [waypointcolor] [title]. Este comando adiciona uma marcação com uma cor determinada (qualquer Cor .NET ou código Hex) e texto.
Ferramentas de pedra
Para iniciar a "Idade da Pedra", você precisará de "Ferramentas de Pedra", o processo geralmente envolve o seguinte:
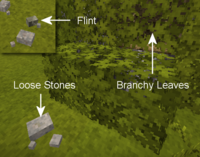
- Encontre Pederneira ou Pedras Soltas (basalto, granito, andesito, obsidiana ou peridotito).
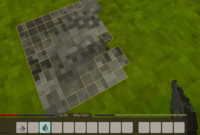
Agache + Botão direitoem um bloco sólido
para criar uma superfície de lapidação. (Somente pederneira criará imediatamente uma superfície
de lapidação ). Para usar as outras pedras soltas, você precisa colocá-la uma vez, e então Agacha + Botão direito novamente com outra pedra solta.
- Escolha a ferramenta para criar no menu. Machado e a Faca são altamente recomendadas como primeiras ferramentas.
- Usando uma pedra na mão ativa,
botão esquerdonos quadrados laranja para removê-los da pedra e moldar a lâmina acabada ou a cabeça da ferramenta. Quando o último quadrado laranja for removido, a cabeça de ferramenta concluída será transferida para a barra de atalhos do jogador. - Pressione E para abrir a GUI e acessar a grade de criação. Na grade, com um graveto (alça) para criar a ferramenta acabada.
- Nota: Gravetos podem ser coletados do chão ou quebrando galhos frondosos usando o
botão esquerdo.
Inventário do jogador
Os jogadores tem acesso a 3 tipos de slots de inventário.
|
Comida
Here are some of the first day options for food:
- Mushrooms can be harvested with a knife or empty hands. They will regrow at the exact spot, so marking mushroom clusters on the map can be advantageous. Make sure to check the mushroom with the Handbook to check for poisonous variants.
- Ripe Berry Bushes can be harvested without tools, and then broken and replanted anywhere else. After a while they will start to bloom again.
- Cattail roots can be harvested using a knife and cooked over a fire as a source of early game forage.
- Most animals can be killed and harvested with a knife for nutritious meat and fat. Hold
Sneak + Hold Right mouse buttonwith a knife in hand to harvest animals. Meat must be cooked in a fire pit.
Clay
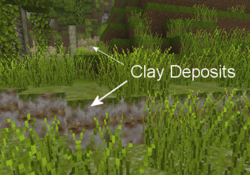
Clay is a required resource to progress through the ages, and in early game it can be used to build comparatively cheap stationary storage options and your first means to preserve food for a bit longer. It is also required to craft a cooking pot, which is necessary for advanced cooking.
Detailed information can be found in the Clay Forming page.
Light / Cooking
Once the sun sets, a player might want to create a firepit as a source of light and for cooking. Be aware though, rain will extinguish any uncovered fires or torches, so be sure to build a simple roof over any firepits.
Gather the following resources:
- Dry grass:
left clickwith a Knife in hand to gather Tall Grass. - Firewood:
left clickwith an Axe in hand to cut Trees and harvest logs. Place the axe and logs in the crafting grid to create firewood.
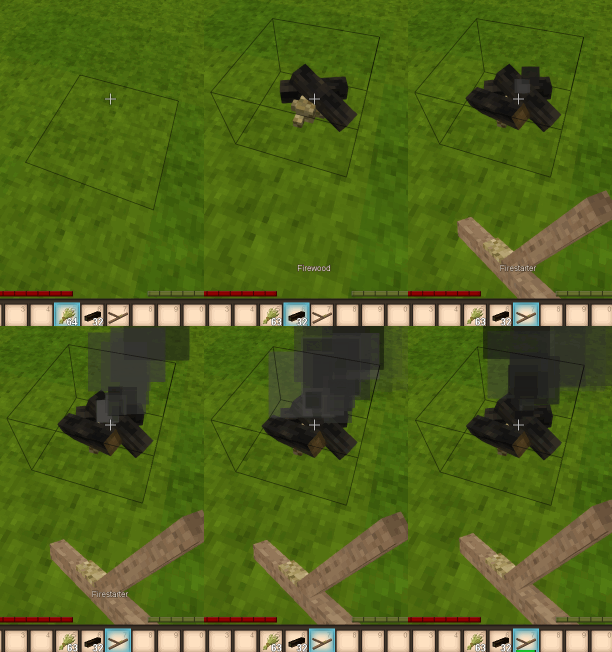
Hold Sneak + Right click on solid ground with the dry grass in hand to place a fire pit. Next, Sneak + Right click with 4 firewood in hand to complete the fire pit. Then, light the fire using a firestarter (or a torch), hold Right click with either item in hand and aim at the base of the firepit. (Optionally check the handbook, opened with H, to find out how to make a firestarter.)
Congratulations, meat can be cooked and new torches created by heating sticks! Be careful though, a torch in your off hand will cause you to take an increased hunger penalty, and torches held while taking a dip in water will get extinguished.
Combat
To defend against hostile creatures, craft stone age weapons by knapping or carving a club from a log. Different weapons have different ranges. Spears are the strongest long range weapon in the stone age, but break quickly. Create a stone spearhead by knapping, and combine with a stick (shaft) in the crafting grid to finish the spear. Wooden clubs are durable but have less damage and less range. Knives, axes, or just plain sticks can all be used as weapons, but these have shorter ranges than the spear. In an emergency, small stones can be thrown at mobs. For more information, see the main article on Combat
Improvised body armor can be crafted from dry grass and firewood for some very basic protection. It will not protect your head or legs, but is better than nothing. Once more established in the world of Vintage Story, more advanced types of armor can be crafted.
Shelter
Once the sun sets, a player might also like a shelter. There are different blocks that you can use to make a shelter using the early resources you have available. Dry grass can be used to make a bed early on, or form hay blocks/cob for early building blocks. Soil is also a good building material, and can be used to form Mud Bricks.
Stationary Storage
- See Container's main article for detailed information.
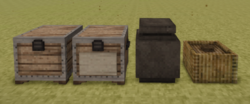
For more storage, the player can craft two early game containers.
- Baskets have 8 slots for items, however they require a total of 24 cattails and shouldn't be used to store food if possible.
- Storage Vessels have 12 slots. They require clay to craft and have the best spoilage rates in the game, which make them suitable for food storage.
- Chests have 16 slots, but require boards, which also require access to smithing.
Temperature
- See Temperature's main article for detailed information.
The player's body temperature needs to be kept around 37°C. Prolonged times with body temperature under this mark will result in freezing animations and even damage taken. Beware that dipping in water or being out in the rain will make your temperature drop faster. Standing near a lit campfire can warm the player up and the body temperature will stay up a while even after stepping away.
Temporal Stability
- See Temporal Stability's main article for detailed information.
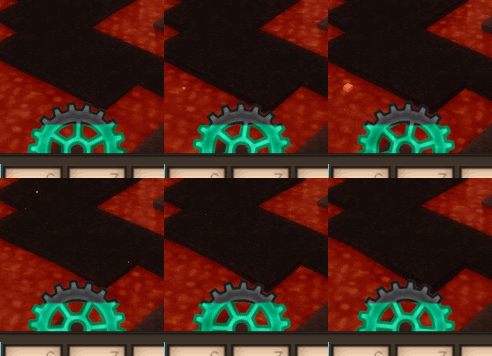
By now a player might be wondering about the cyan gear between the health and satiety bar. This is the temporal stability meter, the level of color in the gear indicates the player's current temporal stability. As a player's temporal stability reduces, the gear turns counter clockwise and the blue color in the gear decreases. When increasing, the gear's color returns as it turns clockwise. If temporal stability reaches zero, the player's vision will change drastically, and bad things tend to happen.
Draining temporal stability:
- Some surface areas are temporally unstable
- Caves, underground caverns, and places below surface level are generally more unstable than the surface of the world
- Temporal storms (occur at regular intervals)
Recovering temporal stability:
- Move to a location of high stability on the surface or at higher elevations in the world
- Transfer the temporal stability from a temporal gear: hold the gear in the left hand, a knife in the right hand, and hold
right mouse buttonto provide a 30% boost - Killing drifters recovers small amounts of your own temporal stability
Advanced Game Mechanics
Once the basics are mastered, players can develop advanced technology: Survival Guide - Advanced tech
Video Tutorial: Primeiro Dia
Obrigado a Rodolfo Clash por criar e compartilhar com a comunidade VS.
| {{{title}}} | |
|---|---|
