Modding:Настройка среды разработки
Эта страница проверялась в последний раз для версии Vintage Story 1.18.8-rc.1.
Программное обеспечение
Когда вы будете готовы приступить к кодированию модов для Vintage Story, вы, вероятно, захотите настроить среду разработки, которая упростит процесс кодирования и тестирования ваших творений. Vintage Story разрабатывается на C# и начиная с версии 1.18.8 мы перешли на .NET 7.
Есть несколько приложений, которые помогут вам в разработке модов. Вот некоторые из них, поддерживающие наш шаблон:
- Visual Studio Community это бесплатная и очень мощная среда разработки, описанная в руководстве ниже. Это также инструмент, который команда Vintage Story использует для создания игры. Он также имеет MacOS версию.
- Jetbrains Rider — это бесплатная и современная среда разработки с бесшовной поддержкой проектов, сочетаний клавиш и макетов Visual Studio. Это корпоративный продукт, и некоторые функции заблокированы лицензией (проверка дублирования кода, инструменты веб-разработчика), но все функции, необходимые для разработки модов VS, бесплатны. Функции индексации/перехода к ссылкам и встроенные функции декомпиляции очень эффективны, так как вы можете нажать на метод, который использует Vintage Story, и он покажет вам код, стоящий за ним. Обратите внимание, что в настоящее время в нем есть одна ошибка + задокументировано обходное решение. тут.
- Visual Studio Code очень облегченная версия Visual Studio. Наш драгоценный член сообщества copygirl использует этот инструмент, а также написал инструкцию по настройке github
While you can use any text editor to edit source code files we highly recommend using any of the above tools to make your experience much more manageable.
VintageStory разработан на C#. Выберите одну из вышеперечисленных IDE или другие альтернативы. Мы предлагаем использовать Visual Studio Community для Windows. Для Linux вы можете использовать Visual Studio Code, Rider или MonoDevelop.
Note: If you are on Linux and plan to install Visual Studio Code or Rider using Flatpak or snap be aware that there might be some issues with using system tools like .NET 7 or the environment variables. So if possible please use a native installation method if possible.
Next, you will need to install the .NET 7 SDK (Software Development Kit) this will also include the .NET 7 Dekstop Runtime which is needed to run the game since version 1.18.8-rc.1.
Verify that the .NET 7 SDK is correctly installed by running the following command in a Terminal:
On Windows open the Application Windows PowerShell which is preinstalled on all modern Windows versions (10 / 11).
dotnet --list-sdks
It should return a list of installed SDK's and should contain a line with 7.0.xxx. If that is the case you are good to continue.
Setup the Environment
Our Mod template makes use of the environment variable VINTAGE_STORY. Which we will set up to contain the path of where your game is installed. The use of the environment helps to keep the setup and the template simple so we recommend using it and will cover it in this article.
The VINTAGE_STORY Environment Variable simplifies reusing your Vintage Story game installation path and helps if multiple modders work on the same project to reference the VINTAGE_STORY Environment Variable and have their game installed where ever they want.
Windows
Here you have two options to set the environment variable:
- Use this short PowerShell script. Open the Windows PowerShell Application and paste the following into it and hit ENTER
[Environment]::SetEnvironmentVariable("VINTAGE_STORY", "$Env:AppData\Vintagestory", "User")
Change $Env:AppData\Vintagestory if you used a custom installation path for your game.
- Follow these manual steps to set the Environment variable
Search in Windows search for Edit the system environment variables > Environment Variables... > User variables for USER > New > Add insert the Variable name: VINTAGE_STORY and add the path to your Vintage Story installation.

For example, the default installation directory would be C:\Users\<Username>\AppData\Roaming\Vintagestory, (replace <Username> with your username) if you are not sure where yours is type %appdata% into the URL field in the File Explorer and hit ENTER. It will take you to your AppData\Roaming folder where Vintage Story should be installed if you haven't changed the default installation location.

Note:
Do not confuse the AppData\Roaming\VintagestoryData directory with the AppData\Roaming\Vintagestory folder. The VintagestoryData directory only holds your Settings, Logs, Savegames and Mods.
Linux and Mac
To set an environment variable in Linux/Mac you need to add the following to your shells startup file:
export VINTAGE_STORY="$HOME/ApplicationData/vintagestory"
Replace the path with the one where your Vintagestory installation is located. The above path should point to your install when you installed Vintagestory using the install.sh script.
Run echo $SHELL in a terminal to see what shell you are using.
- For Bash place it in:
~/.bashrcor~/.bash_profileat the end - For Zsh place it in:
~/.zshrcor~/.zprofileat the end - If you use another shell see their documentation on how their shell startup file is called
Note: If you are using ~/.bash_profile or ~/.zprofile you will have to Logout and Login again to apply the changes. When using ~/.bashrc or ~/.zshrc you only need to restart the application that needs to use the environment variable (Visual Studio, Rider, Visual Studio Code, Terminal).
Создание мода
Mod Template package
The first and recommended option would be to use the template package.
Install the mod Mod template package using the following command on the Terminal:
dotnet new install VintageStory.Mod.Templates
This will download the latest mod template package from nuget.org
Once the template is installed you will see it inside Visual Studio and Rider. From there you can use the templates to create a new Project.
Visual Studio
We advise you to check the option Place solution and project in the same directory for Visual Studio
This will flatten the project tree by one folder and make it easier to navigate.
If you don't want the log output to show up in a separate window you can check the option SuppressWindowsConsoleWindow. When enabled the log output will still be shown inside the Visual Studio Debug Output.
Open Visual Studio and click on Create a new project. If you installed the VintageStory.Mod.Templates you can then select Vintage Story Mod.
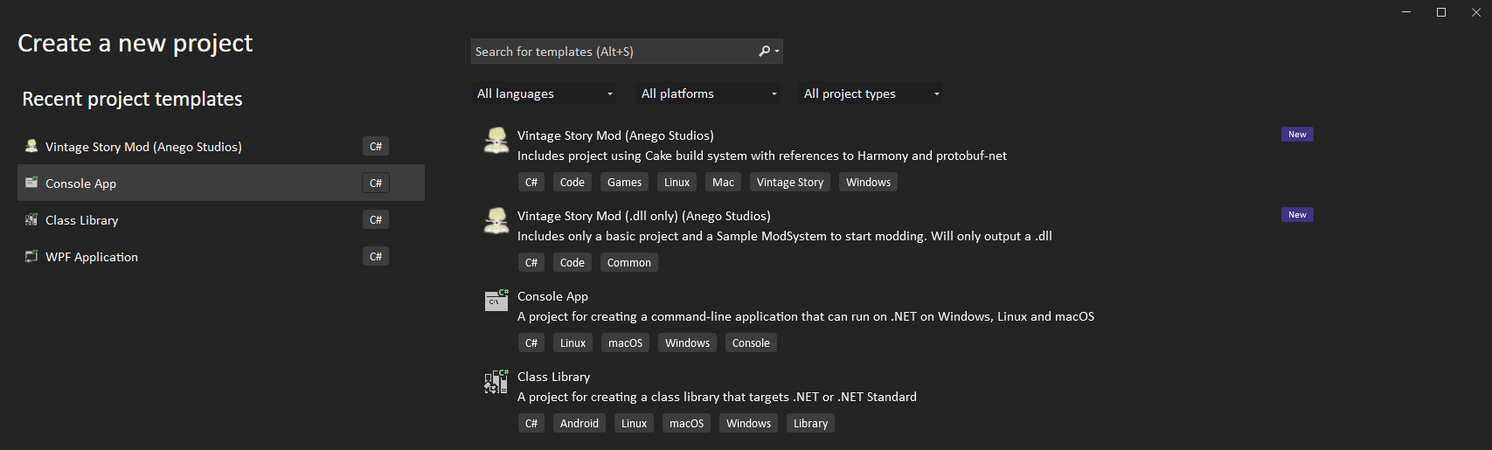
Visual Studio Mod Template

Visual Studio Mod Template setup
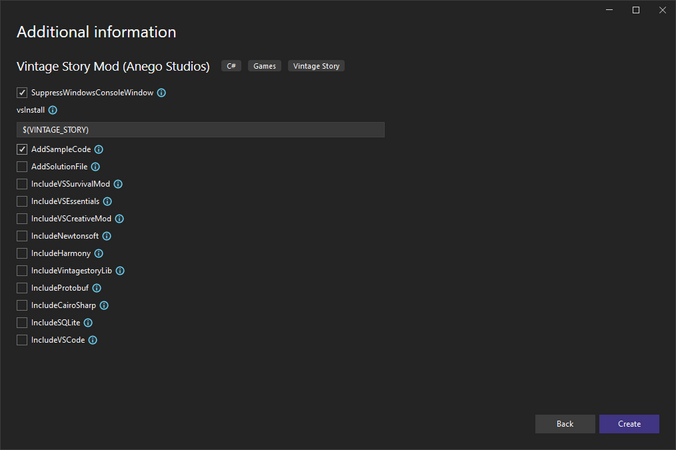
Visual Studio Mod Template options


Rider
We advise you to check the option Put solution and project in the same directory for Rider.
This will flatten the project tree by one folder and make it easier to navigate.
Open Rider and click on New Solution. If you installed the VintageStory.Mod.Templates you can then select Vintage Story Mod.

Note: Unfortunately as of writing this Rider does not support those template options as Visual Studio in the UI yet but you can check this issue for updates. For now you can make use of those options using the CLI see the Visual Studio Code section for how to use it.
Visual Studio Code
To create a new Mod using the template when using Visual Studio Code you have to resort to using the command line for now since there is no UI that supports the options as well. Open a folder in Visual Studio Code where you want your mod to be. Then open the terminal within Visual Studio code Terminal > New Terminal.
- Create a new Mod Project with launch.json and task.json to easily start it and a Solution file. Other IDE's create that automatically so that is why we have this additional
--AddSolutionFileflag for VS Code.
dotnet new vsmod --IncludeVSCode --AddSolutionFile
For all possible options run the following in the terminal:
dotnet new vsmod --help
Once you opened or created a template Visual Studio will prompt you to install the recommended extension, click on Show Recommendations and install the the pre-release version of the C# Dev Kit extension. This will also install the required C# automatically for you. These two extensions are recommended and will add Syntax highlighting, Autocomlet and many more much-needed features for writing C# code.
Other / Commandline
If want to use the Commandline you can use all template options on the Commandline in any Terminal Application with the help of the dotnet command.
- Create a new VS mod in the folder mytestmod in the current location of the terminal.
dotnet new vsmod --AddSolutionFile -o mytestmod
- or create a dll/code only mod
dotnet new vsmoddll --AddSolutionFile -o mytestmod
For all possible options run the following in the terminal:
dotnet new vsmod --help
When using the Commandline you can specify these options like so:
# Will create a new Mod Project with the dependency for VSSurvivalMod
dotnet new vsmod --AddSolutionFile --IncludeVSSurvivalMod -o mytestmod
Finally in mytestmod\mytestmod\modinfo.json
change the name, modid , authors and description to describe your mod.
Обновление шаблонов
To update all installed templates you can run:
dotnet new update
But this should not be necessary when creating a new mod, since using the dotnet new vsmod will check automatically if a new version of the template is available and install it.
Структура папок
Установить средство разработки
Проект-шаблон мода
Use the Github Mod template to create a new mod
The Github Mod template provides an easy way to get the basics for mod setup so you can start directly with adding your modifications to the game.
- Without using git and Github account
To get a copy of the template click the <> Code button on the GitHub repository site. Then download the template as ZIP file and extract it.
- Using Github and or git command
You can directly click on Use this template on the GitHub repository site to create a copy of it to your GitHub account.
After that, you can clone your new repository to your computer.
If you do not use GitHub just clone the repo and upload it to your preferred Git hosting provider (Gitlab, BitBucket, ...)
With a local copy of the template, you can go ahead and open the ModTemplate.sln either in Visual Studio, Rider or Open the folder in Visual Studio Code. The Template is ready to use for any of the aforementioned IDE's. Now you can already start the mod with the game.
When opened you need to change the following to release the mod since a mod has to have a unique modid for the VSModDB:
In modtemplate\resources\modinfo.json
change the name, modid , authors and description to describe your mod.
For a full list of available options see Modinfo.
The modid has to contain only lowercase letters and numbers. No special chars, whitespaces, uppercase letters, etc. are allowed.
Next, rename the folder modtemplate\resources\assets\mymodid to match what your modid is.
Finally change in the file modtemplate\modtemplateModSystem.cs the line
Lang.Get("mymodid:hello")
from mymodid to your new modid.
The file modtemplate\modtemplateModSystem.cs can be called whatever you like.
(Optional) Further, you can change the name ModTemplate to whatever you like as long as you change all of the following:
- Folder
ModTemplate - File
ModTemplate\ModTemplate.csproj - In File
CakeBuild\Program.cson line
ProjectName = "ModTemplate";
If you are on linux and used the Github Template make sure to update in ModTemplate\Properties\launchSettings.json the executablePath. There you need to remove the .exe
Запуск мода
Visual Studio Launch Mod

Rider Launch Mod

Rider Launch Mod (New UI)

Rider Launch Mod


Visual Studio Code Launch Mod

Если у вас возникли проблемы, вы можете узнать из проекта vsmodexamples
Упаковка мода
With the new template, we are using the Cake build system. This includes a second Project within the Solution in the template.
In all supported IDE's you can select from the dropdown that you used to launch the mod the CakeBuild option and run it.
When using Visual Studio Code you can also create a package by running the package task. For that got to Terminal > Run Task... and select package.
It will perform a JSON validation on your assets so they are at least parsable by Newtonsoft.Json and then build a Releases/mymodid_1.0.0.zip. The version is taken from the mymod/modinfo.json file.
Congratulations now you have your mod development environment set up and a ready-to-release mod package.
Note: Make sure you use your own unique modid else you won't be able to upload the mod to the VSModDB.
Дальнейшее продвижение
Если вам удалось настроить среду разработки и запустить Vintage Story через проект VSMods в вашей среде IDE, то пришло время приступить к работе над своим первым модом кода. На данный момент есть много вариантов, которые вы можете выбрать, поскольку моды кода могут изменить практически любой аспект игры. Тем не менее, лучше всего начать с блоков и элементов (поскольку к этому моменту вы уже должны быть знакомы с их созданием с использованием JSONS).
Перейдите на страницу Расширенные блоки, чтобы создать свой первый расширенный блок кода.
Или перейдите на страницу Расширенные элементы, чтобы создать свой первый расширенный элемент кода.
Wondering where some links have gone?
The modding navbox is going through some changes! Check out Navigation Box Updates for more info and help finding specific pages.
| Modding | |
|---|---|
| Modding Introduction | Getting Started • Пакет тем |
| Content Modding | Content Mods • Developing a Content Mod • Basic Tutorials • Intermediate Tutorials • Advanced Tutorials • Content Mod Concepts |
| Code Modding | Code Mods • Setting up your Development Environment |
| Property Overview | Item • Entity • Block • Block Behaviors • Block Classes • Block Entities • Block Entity Behaviors • World properties |
| Workflows & Infrastructure | Modding Efficiency Tips • Mod-engine compatibility • Mod Extensibility • VS Engine |
| Additional Resources | Community Resources • Modding API Updates • Programming Languages • List of server commands • List of client commands • Client startup parameters • Server startup parameters Example Mods • API Docs • GitHub Repository |