Príručka na prežitie - Tvoj prvý deň
Táto príručka je výsledkom spolupráce medzi mnohými jednotlivcami a nemusí byť úplne presná. Skvelá členka komunity, copygirl, ktorá je prispievateľkou do kódu Vintage Story, zostavila stručnejšiu a potenciálne užívateľsky prívetivejšiu príručku prežitia na svojej vlastnej stránke. Rovnako ako v prípade wiki neexistuje žiadna záruka na presnosť obsahu, ktorý je správny podľa najlepšieho vedomia a svedomia autora.
Controls
Toto sú predvolené klávesové skratky, majte prosím na pamäti, že keď napríklad zmeníte kláves Shift na prechod na iný, všetky kombinácie, ktoré predtým používali kláves Shift, sa zmenia na váš nový výber klávesy.
Postava
| W A S D | Pohyb |
| Space | Skok |
| E | Obsah batohu (prístup k vyrábacej mriežke) |
| C | Inventár postavy (Oblečenie a ďalšie veci) |
| Shift | Prikrčenie (používa sa i na položenie vecí a blokov) |
| Ctrl + W | Beh |
| G | Sadnúť si |
| Q | Vyhoď aktuálne držanú vec |
| F5 | Zmeň pohľad kamery (pohľad z prvej osoby, pohľad z tretej osoby, pohľad okolo) |
Užívateľské rozhranie
| tab | Zobraz/Skry komunikačné okno (chat) |
| T | Začni písať do chatu |
| F4 | Zobraz/Skry užívateľské rozhranie |
| F6 | Zobraz/Skry minimapu |
| B | Zobraz/Skry informácie o bloku |
| H | Príručka na prežitie - dá sa zobraziť aj priamo info o veci v inventári po kurzorom myši |
| SHIFT + H | Zobrazí sa príručka o bloku, alebo veci na ktorú sa hráč pozerá priamo vo svete |
| M | Zobraz/Skry mapu sveta |
| N | Zobraz/Skry návod ako pracovať s blokom |
| V | Zobraz/Skry koordináty |
| F12 | Odfoť obrazovku |
| esc | Zavri ktorékoľvek rozhranie |
Tvoj prvý deň
Miesto oživenia hráča (spawn)
Hráči sa vo svete objavia na „mieste oživenia“. Ak hráč v hre zomrie, hráč sa znova objaví (respawnuje) na počiatočnom mieste oživenia, kým sa miesto oživenia hráča nezmení (spôsob, ako sa dá zmeniť miesto oživenia hráča v hre, nájdete neskôr v hre.) Je dobré nastaviť si značku pre toto miesto, keď sa hráč prvýkrát vo svete objaví. Buď kliknite pravým tlačidlom myši na mapu sveta alebo zadáte príkaz /waypoint add [waypointcolor] [title]. Tento príkaz pridá orientačný bod s danou farbou (akákoľvek .NET farba, alebo HEX kód) a text.
Kamenné nástroje
Aby si vstúpil do Doby kammennej, budeš potrebovať Kamenné nástroje, proces obvykle zahŕňa nasledovné:
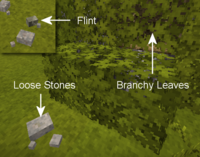
- Nájdi Pazúrik, alebo Tvrdé kamene (čadič, žula, andezit, obsidián, alebo peridotit).
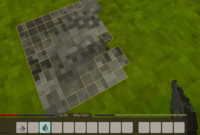
Prikrčenie + pravý klikna pevnej zemi vytvorí štiepací povrch. (Len pazúrik vytvorí štiepací povrch okamžite. Pre použitie iného typu kameňa, musíš ho najprv položiť a potom znovaprikrčením + pravý klikvytvoriť štiepací povrch.- Z menu si vyber nástroj, ktorý chceš vytvoriť. Sekera a Nôž sú dva najlepšie nástroje pre začiatok.
- Kameňom držaným v aktívnej ruke,
ľavým kliknutímna oranžové kocky sa tieto odstránia a vytvorí sa tak čepeľ nôža, alebo daná hlava zvoleného nástroja. Po odstranení poslednej oranžovej kocky sa hotový nástroj prenesie do hráčovho inventára. - Stlačením E sa otvorí inventár a vyrábacia mriežka. V mriežke skombinuj čepeľ noža, či hlavu nástroja s palicou (rúčka) a tým sa vyrobí hotový nástroj.
- Poznámka: Palice sa dajú nájsť na zemi, alebo získať zničením vetvičiek s listami pomocou
ľavého kliknutiamyšou.
Inventár hráča
Hráč má prístup k 3 typom úložných miest.
|
Jedlo
Here are some of the first day options for food:
- Mushrooms can be harvested with a knife or empty hands. They will regrow at the exact spot, so marking mushroom clusters on the map can be advantageous. Make sure to check the mushroom with the Handbook to check for poisonous variants.
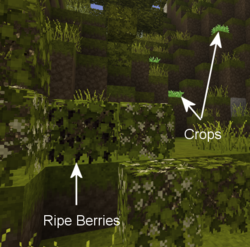
- Ripe Berry Bushes can be harvested without tools, and then broken and replanted anywhere else. After a while they will start to bloom again.
- Cattail roots can be harvested using a knife and cooked over a fire as a source of early game forage.
- Most animals can be killed and harvested with a knife for nutritious meat and fat. Hold
Sneak + Hold Right mouse buttonwith a knife in hand to harvest animals. Meat must be cooked in a fire pit.
Clay
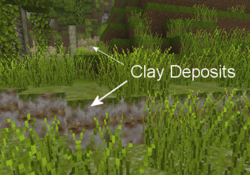
Clay is a required resource to progress through the ages, and in early game it can be used to build comparatively cheap stationary storage options and your first means to preserve food for a bit longer. It is also required to craft a cooking pot, which is necessary for advanced cooking.
Detailed information can be found in the Clay Forming page.
Light / Cooking
Once the sun sets, a player might want to create a firepit as a source of light and for cooking. Be aware though, rain will extinguish any uncovered fires or torches, so be sure to build a simple roof over any firepits.
Gather the following resources:
- Dry grass:
left clickwith a Knife in hand to gather Tall Grass. - Firewood:
left clickwith an Axe in hand to cut Trees and harvest logs. Place the axe and logs in the crafting grid to create firewood.
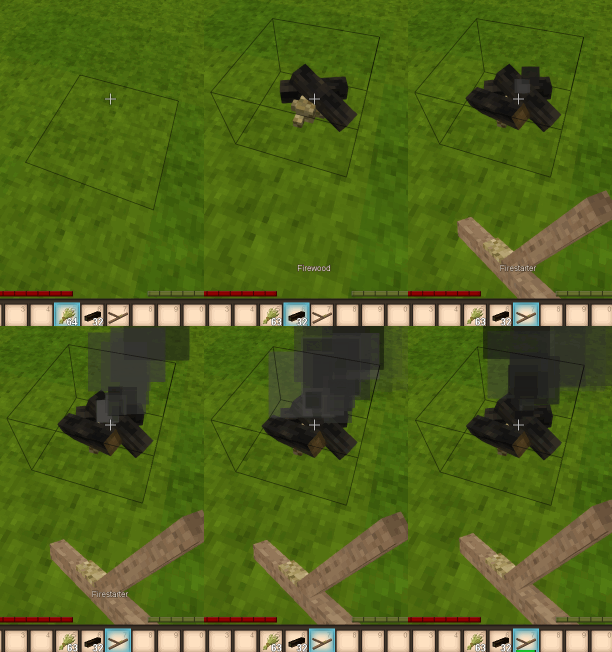
Hold Sneak + Right click on solid ground with the dry grass in hand to place a fire pit. Next, Sneak + Right click with 4 firewood in hand to complete the fire pit. Then, light the fire using a firestarter (or a torch), hold Right click with either item in hand and aim at the base of the firepit. (Optionally check the handbook, opened with H, to find out how to make a firestarter.)
Congratulations, meat can be cooked and new torches created by heating sticks! Be careful though, a torch in your off hand will cause you to take an increased hunger penalty, and torches held while taking a dip in water will get extinguished.
Combat
To defend against hostile creatures, craft stone age weapons by knapping or carving a club from a log. Different weapons have different ranges. Spears are the strongest long range weapon in the stone age, but break quickly. Create a stone spearhead by knapping, and combine with a stick (shaft) in the crafting grid to finish the spear. Wooden clubs are durable but have less damage and less range. Knives, axes, or just plain sticks can all be used as weapons, but these have shorter ranges than the spear. In an emergency, small stones can be thrown at mobs. For more information, see the main article on Combat
Improvised body armor can be crafted from dry grass and firewood for some very basic protection. It will not protect your head or legs, but is better than nothing. Once more established in the world of Vintage Story, more advanced types of armor can be crafted.
Shelter
Once the sun sets, a player might also like a shelter. There are different blocks that you can use to make a shelter using the early resources you have available. Dry grass can be used to make a bed early on, or form hay blocks/cob for early building blocks. Soil is also a good building material, and can be used to form Mud Bricks.
Stationary Storage
- See Container's main article for detailed information.
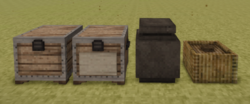
For more storage, the player can craft two early game containers.
- Baskets have 8 slots for items, however they require a total of 24 cattails and shouldn't be used to store food if possible.
- Storage Vessels have 12 slots. They require clay to craft and have the best spoilage rates in the game, which make them suitable for food storage.
- Chests have 16 slots, but require boards, which also require access to smithing.
Temperature
- See Temperature's main article for detailed information.
The player's body temperature needs to be kept around 37°C. Prolonged times with body temperature under this mark will result in freezing animations and even damage taken. Beware that dipping in water or being out in the rain will make your temperature drop faster. Standing near a lit campfire can warm the player up and the body temperature will stay up a while even after stepping away.
Temporal Stability
- See Temporal Stability's main article for detailed information.
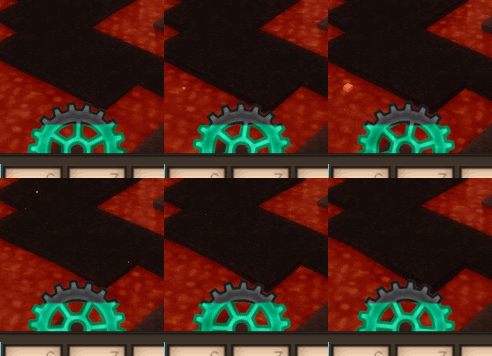
By now a player might be wondering about the cyan gear between the health and satiety bar. This is the temporal stability meter, the level of color in the gear indicates the player's current temporal stability. As a player's temporal stability reduces, the gear turns counter clockwise and the blue color in the gear decreases. When increasing, the gear's color returns as it turns clockwise. If temporal stability reaches zero, the player's vision will change drastically, and bad things tend to happen.
Draining temporal stability:
- Some surface areas are temporally unstable
- Caves, underground caverns, and places below surface level are generally more unstable than the surface of the world
- Temporal storms (occur at regular intervals)
Recovering temporal stability:
- Move to a location of high stability on the surface or at higher elevations in the world
- Transfer the temporal stability from a temporal gear: hold the gear in the left hand, a knife in the right hand, and hold
right mouse buttonto provide a 30% boost - Killing drifters recovers small amounts of your own temporal stability
Advanced Game Mechanics
Once the basics are mastered, players can develop advanced technology: Survival Guide - Advanced tech
Tutorial Video: First Day
Thanks to Ashantin for creating and sharing with the VS community.
| {{{title}}} | |
|---|---|
