Amboss
| Amboss | |

| |
| Material | Metall |
| Stackable | 64 |
| Drops | Sich selbst |
| Blocks | |
Ambosse sind funktionale Blöcke, die beim Schmieden von Metall als Oberfläche genutzt werden.
Herstellung
Der erste Schritt in diesem Prozess ist, eine Ambossform mit Hilfe der Methode des Lehmformens herszustellen. Der Amboss wird dann gegossen. Ein Amboss benötigt 900 Einheiten (9 Barren) Kupfer oder Bronzelegierung, um die Form zu füllen. Sobald ein Amboss gegossen und aus der Form entfernt wurde, kann er wie jeder andere Block auf einer festen Oberfläche platziert werden. Es wir kein Werkzeug benötigt, um den Amboss aufzunehmen und neu zu positionieren.
Iron and Meteoric Iron Anvil

Anvils made out of iron or meteoric iron can not be cast like anvils out of other metals. The player first has to make the upper and lower part of the anvil separately, smithing them on a bronze anvil. Then, the two parts need to be welded together.
To make a complete iron anvil, a total of 10 iron ingots are needed, 5 each for the anvil base and anvil top, as well as one powdered borax. One ingot amounts to 42 pixels added, and the anvil base and top need 196 and 210 pixels respectively.
Protip:
Das Rezept hat eine maximale Höhe für die Pixel. Diese bedeutet, dass beim Hinzufügen zu vieler Barren auf einmal (ohne Verarbeitung der vorherigen Barren) einige Pixel gelöscht werden können. Stelle sicher, dass du den nächsten Barren erst nach der Verarbeitung des letzten Barrens hinzufügst. |
Ambossbasis
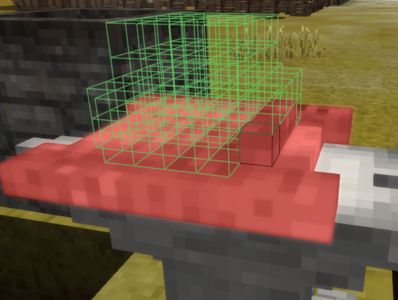
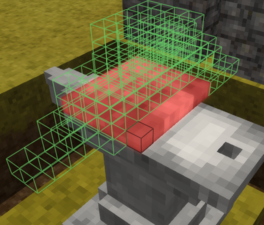
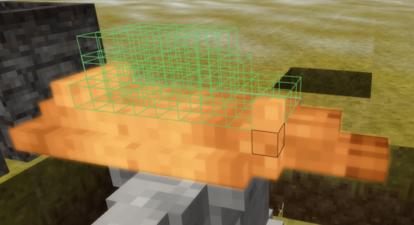
Beginne den Herstellungsprozess, indem du einen erhitzten Eisenbarren auf dem Amboss (Bronze oder höherstufig) platzierst. Wähle die Ambossbasis und beginne zu hämmern. Beachte, dass für die Basis insgesamt 5 Barren nötig werden und nur Raum für Fehler von 14 Pixeln besteht. Dieser Prozess kann leichter sein, wenn mit einer Eisenplatte begonnen wird und dann nacheinander 3 weitere Barren hinzugefügt werden.
Um die Gefahr der Verschwendung von Pixeln (und damit Barren) zu reduzieren, muss nach dem Hinzufügen eines Barrens dieser zuerst geschmiedet werden, bevor der nächste Barren folgt usw. Der Punkt, an dem der nächste Barren hinzugefügt wird, ist immer der gleiche. Daher kann der Spieler sicherstellen, dass dieser Bereich eben und unterhalb der maximalen Höhe des Rezeptes bleibt (6 Pixel bzw. 3 gestapelte Barren). Behalte im Kopf, dass ein neuer Barren nur die leeren Pixel an der genannten Stelle ausfüllt. Daher empfiehlt es sich, diesen Bereich so eben wie möglich zu halten. Der Barren wird auf die gewählte Fläche oben aufgesetzt, sodass der gesamte Bereich "anwächst".
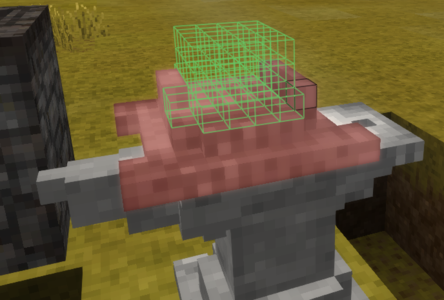
Ein optimaler Weg des Schmiedens kann unten angesehen werden, wobei der Fokus darauf liegen sollte, dass die "Landefläche" des Barren so leer und eben ist wie möglich. Denk daran, dass dies der beste Weg ist, um Eisenbarren zu sparen, aber nicht um Kohle zu sparen.
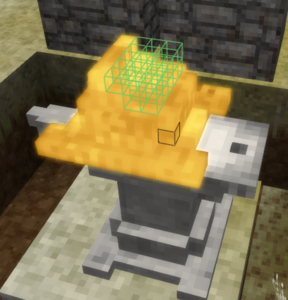
Protip:
Elevating the anvil on which the player crafts the new anvil parts might help checking for missing or misplaced pixels. Try putting the anvil on eye level, or digging a trench around it - this allows you to check the work item from the side. Pressing G to sit down has a similar effect. |
2 ingots
3 ingots
4 ingots
5 ingots


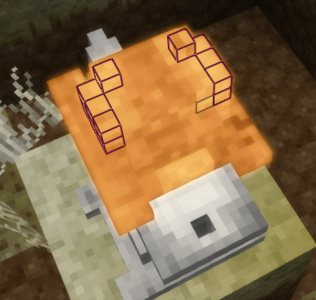
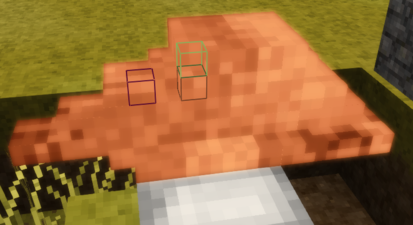
The anvil base needs a total of 196 pixels, divided into five layers:
- 80 first layer
- 38 each for second and third layer
- 20 each for fourth and fifth layer
Anvil Top
For the anvil top, follow the same process. However, keep in mind that for the top part, even with careful smithing, not even one pixel will be wasted. This means there is no margin for error, and any wasted pixels will result in a sixth ingot added to finish the item. As the top part is rather slim, a plate is not helpful as the smithing base.
1 ingot

2 ingots
3 ingots

4 ingots
5 ingots


The anvil top needs a total of 210 pixels, divided into five layers:
- 78 first layer
- 48 second layer
- 40 third layer
- 24 fourth layer
- 20 fifth layer
Welding
After both the base and top are finished, heat both of them up in a forge. Once heated, first place the base part down on the ground. Take one portion of powdered borax and apply with a Shift+right click on the placed base, then add the top part. Hammer until both parts are welded together, this should take about 12 hits.
Usage
The anvil is the work surface used for smithing metal tools from ingots heated in a forge. When a heated ingot is placed on the anvil, a dialog box opens to allow the player to select the item to be crafted. Copper and Bronze items can be worked on any anvil, but iron items can only be worked on a bronze or iron anvil and steel items can only be worked on an iron anvil.
Special
An anvil cannot be smelted to recover the material used in creating the item, however since version 1.14, the player can use a chisel and anvil of the same metal type in the crafting grid to recover 8 ingots worth of metal. Keep in mind that both the anvil and the chisel will be destroyed in the process, meaning from the original 10 ingots, two will be permanently lost.
Since version 1.14, falling anvils do considerable damage when hitting a player or other entity.
Video Tutorials
| Detailed guide through the iron anvil smithing process |
|---|
| {{{title}}} | |
|---|---|