Anvil/ru: Difference between revisions
(Created page with "==Создание== Первый шаг в этом деле - создать Форму для отливки наковальни при помощи Clay formi...") |
(Created page with "===Наковальня из метеоритового и обычного железа=== File:Anvil welding.PNG|thumb|200px|Нижняя часть наковальни...") |
||
| Line 15: | Line 15: | ||
Первый шаг в этом деле - создать [[Molds|Форму для отливки наковальни]] при помощи [[Clay forming|лепки из глины]]. А затем [[casting|отлить]] с помощью неё наковальню. Наковальня требует 900 единиц (9 слитков) меди или бронзы для отливки. Как только наковальня отлита и извлечена из формы, её можно поставить на твёрдую поверхность, как и любой другой блок. Для того, чтоб {{Breaking|сломать}} наковальню не нужны никакие инструменты. | Первый шаг в этом деле - создать [[Molds|Форму для отливки наковальни]] при помощи [[Clay forming|лепки из глины]]. А затем [[casting|отлить]] с помощью неё наковальню. Наковальня требует 900 единиц (9 слитков) меди или бронзы для отливки. Как только наковальня отлита и извлечена из формы, её можно поставить на твёрдую поверхность, как и любой другой блок. Для того, чтоб {{Breaking|сломать}} наковальню не нужны никакие инструменты. | ||
=== | ===Наковальня из метеоритового и обычного железа=== | ||
[[File:Anvil welding.PNG|thumb|200px| | [[File:Anvil welding.PNG|thumb|200px|Нижняя часть наковальни присыпана бурой и ждёт свою вторую половинку.]] | ||
Наковальни из обоих видов железа не могут быть отлиты как наковальни из других металлов. Сначала игроку нужно выковать на бронзовой наковальне нижнюю и верхнюю части наковальни по отдельности, а затем сварить их. | |||
<br> | <br> | ||
Для наковальни в сумме требуется десять слитков, по пять на каждую часть, и один порошок буры. Один слиток добавляет 42 кубика, нижняя часть требует 196, а верхушка - 210 кубиков. | |||
{{Protip | {{Protip | ||
Revision as of 06:13, 2 January 2022
| Anvil | |

| |
| Материал | Metal |
| Размер стака | No |
| Выпадают предметы | Itself |
| Блоки | |
Наковальни - блоки, используемые в качестве рабочей поверхности при ковке металлических предметов.
Создание
Первый шаг в этом деле - создать Форму для отливки наковальни при помощи лепки из глины. А затем отлить с помощью неё наковальню. Наковальня требует 900 единиц (9 слитков) меди или бронзы для отливки. Как только наковальня отлита и извлечена из формы, её можно поставить на твёрдую поверхность, как и любой другой блок. Для того, чтоб сломать наковальню не нужны никакие инструменты.
Наковальня из метеоритового и обычного железа

Наковальни из обоих видов железа не могут быть отлиты как наковальни из других металлов. Сначала игроку нужно выковать на бронзовой наковальне нижнюю и верхнюю части наковальни по отдельности, а затем сварить их.
Для наковальни в сумме требуется десять слитков, по пять на каждую часть, и один порошок буры. Один слиток добавляет 42 кубика, нижняя часть требует 196, а верхушка - 210 кубиков.
Подсказка:
The recipe has an upper height limit of pixels, which means adding too many ingots too fast without first distributing previously placed pixels might effectively delete pixels altogether! Make sure to add the next ingot only after distributing the pixels from the last one. |
Anvil Base
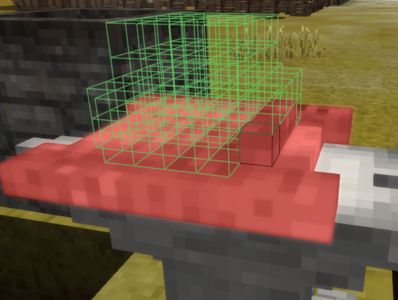
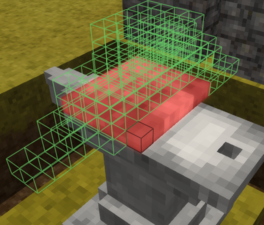
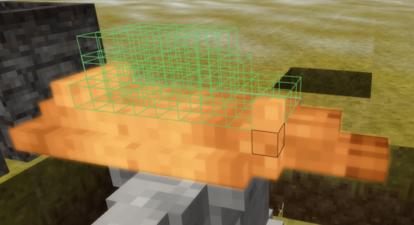
Start the crafting process by placing a heated iron ingot on the anvil - bronze or higher anvil tier is needed. Select the anvil base and start hammering. Note that for the base, a total of 5 ingots need to be added, and there is at maximum 14 pixels worth room for error. This process might be easier when starting with one iron plate as the base, and then adding 3 more ingots, one at a time.
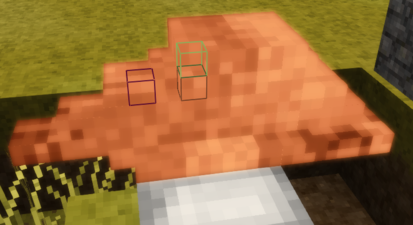
To lessen the chance of wasting pixels - and thus ingots - it is necessary to add one ingot, flatten it out and only then add the next - and so forth. The space on which the next anvil will be added is always the same, and the player can make sure that this space is flat and below the maximum height limit of the recipe, which is 6 pixels, or 3 ingots stacked. Keep in mind that a new ingot added will only fill in the empty pixels in that specific space, so it is recommended to keep the ingot place as flat as possible. The ingot will however rise with the rest, meaning it will be added on top of the current surface.
An optimum way of smithing can be seen below, with the focus on keeping the "ingot landing space" as empty and flat as possible. However, keep in mind that this is the best way to save iron ingots, not the best way to save coal.
Подсказка:
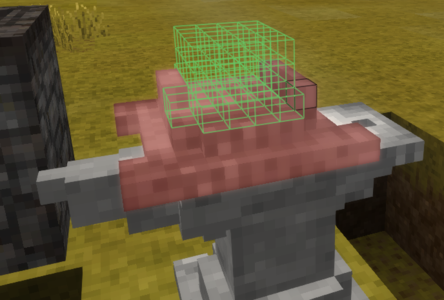
Elevating the anvil on which the player crafts the new anvil parts might help checking for missing or misplaced pixels. Try putting the anvil on eye level, or digging a trench around it - this allows you to check the work item from the side. Pressing G to sit down has a similar effect. |
2 ingots
3 ingots
4 ingots
5 ingots


The anvil base needs a total of 196 pixels, divided into five layers:
- 80 first layer
- 38 each for second and third layer
- 20 each for fourth and fifth layer
Anvil Top
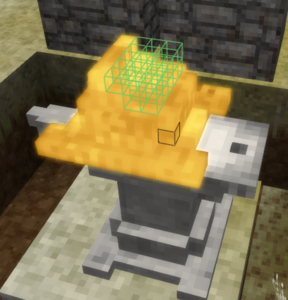
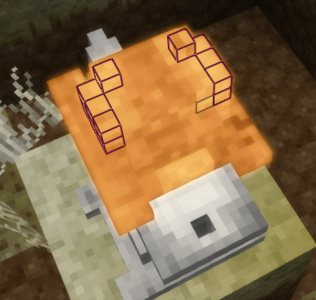
For the anvil top, follow the same process. However, keep in mind that for the top part, even with careful smithing, not even one pixel will be wasted. This means there is no margin for error, and any wasted pixels will result in a sixth ingot added to finish the item. As the top part is rather slim, a plate is not helpful as the smithing base.
1 ingot

2 ingots
3 ingots

4 ingots
5 ingots


The anvil top needs a total of 210 pixels, divided into five layers:
- 78 first layer
- 48 second layer
- 40 third layer
- 24 fourth layer
- 20 fifth layer
Welding
After both the base and top are finished, heat both of them up in a forge. Once heated, first place the base part down on the ground. Take one portion of powdered borax and apply with a Shift+right click on the placed base, then add the top part. Hammer until both parts are welded together, this should take about 12 hits.
Usage
The anvil is the work surface used for smithing metal tools from ingots heated in a forge. When a heated ingot is placed on the anvil, a dialog box opens to allow the player to select the item to be crafted. Copper and Bronze items can be worked on any anvil, but iron items can only be worked on a bronze or iron anvil and steel items can only be worked on an iron anvil.
Special
An anvil cannot be smelted to recover the material used in creating the item, however since version 1.14, the player can use a chisel and anvil of the same metal type in the crafting grid to recover 8 ingots worth of metal. Keep in mind that both the anvil and the chisel will be destroyed in the process, meaning from the original 10 ingots, two will be permanently lost.
Since version 1.14, falling anvils do considerable damage when hitting a player or other entity.
Video Tutorials
| Detailed guide through the iron anvil smithing process |
|---|
| {{{title}}} | |
|---|---|