Accessibility: Difference between revisions
m (disclaimer for non-vanilla content) |
(updated) |
||
| Line 91: | Line 91: | ||
=== World map === | === World map === | ||
The map prior to version 1.19 was colorful and could be used to locate resources when familiar with their appearance | The map prior to version 1.19 was colorful and could be used to locate resources when familiar with their appearance from a birds-eye view. The classic world map visuals can be restored in a singleplayer world using the command <code>/worldconfig colorAccurateWorldmap true</code> in the chat overlay; then exit and re-launch that world for the change to take effect. <br><br> | ||
In a multiplayer world, the classic world map can only be restored by someone with admin privileges editing the serverconfig file or running a similar command. | |||
* enables for all players on the server: <code>/worldconfigcreate bool colorAccurateWorldmap true</code> | |||
* enables for individual players: <code>/player [playername] privilege grant colorAccurateWorldmap</code> | |||
Restart the server for changes to take effect. | |||
=== GUI scale === | === GUI scale === | ||
Revision as of 19:18, 16 February 2024
This page was last verified for Vintage Story version 1.19.0-pre1.
Click on an image to open a larger version. See the Settings page for descriptions of every option, or open the menu in-game and hover over each option. Options that seem especially relevant to accessibility are featured below.
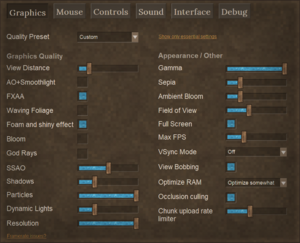
Graphics tab
- Resolution: If the game looks blurry, increasing the percentage on the Resolution slider to 100% might help.
- Gamma: Increasing the gamma value might improve visibility in darkness.
- View bobbing: [in game version 1.19, this setting is now found on the Accessibility tab] Uncheck this box if you tend to experience motion sickness. With view bobbing enabled, your character's field of view would bounce up and down while (s)he runs.
The Settings page should cover all the features in the Graphics tab in detail.
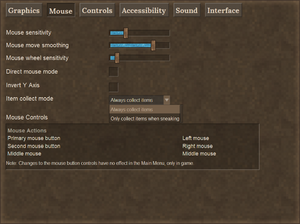
Mouse tab
- Item collect mode: Check this box to reduce the need to use the Shift key.
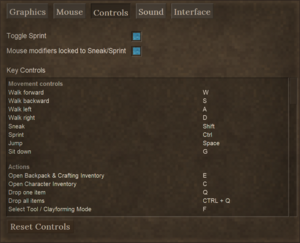
Controls tab
Any key used in the game can be rebound to something different, which may be important for some players: in general, everyone playing the game for extended periods should set the keys to bindings which are comfortable to use (and take breaks!)
- Toggle Sprint: [in game version 1.19, this setting is now found on the Accessibility tab] Check this box to reduce the need to use the Sprint key. Tap Sprint once while walking to begin running; your character will continue running without keeping the Sprint key pressed, until you stop moving forward. When you move again it will be at a walking pace.
- Mouse modifiers locked to Sneak/Sprint: Several actions in-game require a combination of either the Shift key or the Ctrl key, as well as a mouseclick (left or right mouse button). By default, the Shift key is also the key used for Sneak, so if you happen to change Sneak to a different key, that will also have the effect of changing the key which has to be pressed for Shift + mouseclick as well. Some people like that (thinking of it as "Sneak + mouseclick"), some people don't like that at all... If you don't want that, then unlocking mouse modifiers means you can keep on using Shift as the Shift key for mouseclicks, even though the Sneak key has changed to something different. Or you can leave the Sneak key as it is but change only the Shift key for mouseclicking. All the same points apply to the Ctrl key and Sprint, mutatis mutandis.
People who use the mouse in their left hand might like to change these settings to use the right-hand side R Shift key on the keyboard.
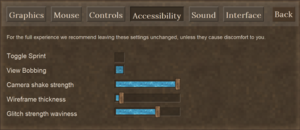
Accessibility tab
Options:
- Toggle Sprint: Check this box to reduce the need to use the Sprint key. Tap Sprint once while walking to begin running; your character will continue running without keeping the Sprint key pressed, until you stop moving forward. When you move again it will be at a walking pace.
- View Bobbing: Uncheck this box if you tend to experience motion sickness. With view bobbing enabled, your character's field of view would bounce up and down while (s)he runs.
- Camera shake strength: When your character's body temperature drops dangerously low, (s)he will begin shivering and the edges of the screen will become frosty. Increasing the Camera shake strength slider should reduce the degree to which the character's view is disrupted. You'll need to use other indicators such as the frosty screen to warn you of low body temperature. Your character will begin losing health points if you don't take steps to raise her/his body temperature.
- Wireframe thickness: This affects the thickness of the selection box drawn around the block you are looking at. It also affects the colored voxel gridlines seen when knapping, clay-forming and smithing. Some people may find thicker lines easier to see - especially on very high resolution monitors eg. 4k monitors.
- Glitch strength waviness: Temporal Storms can be disabled entirely through commands. It might be preferable to preserve this feature of the game while removing effects that are uncomfortable. Reducing the Glitch strength waviness slider should make visual distortions during storms more tolerable. Expect the normal colors of the world to become reddish until the storm ends. (Those feeling experimental can even increase the Glitch strength waviness to more than 100%.)
Sound tab
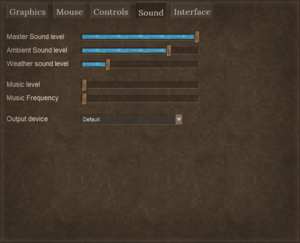
The sound levels for various types of sound can be set individually.
Interface tab
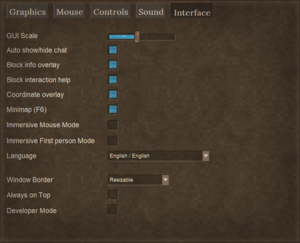
- GUI scale: Increasing this slider will make the text larger in most places. However, the field for text might not always be large enough for the selected font size. Experiment to find a text large enough for you to see that is still small enough to fit in its field.
- Block info overlay: This is a tremendously useful feature, identifying the block/entity your mouse is aimed at. In addition to the name of the item, other useful hints might be included. If it obscures your view, hold Ctrl and press B to toggle the overlay off.
- Coordinate overlay:
- Minimap: By default in a Standard playstyle world, a minimap will be visible in the top-right corner of your screen. Press M to show/hide the world map. Press F6 to show/hide the minimap. It's always oriented with north upwards.
Debug tab
Only visible if you check the Developer Mode box in the Interface tab.
Mods
The modding community for Vintage Story has produced several excellent mods that might help with one or more Accessibility issues. Examples of useful mods are listed under the Visual, Dexterity and Auditory headings below.
General guidance for using mods:
- It's generally safe to add/remove convenience mods even after playing a world for awhile. But best practice includes creating a backup before changing mods. (If a mod adds blocks, items, entities, or new worldgen, a backup may be more important.)
- Mods are specific to game versions. If you update the game it's worth checking your favorite mods to see if they have also been updated (which is up to the individual mod authors). A mod that hasn't been specifically updated for your current game version can sometimes still work or mostly work, it is always worth trying this. Again, back up your world before experimenting.
- Code mods - especially if not updated for the current game version or only recently updated - can cause issues or crashes (either directly, or more subtly if they prevent another game system from working properly). Test them out and report any issues direct to the mod author.
- In single player games, mods are installed by downloading them and then dragging and dropping to your Vintagestory Mods folder. On a Windows PC, the Mods folder is found at %appdata%\Vintagestory\Mods. Alternatively, a mod's download page may offer '1-click install'.
- In multiplayer games, when you join a server, the required mods are automatically downloaded to a specific folder for that server, kept separate from your single-player mod folder (in your Mods folder, the main folder is for single-player and the game creates a subfolder for each multiplayer server). To also use one of your single-player client-side mods in multiplayer, copy-paste it into that server's subfolder. Several mods are client-side, meaning that you can use them even on multiplayer servers without causing problems. Other mods require the server admins to install them, if you want to see them in a multiplayer game.
Visual
Gamma
The Graphics tab of the Settings menu has a slider for Gamma, which might improve ability to see in some situations.
World map
The map prior to version 1.19 was colorful and could be used to locate resources when familiar with their appearance from a birds-eye view. The classic world map visuals can be restored in a singleplayer world using the command /worldconfig colorAccurateWorldmap true in the chat overlay; then exit and re-launch that world for the change to take effect.
In a multiplayer world, the classic world map can only be restored by someone with admin privileges editing the serverconfig file or running a similar command.
- enables for all players on the server:
/worldconfigcreate bool colorAccurateWorldmap true - enables for individual players:
/player [playername] privilege grant colorAccurateWorldmap
Restart the server for changes to take effect.
GUI scale
The scale of the GUI - which also includes the size of items in the hotbar, and the size of the mouse pointer - can be adjusted in Settings / Interface.
(Note: it is possible to make the GUI so large that the Interface tab is off the screen, when you next visit Settings, especially from the main menu. If this occurs, the guiScale number can be adjusted by editing the clientsettings.json file in a text editor, find this file in the VintagestoryData folder.)
Windows Magnifier
If using the Windows Magnifier to enlarge parts of the screen, note that the mouse pointer (and therefore the ability to control the Magnifier) will disappear during normal gameplay. To make the mouse pointer visible again, hold down the Alt key.
Visual mods
Epilepsy and other flicker or motion sensitivity
Some mods give greater control over visual effects such as lightning flashes and the screen warping during Temporal Storms or drunkenness.
- Accessibility Tweaks https://mods.vintagestory.at/show/mod/665
- "Lots of customisable tweaks for sounds effects, visual effects, text, weather, colours, and gamma."
Color vision deficiency or color blindness
Some mods help players to distinguish the block selection box (the outline around the currently looked at block)
- Better Outline mod [1] can change the color of the block selection box, or add glow effects etc., to make it more visible.
Light
Some mods give greater control over the lighting levels.
- Accessibility Tweaks https://mods.vintagestory.at/show/mod/665
- "Lots of customisable tweaks for sounds effects, visual effects, text, weather, colours, and gamma."
- Cave Beacons (Navigation Lights) https://mods.vintagestory.at/show/mod/3329
- "Can be used to lead your way through cave systems." An alternative to torches, which go out after 48 game-hours.
Resources visibility
Some mods make key resources easier to distinguish from their surroundings.
- Juicy Ores https://mods.vintagestory.at/show/mod/2602
- "Replaces ore block's model with more noticeable one."
- Visible Ore https://mods.vintagestory.at/show/mod/1526
- "A small mod that makes the ore in the rock more visible in some combinations."
- Obvious Resin https://mods.vintagestory.at/show/mod/5138
- "Gives resin producing leaking blocks a bright blue overlay to be more visible."
- Mobs Radar https://mods.vintagestory.at/show/mod/6849
- "Detects creatures and adds markers for them on both world map and minimap." This can be configured to not reveal enemy locations, but still help with finding dropped items such as logs from chopped trees.
- Zoom Button - Reborn https://mods.vintagestory.at/show/mod/1820
- "Use a hotkey (default Z) to squint" for a closeup.
Map
- Pixel Waypoints https://mods.vintagestory.at/show/mod/6477
- "increasing waypoint icon visibility on the world map"
- Alternative Map Icon Renderer https://mods.vintagestory.at/show/mod/6609
- "increasing waypoint icon visibility on the world map"
- Medieval Map https://mods.vintagestory.at/show/mod/6677
- "Replaces the way world maps are drawn" with the ability to customize colors for land, desert, water, etc.
Dexterity and repetitive actions
Key mapping
See Controls tab.
Hardware
While Vintage Story has no native controller support, some people use Steam to add controller support, and others use third party apps (like Antimicro). Controller Compatibility has an example. Others get Vintage Story to work on a Steam Deck.
An ergonomic mouse might be helpful - but minimizing repetitive stress also includes considerations of posture, taking breaks, and more.
Dexterity Mods
Several mods modify one or more aspects of the game to reduce repetitive motions.
Crafting
- Knapster https://mods.vintagestory.at/show/mod/4046
- "Easier knapping, clayforming, and smithing, for those with low manual dexterity."
- Simple Pottery Wheel https://mods.vintagestory.at/show/mod/4980
- "Adds a pottery wheel to make clay forming slightly easier."
- QP's Chisel Tools https://mods.vintagestory.at/show/mod/2751
- Copy and merge chiseled blocks; move, rotate, and mirror; cut or add entire planes, or matching materials; paint materials onto chiseled blocks.
Movement
- Auto Walk / Auto Run https://mods.vintagestory.at/show/mod/6541
- "Adds a key for auto walk, including auto running."
- StepUp https://mods.vintagestory.at/show/mod/85
- "Doubles step height of players (0.6 to 1.2 blocks) to allow stepping up whole blocks by just walking forward."
- Auto Close https://mods.vintagestory.at/show/mod/4020
- "Auto closes doors, gates, trapdoors etc. that were opened a few moments ago."
- Autoloot https://mods.vintagestory.at/show/mod/6966
- "Automatically loots corpses" when harvested.
- Carry On https://mods.vintagestory.at/show/mod/4405
- "Allows picking up and carrying blocks, especially containers along with their contents."
Map
- Auto Map Markers https://mods.vintagestory.at/show/mod/797
- "Automatically adds map markers to your map when you interact with certain objects."
- Map Zoom Key https://mods.vintagestory.at/show/mod/7493
- "Use keyboard to zoom map" instead of mousewheel.
Resources
- Reduced Grind https://mods.vintagestory.at/show/mod/180
- "Increased fuel burn duration, increased ore yields from chunks, & increased fat droprate."
- StickEmUp! https://mods.vintagestory.at/show/mod/7500
- "Trees will drop sticks (and saplings) when chopped!"
- Sticks From Firewood https://mods.vintagestory.at/show/mod/2920
- "This mod will allow you to craft sticks from firewood."
- Scythe More https://mods.vintagestory.at/show/mod/5824
- "Expands the list of blocks that can be harvested with a scythe" in a 3x3 area.
- Autoloot https://mods.vintagestory.at/show/mod/6966
- "Automatically loots corpses" when harvested.
- One-shot Prospecting Pick https://mods.vintagestory.at/show/mod/1561
- "They allow you to prospect by breaking only one block" instead of 3 blocks per reading in Density Mode.
- Auto Panning https://mods.vintagestory.at/show/mod/6968
- "Set your character up to pan for you."
- Auto-Sifter https://mods.vintagestory.at/show/mod/3831
- "Automatic Panning Machine" for the iron age.
Auditory
The Sound tab in the Settings menu lets you adjust "ambient sound" volume separately from weather volume and music.
See Considerations in the Notes section.
Hardware
Headphones are useful for identifying the source of a sound, which can help you avoid danger or find resources.
Assets
You can replace audio files individually.
AppData\Roaming\Vintagestory\assets\game\soundsprimarily sounds related to the playerAppData\Roaming\Vintagestory\assets\survival\soundssounds related to creatures, processes, and weather, including thunderAppData\Roaming\Vintagestory\assets\assets\game\musica few music filesAppData\Roaming\Vintagestory\assets\survival\musicmost music filesAppData\Roaming\Vintagestory\assets\creative\musica few music files
Auditory Mods
Some mods give greater control over the volume levels of sounds that may be disturbing.
- Accessibility Tweaks https://mods.vintagestory.at/show/mod/665
- "Lots of customisable tweaks for sounds effects, visual effects, text, weather, colours, and gamma."
Some mods give visual alternatives to auditory cues.
- Buzzwords https://mods.vintagestory.at/show/mod/3303
- "If you're 12 or so blocks away from a wild beehive of some sort, you'll get a 'BzZzZzZ...' text alert to notify you that bees are nearby."
Other accessibility issues
One of the dev team members created tutorial videos that might be of help to people with dyslexia, low literacy, or dislike of reading. Vintage Story Bit-By-Bit - How to Handbook on YouTube
History
- A few Accessibility features were added in version 1.19.0-pre.1: "Added Accessibility tab. Moved View Bobbing and Toggle Sprint settings there. Added 2 new accessibility settings: Camera shake strength and Wireframe thickness.
- Tweak: Added ability to adjust temporal instability waviness in the new Accessibility tab
- Tweak: Added experimental minbrightness client config, potential use for YouTubers/streamers to prevent pitch-black areas." Official Devlog
Notes
- Tyron gave permission for this page to include brief descriptions of mod functionality. In general, this wiki is only for vanilla content.[1]
Audio considerations
- Bees are an important resource that can be difficult to find. The most-recommended technique is to increase the Ambient Sound slider and decrease the Weather Sound and Music sliders while hunting for beehives.
- Wolves are a dangerous enemy that can often be avoided due to their periodic howls announcing their location.
- Bears growl but usually the player is within attack range when that happens.
- Low Temporal Stability triggers ominous music. The player should take action to reduce the stability drain and restore stability soon.
Speculation needing testing:
- If you simply delete an audio file, the game might crash.
- When you update to the next game version, you might lose the changes made.
Gallery
See also
References
- ↑ Comment in the #wiki-and-translations channel of the official Discord: https://discord.com/channels/302152934249070593/420476226420080670/1208117493772849272
