Fabricación de acero

This page is outdated.
The content on this page is not up to date with the most recent game update. If you do wish to contribute, please request wiki edit access on the Discord.
This page was last verified for Vintage Story version 1.14.0.
La siderurgia es el proceso de carbonización del hierro a altas temperaturas, para el que se requiere un nuevo tipo de construcción de hornos.
Material necesario
Para producir acero, un jugador necesita un yunque de hierro, una fragua, combustible (carbón o carbón vegetal) y lingotes de acero blíster.
Para obtener acero blíster, el jugador necesita primero un pulverizador para construir un horno refractario, y combustible (coque o carbón vegetal).
Creación de acero blíster
El acero blíster es el primer paso en la creación de acero a partir del hierro, y funciona de la misma manera que una floración de hierro. Para calentar el hierro a la temperatura necesaria para la carbonización, el jugador debe construir una estructura de horno especial con bloques refractarios y otros bloques especiales.
Creating Refractory Bricks
Refractory blocks come in three different tiers with different heat resistances. They are important for the steel making process as no other currently available block can withstand the extreme heat. To produce refractory blocks, different stone and ore types need to be crushed in a pulverizer first. The powders can then be used in the crafting grid together with fire clay to make unfired refractory bricks. Different compositions of powders are required for the different tiers.
| Material | Stone | Powder | Minimum Pounder Cap Tier |
|---|---|---|---|
| Bauxite |  |
 |
Bronze |
| Quartz |  |
 |
Bronze |
| Olivine |  |
 |
Iron |
| Ilmenite |  |
 |
Steel |
Note : One chunk of poor or medium ilmenite creates one crushed ilmenite. Rich and bountiful creates two.
From tier 1 to tier 3, the recipes for raw refractory bricks are as follows:
Raw refractory bricks need to be baked in a pit kiln to turn into fired refractory bricks. Those can then be used to craft their tier specific brick blocks and brick grating blocks. The different tiers of refractory bricks have different heat resistances. Tier 1 has a heat resistance of 90%, Tier 2 has 95%, and Tier 3 reaches 100%. All refractory brick blocks have a chance to receive damage in each smelting process. Each tier 1 brick block has a 1 in 10 chance to break, while it is 1 in 20 for tier 2. Tier 3 refractory bricks have a low 1 in 1000 chance to break. Damaged refractory brick blocks can be broken to return some of their materials back, similar to a broken bloomery. Grate blocks do not get damaged at the moment, which means there is no sense in making them out of higher tier bricks.
![]()
![]()
![]()
![]()
![]()
![]()
![]()
![]()
![]()
![]()
![]()
![]()
![]()
![]()
![]()
![]()
![]()
![]()
Other Required Blocks
Additionally to the refractory blocks, there are some more specialist blocks necessary to build a functioning steel making furnace, namely an iron door and a stone coffin including a coffin lid.
And iron door can either be found in ruins, or crafted out of 6 iron plates. Stone coffins can be made out of granite, andesite, basalt or peridotite.
![]()
![]()
![]()
![]()
![]()
![]()
![]()
![]()
![]()
![]()
![]()
![]()
![]()
![]()
![]()
![]()
![]()
![]()
Construcción de un horno de cementación

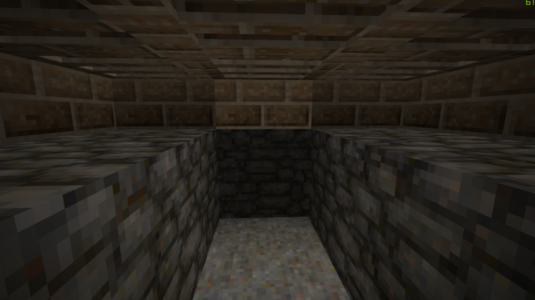
Para construir un horno de cementación que funcione, el jugador necesita 1 puerta de hierro, 2 secciones de ataúd de piedra y 2 tapas de ataúd de piedra, 6 rejillas de ladrillo refractario, 53 bloques de ladrillo refractario y varios bloques de tierra o piedra para construir la zona de combustión del carbón bajo la propia estructura del horno.
El horno es una estructura multibloque que debe construirse de una forma específica para garantizar que funciona según lo previsto. Al iniciar la construcción de un horno, el jugador puede Shift+right click el ataúd de piedra con carbón o una mano vacía para activar una superposición de ayuda a la construcción. Shift+right click informará adicionalmente al jugador sobre el número de bloques que aún faltan o están mal colocados en la estructura.
Protip:
La dirección desde la que el jugador accede al ataúd mientras comprueba la superposición dictará la dirección en la que se mostrará la superposición del edificio. El horno siempre asumirá que el bloque de ataúd que el jugador golpea al comprobar es el más cercano a la futura puerta del horno - independientemente de si el jugador accede desde el lateral del ataúd o desde el extremo real del mismo. |
El jugador debe asignar al menos un espacio de 5x5 para el horno, y espacio adicional para llegar a la parte trasera o lateral del horno para introducir carbón o coque. La estructura del horno tiene 6 bloques de altura, pero se requiere una capa adicional debajo de los bloques de la parrilla. La chimenea de la parte superior de la estructura no tiene por qué estar abierta al cielo en este momento, pero si está bloqueada no se mostrarán indicaciones de humo mientras el horno esté en funcionamiento. Ten en cuenta que el horno, por ahora, siempre se construye con el lado de la puerta orientado en una dirección específica, incluso si toda la estructura ya está terminada y el ataúd se añade como último elemento, la superposición de construcción seguirá exigiendo construir la estructura con una orientación específica, independientemente de cómo el jugador la construya ya. La orientación parece ser diferente de un mundo a otro - se necesitan más pruebas o buceo de código.
Shopping List
For one cementation furnace, the player would need:
- 6 iron plates = 12 iron ingots
- 8 whole granite, andesite, basalt or peridotite blocks
- 456 fireclay, which is about 8 stacks
- 29 mortar
- 228 of each powdered ingredient needed, depending on tier, which is about 4 stacks each
The Structure
- First, place the grate blocks and the coffin. These are the centre blocks of the structure. The coffin half will always be placed with the open side towards the player. As soon as the full coffin is placed - without coffin lid, for now - the player can Shift+right click for the building help.
- The full size of the furnace takes up a 5x5 space as shown below.
- Raise the walls up by two blocks, and don't forget to place the iron door at some point in the process.
- Build up the roof, covering every open block with one above in a stair pattern. The finished furnace should have a two high chimney as shown below.
- The confusing part about building a cementation furnace is the space below the actual brick structure. For the process to work, the player needs to be able to access the two spots below the coffin placed on the grate blocks, as the steel making requires fuel layers to be placed on those two blocks. Due to the fact that coal will behave similar to snow if piled up to high, it is recommended to put stabilizing blocks to the side of the two open spaces for the coal. It is not required to close this space off airtight, the player can choose to leave a permanent hole or put in a coke oven door. Note that none of the refractory brick blocks can be removed to access this space, instead the opening needs to be created one block below the lowest brick layer.
- If the structure was build correctly, there will be no further indication of missing or misplaced block when Shift+right clicking the coffin.


coal needs to be piled exactly below the two middle grid blocks
the coal piles need to be encased in some form to prevent collapse - this can also be done with chiselling


Smelting Process
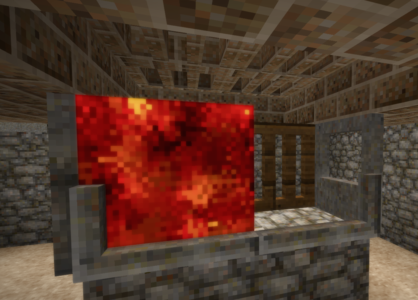
With a finished refractory furnace build, the next step requires the player to fill the coffin.
One stone coffin will hold a total of 16 iron ingots and 40 fuel pieces - either coke or charcoal. Place down one layer of fuel first, then one layer of iron ingots. Repeat until the coffin is full and will not accept any more items. The coffin should allow 5 layers of fuel with 8 pieces per layer, and 4 layers of iron ingots with 4 ingots per layer.
Once filled, the coffin tool tip will indicate that a coffin lid needs to be placed on top of the coffin. Note that the coffin needs to be filled completely, otherwise the process will not start even if the lid is placed and coal beneath ignited.
After the coffin is closed, the player should leave the burning chamber and close the door. It is not recommended to enter the chamber again in the middle of the smelting process, as the extreme heat inside will cause 5 HP damage per tick if inside while the bricks are still heated. The coffin tool tip will indicate that the process requires fuel to be placed and ignited below the two grates under the coffin.
Access the underbelly of the furnace as shown above from the side or the back of the furnace. Place fuel in equal amounts on the two spaces directly below the coffin. Each fuel layer on one block takes 2 fuel items, meaning a full layer on both blocks requires 4 fuel items. Charcoal, black coal, anthracite and coke work as possible fuel items.
When testing out the process in creative or survival, keep in mind that the coffin tooltip might take a few seconds to update correctly from one state to the next, specifically once the player ignites fuel below. The coffin will show the progress in percentages, but again it might take a tick until that progress info is shown correctly. A working furnace will have fire particles inside the burning chamber - which also indicates the danger of stepping inside at that time - as well as smoke rising from the chimney.
Protip:
The coffin will retain the progressed reached, even if the coal burns out before the process is finished! This allows the player to start the process with a low amount of fuel, and add further fuel as needed, or log of from a server without fear to loose progress and materials. |
One firing of 16 iron ingots will reward the player with an equal amount of blister steel ingots.
Making Steel
Blister steel in itself is not yet workable steel, instead it behaves similar to iron blooms, and further refining is necessary. To turn blister steel into steel, it needs to be processed on an iron anvil either by hand or with the help of a helve hammer. Note that the blister steel is less complicated to process by hand then iron blooms, and there is no possibility of pixel loss if processed by hand, making helve hammer processing almost overkill.
Video Tutorials
| Detailed guide on what to get for steelmaking to start | Guide on how to build and use the furnace | German full Guide on how to make Steel |
|---|---|---|
| Ores, metals and minerals | |
|---|---|
| Guides | Ore Deposits • Metals |
| Metals | Copper • Iron • Meteoric iron • Gold • Silver • Lead • Tin • Zinc • Bismuth • Titanium (Ilmenite) |
| Alloys | Bronze (Tin bronze, bismuth bronze, black bronze) • Steel • Brass • Solder (Lead solder, Silver solder) • Molybdochalkos • Cupronickel • Electrum |
| Minerals | Alum • Borax • Cinnabar • Coal • Halite (Salt) • Lapis lazuli • Quartz • Saltpeter • Sulfur • Sylvite (Potash) |
| Tools | Pickaxe • Hammer • Prospecting Pick • Crucible • Forge • Ore blasting bomb • Quern • Anvil • Bloomery • Helve hammer • Pulverizer |
| Other | Gemstones |
| Related mechanics | Panning • Mining • Clay forming • Casting • Smithing • Steel making |
| {{{title}}} | |
|---|---|