Modding:VS Model Creator tutorials: Difference between revisions
No edit summary |
No edit summary |
||
| Line 1: | Line 1: | ||
[ | Vintage Story has its own model creator called VS Model Creator. It's very easy to create 3D Models and Animations, and anyone can download it! Below you can find modified versions of a modeling tutorial and an animation tutorial created by Balduranne and Luke, respectively. Click [https://www.vintagestory.at/forums/topic/505-vs-model-creator-basics/ here] if you would like to visit the original thread where these tutorials were originally posted. | ||
[[File:Vsmc_1.png|thumb|center|600px]] | |||
__TOC__ | |||
== Modeling == | |||
[[File: | ===Modeling Basics=== | ||
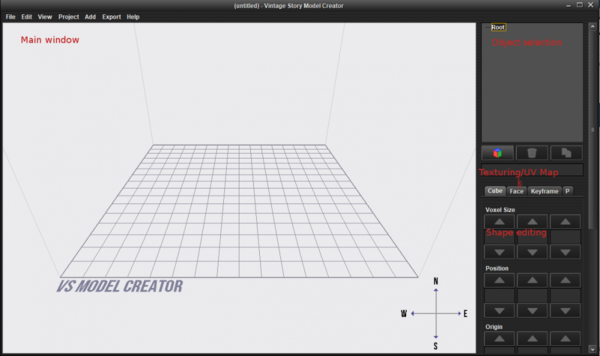
The model creator only allows working with cubes or parts of cubes, which you can create by clicking the Red/Green/Blue icon below the selection window. Once you have something selected, you can get to the modeling proper - Voxel Size determines the shape and size of the object, Position moves it around the grid, while Origin is from where the model is supposed to 'start' from. This mostly comes into play when rotating the object. | |||
[[File:Vsmc_2.jpg|thumb|center|800px]] | |||
| |||
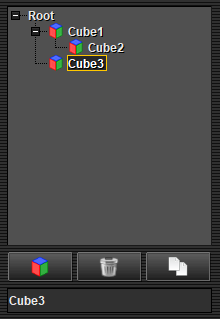
When adding more cubes, it's important to keep in mind what you have selected - In this case, Cube2 is docked under Cube1, so if we move the latter, Cube2 will end up moving along with Cube1. Cube 3 in this example is sitting on its own, and is unaffected by the other two. | When adding more cubes, it's important to keep in mind what you have selected - In this case, Cube2 is docked under Cube1, so if we move the latter, Cube2 will end up moving along with Cube1. Cube 3 in this example is sitting on its own, and is unaffected by the other two. | ||
[[File:Vsmc_3.png|thumb|center|800px]] | |||
| |||
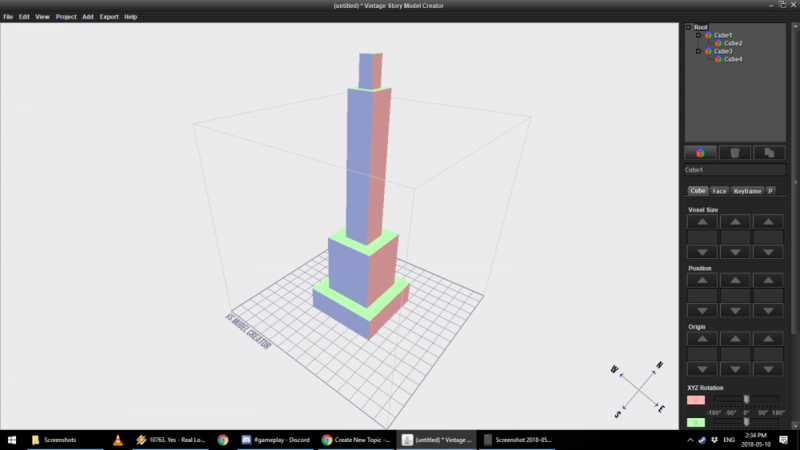
After a little fiddling, we have our model. In this case it's a candle holder with a candle: | |||
[[File:Vsmc_4.png|thumb|center|800px]] | |||
After a little fiddling, we have our model. In this case it's a candle holder with a candle | | ||
[[File: | |||
===Model Duplication=== | |||
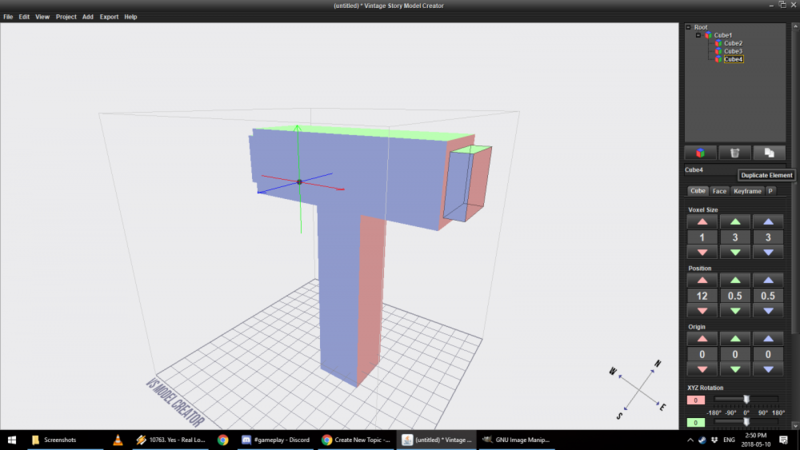
Very often you'll want to duplicate an element and move it around to speed up the modelling process. It's less time consuming than making a fresh object and moving it in the correct place and shape: | |||
[[File:Vsmc_10.png|thumb|center|800px]] | |||
| |||
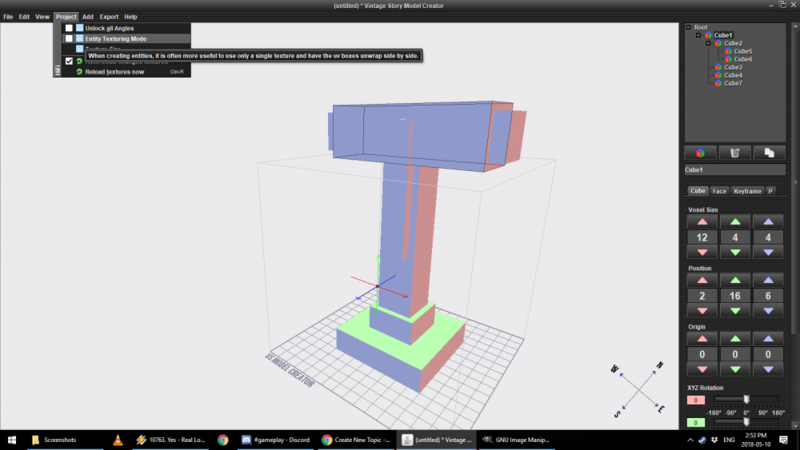
I'm sure very often you'll find yourself just applying the same texture to the entire object. This is where the Entity Texturing Mode comes into play: | |||
[[File:Vsmc_11.png|thumb|center|800px]] | |||
| |||
I'm sure very often you'll find yourself just applying the same texture to the entire object. This is where the Entity Texturing Mode comes into play | |||
[[File: | |||
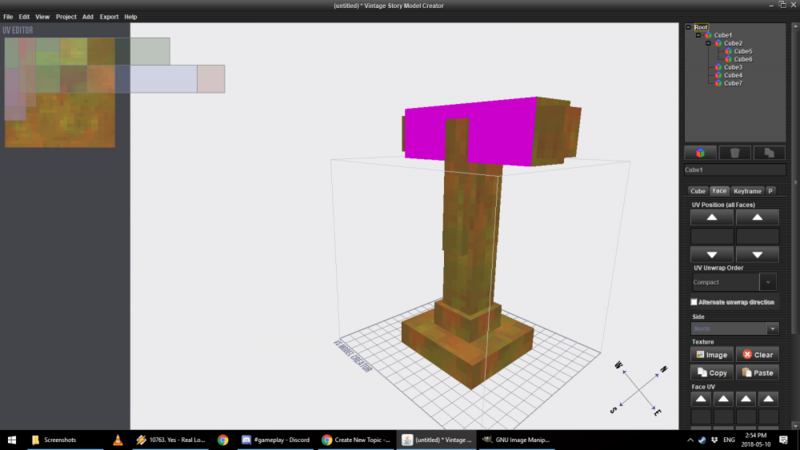
Once clicked, the entire model will be assigned one texture. It's handy, but we still need to tweak it by hand. While the mode is on, you can only move an entire object around in the UV map editor (Left), that's hardly ideal in some cases. That's why we want to disable the Entity Texturing Mode (Don't worry, the texture will stay on), and go back to the Face menu and manually move the texture around. | Once clicked, the entire model will be assigned one texture. It's handy, but we still need to tweak it by hand. While the mode is on, you can only move an entire object around in the UV map editor (Left), that's hardly ideal in some cases. That's why we want to disable the Entity Texturing Mode (Don't worry, the texture will stay on), and go back to the Face menu and manually move the texture around. | ||
[[File:Vsmc_12.png|thumb|center|800px]] | |||
| |||
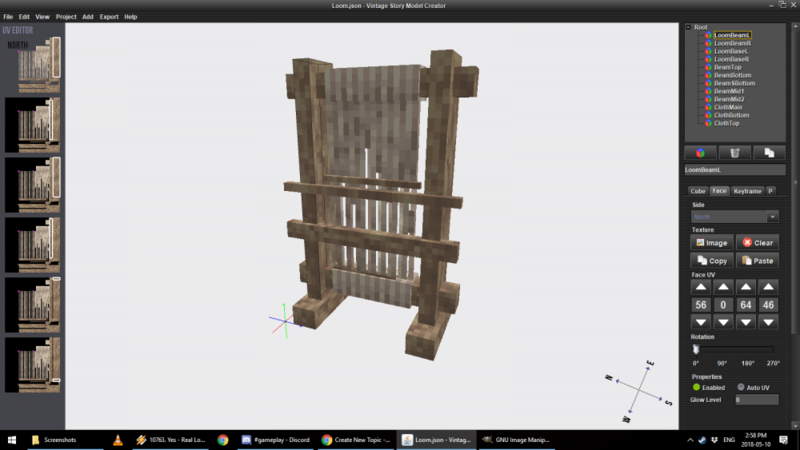
[[File:Vsmc_13.png| | This is especially important in cases where we want to use a single texture for a model, as is the case with my Loom model, or the NPC models (Including the player one): | ||
[[File:Vsmc_13.png|thumb|center|800px]] | |||
| |||
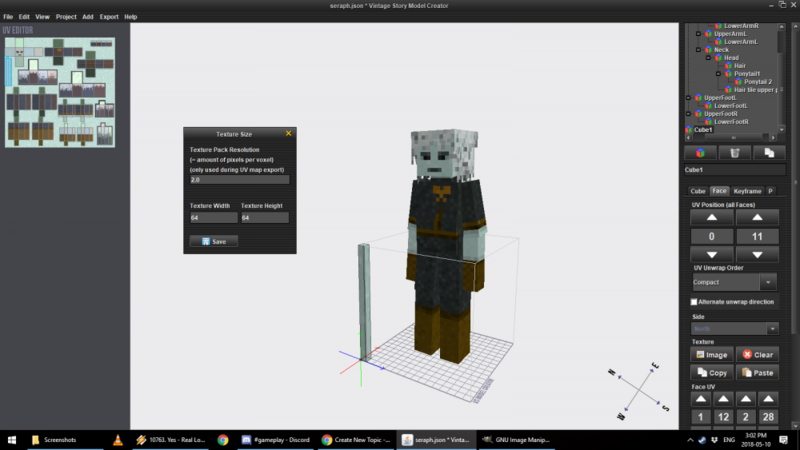
Furthermore, if you're using one texture, you can tweak the texture size for larger objects: | |||
[[File:Vsmc_14.png|thumb|center|800px]] | |||
| |||
[[File: | [[File:Vsmc_15.png|thumb|center|800px]] | ||
| |||
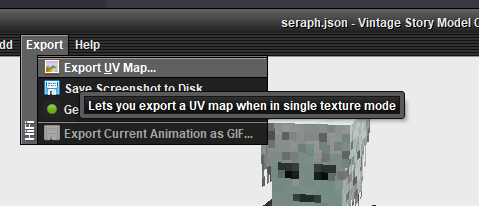
Another useful trick is exporting the UV map of your model. Once you have it unwrapped (That is, spread around your texture sheet), you can export the UV map to make a proper texture for it, or in the case of the player model - Make your own skin for it: | |||
[[File:Vsmc_16.png|thumb|center|800px]] | |||
| |||
That should about cover the basics. One important thing to keep in mind is that one block is 16x16x16 (The size of the grid) in the editor. | |||
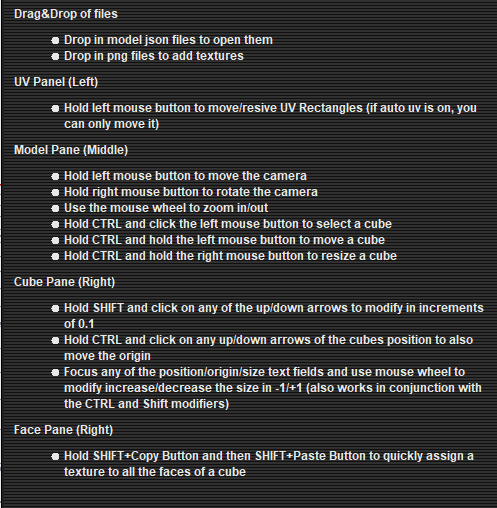
Model Editor controls, for reference - They're in the Help submenu (It really helps to memorize them!): | |||
[[File:Vsmc_18.png|thumb|center|600px]] | |||
| |||
Once you have the hang of it, you can use Render Passes. An explanation of the different modes can be found by clicking [http://apidocs.vintagestory.at/api/Vintagestory.API.Client.EnumChunkRenderPass.html here], but In laymans terms, they determine how a block will behave visually (Think - Glass, Ice, etc): | |||
[[File:Vsmc_17.png|thumb|center|600px]] | |||
| |||
== Texturing == <!--T:5--> | |||
Once we have our model, we can slap some textures on: | |||
[[File:Vsmc_5.png|thumb|center|800px]] | |||
| |||
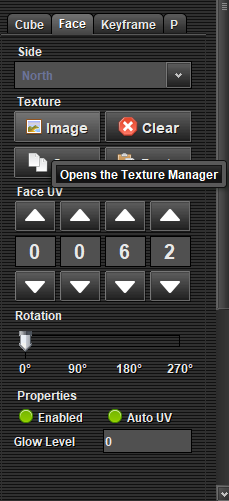
[[File: | Let's look at this interface - Textures are assigned separately for each side of the model, which we need to apply manually. We can speed it up by clicking Copy and then Paste for every side. If a side is not going to be visible in game, you can deselect "Enabled", which will make that side invisible. | ||
[[File:Vsmc_6.png|thumb|center|800px]] | |||
| |||
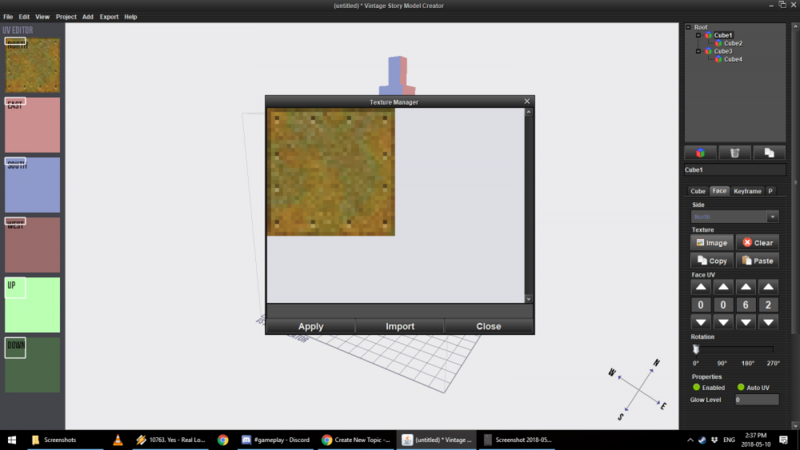
But first we need to click Image and import a texture we want to use. To make life easier, you can set the default texture path to take textures from. This is useful if you're going to use vanilla textures. Once a texture is imported - Click on it and select Apply. Please note that if your texture is outside of the game folder when Imported, you will need to tweak the model's shape (.json) file to reflect its location for the game. You will have to do this most of the time. | |||
[[File:Vsmc_7.png|thumb|center|800px]] | |||
| |||
[[File: | If we want to fine tune our UV Mapping (Aka how the texture is lined up on the model), we can use the Face UV controls to change the shape of the face. In this case, we stretch it out so that all the rivets are visible. One should also drag and move around the individual faces in the leftmost menu for best effect: | ||
[[File:Vsmc_8.png|thumb|center|800px]] | |||
| |||
Once | Once we're satisfied with the effect, we can save the model and use it in a mod: | ||
[[File:Vsmc_9.png|thumb|center|800px]] | |||
| |||
Revision as of 23:44, 28 October 2018
Vintage Story has its own model creator called VS Model Creator. It's very easy to create 3D Models and Animations, and anyone can download it! Below you can find modified versions of a modeling tutorial and an animation tutorial created by Balduranne and Luke, respectively. Click here if you would like to visit the original thread where these tutorials were originally posted.
Modeling
Modeling Basics
The model creator only allows working with cubes or parts of cubes, which you can create by clicking the Red/Green/Blue icon below the selection window. Once you have something selected, you can get to the modeling proper - Voxel Size determines the shape and size of the object, Position moves it around the grid, while Origin is from where the model is supposed to 'start' from. This mostly comes into play when rotating the object.
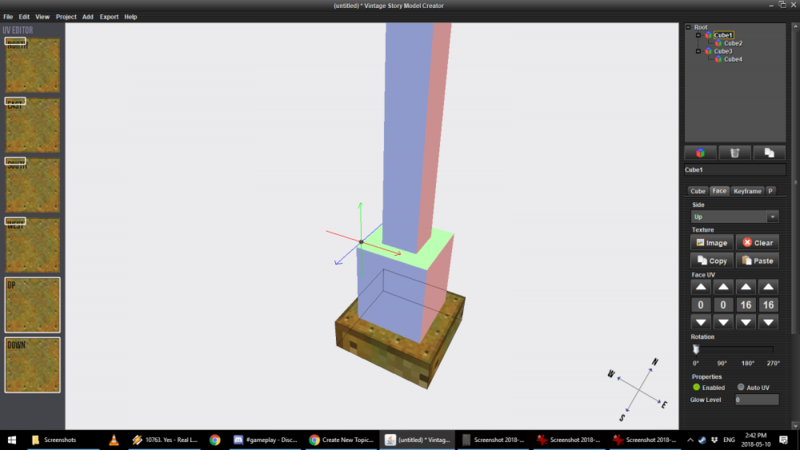
When adding more cubes, it's important to keep in mind what you have selected - In this case, Cube2 is docked under Cube1, so if we move the latter, Cube2 will end up moving along with Cube1. Cube 3 in this example is sitting on its own, and is unaffected by the other two.
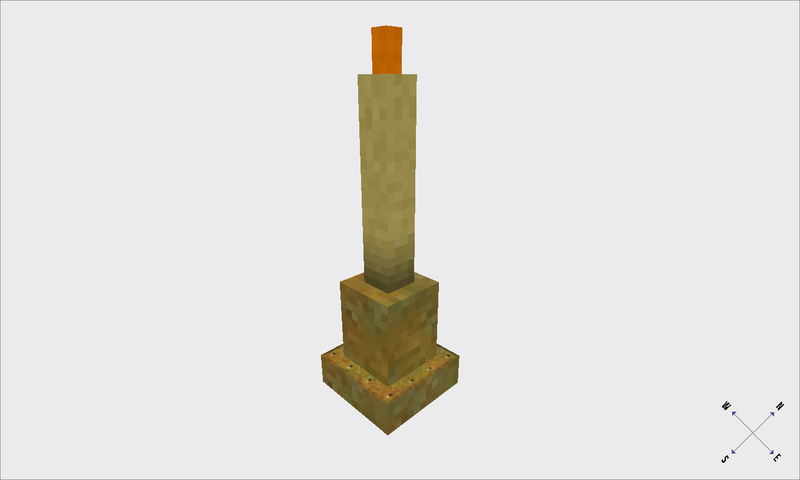
After a little fiddling, we have our model. In this case it's a candle holder with a candle:
Model Duplication
Very often you'll want to duplicate an element and move it around to speed up the modelling process. It's less time consuming than making a fresh object and moving it in the correct place and shape:
I'm sure very often you'll find yourself just applying the same texture to the entire object. This is where the Entity Texturing Mode comes into play:
Once clicked, the entire model will be assigned one texture. It's handy, but we still need to tweak it by hand. While the mode is on, you can only move an entire object around in the UV map editor (Left), that's hardly ideal in some cases. That's why we want to disable the Entity Texturing Mode (Don't worry, the texture will stay on), and go back to the Face menu and manually move the texture around.
This is especially important in cases where we want to use a single texture for a model, as is the case with my Loom model, or the NPC models (Including the player one):
Furthermore, if you're using one texture, you can tweak the texture size for larger objects:
Another useful trick is exporting the UV map of your model. Once you have it unwrapped (That is, spread around your texture sheet), you can export the UV map to make a proper texture for it, or in the case of the player model - Make your own skin for it:
That should about cover the basics. One important thing to keep in mind is that one block is 16x16x16 (The size of the grid) in the editor.
Model Editor controls, for reference - They're in the Help submenu (It really helps to memorize them!):
Once you have the hang of it, you can use Render Passes. An explanation of the different modes can be found by clicking here, but In laymans terms, they determine how a block will behave visually (Think - Glass, Ice, etc):
Texturing
Once we have our model, we can slap some textures on:
Let's look at this interface - Textures are assigned separately for each side of the model, which we need to apply manually. We can speed it up by clicking Copy and then Paste for every side. If a side is not going to be visible in game, you can deselect "Enabled", which will make that side invisible.
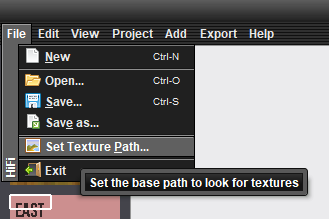
But first we need to click Image and import a texture we want to use. To make life easier, you can set the default texture path to take textures from. This is useful if you're going to use vanilla textures. Once a texture is imported - Click on it and select Apply. Please note that if your texture is outside of the game folder when Imported, you will need to tweak the model's shape (.json) file to reflect its location for the game. You will have to do this most of the time.
If we want to fine tune our UV Mapping (Aka how the texture is lined up on the model), we can use the Face UV controls to change the shape of the face. In this case, we stretch it out so that all the rivets are visible. One should also drag and move around the individual faces in the leftmost menu for best effect:
Once we're satisfied with the effect, we can save the model and use it in a mod:
