Smithing: Difference between revisions
(Creation) |
m (Trying to add icon thing.) |
||
| (64 intermediate revisions by 21 users not shown) | |||
| Line 1: | Line 1: | ||
<languages/><br><translate> | |||
<!--T:20--> | |||
[[File:Smithing_Action.gif|thumb|250px|Seraph smithing.]] | |||
<!--T:26--> | |||
'''Smithing''' is a powerful way to form {{ll|Metal|metal}} ingots into crafting components, {{ll|armor|armor}} materials, {{ll|Tools and Weapons|tool and weapon heads}}. | |||
</translate> | |||
__TOC__ | |||
<translate> | |||
== Required Materials == <!--T:1--> | |||
<!--T:21--> | |||
To smith items, a player needs an {{ll|Anvil|anvil}}, a {{ll|Hammer|hammer}}, a {{ll|Forge|forge}} with fuel (such as {{ll|Coal|coal}} or {{ll|Charcoal|charcoal}}), and {{ll|Metal|metal}} ingots.<br> | |||
In the case of Copper and Bronze Alloys, the metal must be {{ll|casting|casted}} to form ingots using the {{ll|crucible|crucible}} and {{ll|molds|clay molds}} prior to working them in the anvil. Iron ingots require preparation using a bloomery. | |||
<!--T:15--> | |||
:''See {{ll|Bloomery|Bloomery}} and {{ll|Casting|Casting}} for more detailed information.'' | |||
== Preparing the Ingots == <!--T:3--> | |||
<!--T:22--> | |||
# '''Load the Forge''': {{SneakClick|Add}} fuel ({{ll|Coal|coal}} or {{ll|Charcoal|charcoal}}) to the {{ll|Forge|forge}}, then {{SneakClick|add up}} to four ingots. | |||
# '''Ignite the Forge''': {{SneakClick|Ignite}} with a torch. Most {{ll|Metal|metals}} can be worked when they are heated to a temperature above 50% of their melting point. {{ll|Lead|Lead}} can be smithed at any temperature, {{ll|Iron#Bloomery|iron blooms}} can be smithed at above 700°C. | |||
<!--T:19--> | |||
# '''Collect heated ingots''': {{Using|Remove}} the ingot from the {{ll|Forge|forge}} using {{ll|tongs|tongs}} in the {{ll|off-hand|off-hand}}. | |||
# '''Select the tool''': {{SneakClick|Placing}} an ingot on the {{ll|Anvil|anvil}}, opens a dialog allowing the player to choose what tool, weapon, or item to craft. | |||
== Smithing the Item == <!--T:4--> | |||
<!--T:23--> | |||
[[File:Smithing example.png|thumb|left|200px|Ingot being worked on an anvil]] | |||
<!--T:27--> | |||
Once the tool, weapon, or item is selected, two different colors of voxel outlines will appear, green and purple. To form the item, the empty green outlines must be filled with metal voxels, and the metal voxels must be removed from the purple outlines. This is done by hitting the metal with a hammer to move the metal from its current ingot shape into the shape of selected item. The hammer has specific modes, explained below, that allow players to choose which direction the metal will move when striking the work item with the hammer. Using the Right-mouse-button {{RMB}} will turn the work item around, making it easier to hit certain parts. If the work item cools down too much during this process, use the forge to reheat the work item. Item progress will not be lost if the item is removed from the anvil and replaced. Some items, like plates, require two ingots to complete. To continue work shaping an item that needs more material, {{Using|add}} another heated ingot to the work item on the anvil as if placing a new ingot to work. | |||
<!--T:5--> | |||
{{Protip | |||
|Icon=Ironbloom.png | |||
|While copper and bronze work items can be melted back to an ingot, iron work items must be smelted in a bloomery again. Be careful with them!}} | |||
=== Hammer Modes=== <!--T:6--> | |||
<!--T:24--> | |||
To move metal in specific directions, change the hammer mode. Press {{Keypress|F}} with a {{ll|hammer|hammer}} in the active hand to view and change tool modes. | |||
<!--T:28--> | |||
[[File:Hammer_modes_screen.png|thumb|350px|Hammer modes screen.]] | |||
<!--T:16--> | |||
Hammer modes include three modes: | |||
<!--T:8--> | |||
* '''Heavy Hit''': When used on the bottom layer: No effect, when used on the upper layers: If near the edge, it will move voxels the the lower layer, i.e. flatten the work item. Otherwise it will ''spread'' the voxels. | |||
<!--T:9--> | |||
* '''Upset (Up, Left, Down, Right)''': When used on the bottom layer: Move voxels to the upper layer, only possible at the edges of a work item, when used on upper layers: Move voxels horizontally or down a layer if at the edge. | |||
<!--T:10--> | |||
* '''Split''': When used on metal: Permanently removes one voxel. When used on {{ll|Metal#Iron|Iron Bloom}}: Permanently removes up to 9 slag voxels (dark parts) in a 3x3 arrangement (if slag voxels are hit, no metal voxels will be removed.) | |||
=== Smithing List === <!--T:17--> | |||
<!--T:25--> | |||
Only certain items, weapons, and tool heads are available depending on the metal: | |||
</translate> | |||
{|class="wikitable sortable" style="text-align:center; width: 90%;" | |||
|- | |||
! width="5%" | <translate><!--T:29--> Icon</translate> | |||
! <translate><!--T:30--> Item</translate> | |||
! width="9%" | <translate><!--T:31--> Amount of ingots</translate> | |||
! <translate><!--T:32--> Copper</translate> | |||
! <translate><!--T:33--> Gold</translate> | |||
! <translate><!--T:34--> Silver</translate> | |||
! <translate><!--T:35--> Tin</translate> | |||
! <translate><!--T:36--> Zinc</translate> | |||
! <translate><!--T:37--> Bismuth</translate> | |||
! <translate><!--T:38--> Lead</translate> | |||
! <translate><!--T:39--> Bronze</translate> | |||
! <translate><!--T:40--> Iron</translate> | |||
! <translate><!--T:41--> Meteoric<br>Iron</translate> | |||
! <translate><!--T:42--> Steel</translate> | |||
|- | |||
![[File:anvilpart-base-iron.png|50px]] | |||
! '''<translate><!--T:43--> Anvil Base</translate>''' | |||
| 5 || ❌ || ❌ || ❌ || ❌ || ❌ || ❌ || ❌ || ❌ || ✔️ || ✔️ || ❌ | |||
|- | |||
![[File:anvilpart-top-iron.png|50px]] | |||
! '''<translate><!--T:44--> Anvil top</translate>''' | |||
| 5 || ❌ || ❌ || ❌ || ❌ || ❌ || ❌ || ❌ || ❌ || ✔️ || ✔️ || ❌ | |||
|- | |||
![[File:Arrowhead-copper.png|50px]] | |||
! '''<translate><!--T:45--> Arrowhead</translate>''' | |||
| 1<br>''(<translate><!--T:46--> for 6 or 9 arrowheads</translate>)'' || ✔️ || ✔️ || ✔️ || ❌ || ❌ || ❌ || ❌ || ✔️ || ✔️ || ✔️ || ✔️ | |||
|- | |||
![[File:Grid Copper axe head.png|50px]] | |||
! '''<translate><!--T:47--> Axe Head</translate>''' | |||
| 1 || ✔️ || ✔️ || ✔️ || ❌ || ❌ || ❌ || ❌ || ✔️ || ✔️ || ✔️ || ✔️ | |||
|- | |||
![[File:Grid Copper Chisel.png|50px]] | |||
! '''<translate><!--T:48--> Chisel</translate>''' | |||
| 1 || ✔️ || ✔️ || ✔️ || ❌ || ❌ || ❌ || ❌ || ✔️ || ✔️ || ✔️ || ✔️ | |||
|- | |||
![[File:Chutesection-copper.png|50px]] | |||
! '''<translate><!--T:49--> Chute Section</translate>''' | |||
| 1<br>''(<translate><!--T:50--> or 1 plate for easier smithing</translate>)'' || ✔️ || ❌ || ❌ || ❌ || ❌ || ❌ || ❌ || ❌ || ❌ || ❌ || ❌ | |||
|- | |||
![[File:Cleaver-copper.png|50px]] | |||
! '''<translate><!--T:51--> Cleaver</translate>''' | |||
| 1 || ✔️ || ✔️ || ✔️ || ❌ || ❌ || ❌ || ❌ || ✔️ || ✔️ || ✔️ || ✔️ | |||
|- | |||
![[File:Grid Copper hammer head.png|50px]] | |||
! '''<translate><!--T:52--> Hammer Head</translate>''' | |||
| 1 || ✔️ || ✔️ || ✔️ || ❌ || ❌ || ❌ || ❌ || ✔️ || ✔️ || ✔️ || ✔️ | |||
|- | |||
![[File:Grid Copper hoe head.png|50px]] | |||
! '''<translate><!--T:53--> Hoe Head</translate>''' | |||
| 1 || ✔️ || ✔️ || ✔️ || ❌ || ❌ || ❌ || ❌ || ✔️ || ✔️ || ✔️ || ✔️ | |||
|- | |||
![[File:Knifeblade-copper.png|50px]] | |||
! '''<translate><!--T:54--> Knife Blade</translate>''' | |||
| 1 || ✔️ || ✔️ || ✔️ || ❌ || ❌ || ❌ || ❌ || ✔️ || ✔️ || ✔️ || ✔️ | |||
|- | |||
![[File:Bladehead-falx-copper.png|50px]] | |||
! '''<translate><!--T:55--> Falx head</translate>''' | |||
| 1 || ✔️ || ✔️ || ✔️ || ❌ || ❌ || ❌ || ❌ || ✔️ || ✔️ || ✔️ || ✔️ | |||
|- | |||
![[File:metalchain-copper.png|50px]] | |||
! '''<translate><!--T:56--> Chain</translate>''' | |||
| 2 || ✔️ || ✔️ || ✔️ || ❌ || ❌ || ❌ || ❌ || ✔️ || ✔️ || ✔️ || ✔️ | |||
|- | |||
![[File:Grid Copper plate.png|50px]] | |||
! '''<translate><!--T:57--> Plate</translate>''' | |||
| 2 || ✔️ || ✔️ || ✔️ || ✔️ || ✔️ || ✔️ || ✔️ || ✔️ || ✔️ || ✔️ || ✔️ | |||
|- | |||
![[File:metalscale-copper.png|50px]] | |||
! '''<translate><!--T:58--> Scales</translate>''' | |||
| 2 || ✔️ || ❌ || ❌ || ❌ || ❌ || ❌ || ❌ || ✔️ || ✔️ || ✔️ || ✔️ | |||
|- | |||
![[File:Padlock-tinbronze.png|50px]] | |||
! '''<translate><!--T:59--> Padlock</translate>''' | |||
| 1 || ❌ || ❌ || ❌ || ❌ || ❌ || ❌ || ❌ || ✔️ || ✔️ || ✔️ || ✔️ | |||
|- | |||
![[File:Grid Copper pickaxe head.png|50px]] | |||
! '''<translate><!--T:60--> Pickaxe Head</translate>''' | |||
| 1 || ✔️ || ✔️ || ✔️ || ❌ || ❌ || ❌ || ❌ || ✔️ || ✔️ || ✔️ || ✔️ | |||
|- | |||
![[File:Poundercap-tinbronze.png|50px]] | |||
! '''<translate><!--T:61--> Pounder Cap</translate>''' | |||
| 1 || ❌ || ❌ || ❌ || ❌ || ❌ || ❌ || ❌ || ✔️ || ✔️ || ✔️ || ✔️ | |||
|- | |||
![[File:Grid Copper prospecting pick head.png|50px]] | |||
! '''<translate><!--T:62--> Prospecting Pick</translate>''' | |||
| 1 || ✔️ || ✔️ || ✔️ || ❌ || ❌ || ❌ || ❌ || ✔️ || ✔️ || ✔️ || ✔️ | |||
|- | |||
![[File:Grid Copper saw blade.png|50px]] | |||
! '''<translate><!--T:63--> Saw Blade</translate>''' | |||
| 1 || ✔️ || ✔️ || ✔️ || ❌ || ❌ || ❌ || ❌ || ✔️ || ✔️ || ✔️ || ✔️ | |||
|- | |||
![[File:Scythehead-copper.png|50px]] | |||
! '''<translate><!--T:64--> Scythe Head</translate>''' | |||
| 1 || ✔️ || ✔️ || ✔️ || ❌ || ❌ || ❌ || ❌ || ✔️ || ✔️ || ✔️ || ✔️ | |||
|- | |||
![[File:shears-copper.png|50px]] | |||
! '''<translate><!--T:65--> Shears</translate>''' | |||
| 1 || ✔️ || ✔️ || ✔️ || ❌ || ❌ || ❌ || ❌ || ✔️ || ✔️ || ✔️ || ✔️ | |||
|- | |||
![[File:Grid Copper shovel head.png|50px]] | |||
! '''<translate><!--T:66--> Shovel Head</translate>''' | |||
| 1 || ✔️ || ✔️ || ✔️ || ❌ || ❌ || ❌ || ❌ || ✔️ || ✔️ || ✔️ || ✔️ | |||
|- | |||
![[File:Grid Copper spear head.png|50px]] | |||
! '''<translate><!--T:67--> Spear Head</translate>''' | |||
| 1 || ✔️ || ✔️ || ✔️ || ❌ || ❌ || ❌ || ❌ || ✔️ || ✔️ || ✔️ || ✔️ | |||
|- | |||
![[File:Boss-tinbronze.png|50px]] | |||
! '''<translate><!--T:68--> Shield's boss</translate>''' | |||
| 1 || ❌ || ✔️ || ✔️ || ❌ || ❌ || ❌ || ❌ || ✔️ || ✔️ || ✔️ || ✔️ | |||
|- | |||
![[File:Hoop-tinbronze.png|50px]] | |||
! '''<translate><!--T:69--> Shield's hoop</translate>''' | |||
| 1 || ❌ || ✔️ || ✔️ || ❌ || ❌ || ❌ || ❌ || ✔️ || ✔️ || ✔️ || ✔️ | |||
|- | |||
![[File:Wrench-copper.png|50px]] | |||
! '''<translate>Wrench</translate>''' | |||
| 1 || ✔️ || ✔️ || ✔️ || ❌ || ❌ || ❌ || ❌ || ✔️ || ✔️ || ✔️ || ✔️ | |||
|- | |||
|} | |||
<translate> | |||
==Smithing Tutorial Videos== <!--T:11--> | |||
</translate> | |||
<youtube>2h9is76yNgM</youtube> | <youtube>2h9is76yNgM</youtube> | ||
> | |||
<youtube>MF_mA0SFYcI</youtube> | |||
> | |||
<youtube>483Gjlfa-68</youtube> | |||
{{Metals navbox}} | |||
{{Game navbox}} | |||
[[Category:Guides{{#translation:}}]] | |||
Latest revision as of 20:26, 4 April 2024
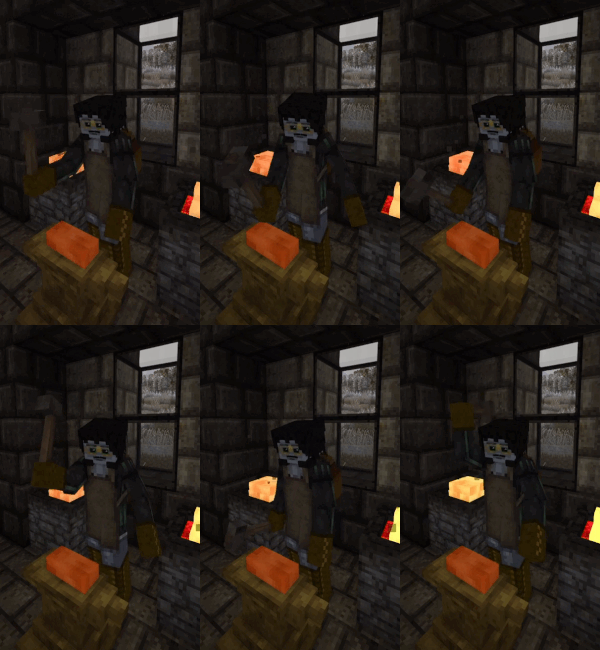
Smithing is a powerful way to form metal ingots into crafting components, armor materials, tool and weapon heads.
Required Materials
To smith items, a player needs an anvil, a hammer, a forge with fuel (such as coal or charcoal), and metal ingots.
In the case of Copper and Bronze Alloys, the metal must be casted to form ingots using the crucible and clay molds prior to working them in the anvil. Iron ingots require preparation using a bloomery.
Preparing the Ingots
- Load the Forge: Add fuel (coal or charcoal) to the forge, then add up to four ingots.
- Ignite the Forge: Ignite with a torch. Most metals can be worked when they are heated to a temperature above 50% of their melting point. Lead can be smithed at any temperature, iron blooms can be smithed at above 700°C.
- Collect heated ingots:
Remove the ingot from the forge using tongs in the off-hand.
- Select the tool: Placing an ingot on the anvil, opens a dialog allowing the player to choose what tool, weapon, or item to craft.
Smithing the Item
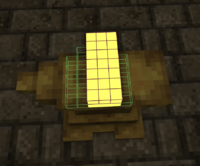
Once the tool, weapon, or item is selected, two different colors of voxel outlines will appear, green and purple. To form the item, the empty green outlines must be filled with metal voxels, and the metal voxels must be removed from the purple outlines. This is done by hitting the metal with a hammer to move the metal from its current ingot shape into the shape of selected item. The hammer has specific modes, explained below, that allow players to choose which direction the metal will move when striking the work item with the hammer. Using the Right-mouse-button ![]() will turn the work item around, making it easier to hit certain parts. If the work item cools down too much during this process, use the forge to reheat the work item. Item progress will not be lost if the item is removed from the anvil and replaced. Some items, like plates, require two ingots to complete. To continue work shaping an item that needs more material,
add another heated ingot to the work item on the anvil as if placing a new ingot to work.
will turn the work item around, making it easier to hit certain parts. If the work item cools down too much during this process, use the forge to reheat the work item. Item progress will not be lost if the item is removed from the anvil and replaced. Some items, like plates, require two ingots to complete. To continue work shaping an item that needs more material,
add another heated ingot to the work item on the anvil as if placing a new ingot to work.

|
Protip:
While copper and bronze work items can be melted back to an ingot, iron work items must be smelted in a bloomery again. Be careful with them! |
Hammer Modes
To move metal in specific directions, change the hammer mode. Press F with a hammer in the active hand to view and change tool modes.
Hammer modes include three modes:
- Heavy Hit: When used on the bottom layer: No effect, when used on the upper layers: If near the edge, it will move voxels the the lower layer, i.e. flatten the work item. Otherwise it will spread the voxels.
- Upset (Up, Left, Down, Right): When used on the bottom layer: Move voxels to the upper layer, only possible at the edges of a work item, when used on upper layers: Move voxels horizontally or down a layer if at the edge.
- Split: When used on metal: Permanently removes one voxel. When used on Iron Bloom: Permanently removes up to 9 slag voxels (dark parts) in a 3x3 arrangement (if slag voxels are hit, no metal voxels will be removed.)
Smithing List
Only certain items, weapons, and tool heads are available depending on the metal:
Smithing Tutorial Videos
> >
| Ores, metals and minerals | |
|---|---|
| Guides | Ore Deposits • Metals |
| Metals | Copper • Iron • Meteoric iron • Gold • Silver • Lead • Tin • Zinc • Bismuth • Titanium (Ilmenite) |
| Alloys | Bronze (Tin bronze, bismuth bronze, black bronze) • Steel • Brass • Solder (Lead solder, Silver solder) • Molybdochalkos • Cupronickel • Electrum |
| Minerals | Alum • Borax • Cinnabar • Coal • Halite (Salt) • Lapis lazuli • Quartz • Saltpeter • Sulfur • Sylvite (Potash) |
| Tools | Pickaxe • Hammer • Prospecting Pick • Crucible • Forge • Ore blasting bomb • Quern • Anvil • Bloomery • Helve hammer • Pulverizer |
| Other | Gemstones |
| Related mechanics | Panning • Mining • Clay forming • Casting • Smithing • Steel making |
| Wiki Navigation | |
|---|---|
| Vintage Story | Guides • Frequently Asked Questions • Soundtrack • Versions • Controls |
| Game systems | Crafting • Knapping • Clay forming • Smithing • Cooking • Temperature • Hunger • Mining • Temporal stability • Mechanical power • Trading • Farming • Animal husbandry |
| World | World generation • Biomes • Weather • Temporal storms |
| Items | Tools • Weapons • Armor • Clothing • Bags • Materials • Food |
| Blocks | Terrain • Plants • Decorative • Lighting • Functional • Ore |
| Entities | Hostile entities • Animals • NPCs • Players |
| Miscellaneous | List of client commands • List of server commands • Creative Starter Guide • Bot System • WorldEdit • Cinematic Camera • Adjustable FPS Video Recording • ServerBlockTicking |


