Modding:Setting up your Development Environment
This page was last verified for Vintage Story version 1.19.3.
Software
When you are ready to begin coding mods for Vintage Story, you probably would want to set up a development environment that simplifies the process of coding and testing your creations. VintageStory is developed in C# and since version 1.18.8 we switched to .NET 7.
There are several applications that aid you in the development of mods and the following Software is supported by our modding template:
- Visual Studio Community is a free and very powerful development environment made by Microsoft and has probably the best support for working with C# and dotnet which are also developed by Microsoft. This is also the tool the Vintage Story Team uses to build the game. It also has a MacOS Version. When using it make sure to install the
.NET desktop developmentWorkload as well.
- JetBrains Rider is a paid powerful and user-friendly integrated development environment (IDE) specifically designed for .NET. Since it is made for the .NET it also has very good support for all the features you may need while being fully cross-platform. It is also used to develop the game by the Vintage Story Team.
- Visual Studio Code is a free, lightweight and versatile source code editor developed by Microsoft. It supports numerous programming languages and offers a wide range of extensions to enhance its functionality. There are extensions to support C# and thus can be a good choice to start out making mods. It is a lot used by our modding community.
While you can use any text editor to edit source code files we highly recommend using any of the above tools to make your experience much more manageable.
Choose one of the above IDEs or other alternatives. We suggest using Visual Studio Community for Windows. For Linux you may want to use Visual Studio Code or Rider.
Note: If you are on Linux and plan to install Visual Studio Code or Rider using Flatpak or snap be aware that there might be some issues with using system tools like .NET 7 or the environment variables. So if possible please use a native installation method if possible.
Next, you will need to install the .NET 7 SDK (Software Development Kit) this will also include the .NET 7 Dekstop Runtime which is needed to run the game since version 1.18.8-rc.1.
Verify that the .NET 7 SDK is correctly installed by running the following command in a Terminal:
On Windows open the Application Windows PowerShell which is preinstalled on all modern Windows versions (10 / 11).
dotnet --list-sdks
It should return a list of installed SDK's and should contain a line with 7.0.xxx. If that is the case you are good to continue.
Setup the Environment
Our Mod template makes use of the VINTAGE_STORY environment variable. An environment variable is a stored value within your operating system that can be easily accessed from any program. In this case, the VINTAGE_STORY variable allows our mod template to easily find our installation folder. The first step for setting up our environment is to create this environment variable to link to our game installation path.
The VINTAGE_STORY environment variable simplifies reusing your Vintage Story game installation path and helps if multiple modders work on the same project to reference the VINTAGE_STORY Environment Variable and have their game installed where ever they want. As well as this, it increases the efficiency of updating any existing mods.
Windows
Here you have two options to set the environment variable:
- Use this short PowerShell script. Open the Windows PowerShell Application, paste the following into it, and hit ENTER.
[Environment]::SetEnvironmentVariable("VINTAGE_STORY", "$Env:AppData\Vintagestory", "User")
Change $Env:AppData\Vintagestory if you used a custom installation path for your game.
- Follow these manual steps to set the Environment variable
Search in Windows search for Edit the system environment variables > Environment Variables... > User variables for USER > New > Add insert the Variable name: VINTAGE_STORY and add the path to your Vintage Story installation.

For example, the default installation directory would be C:\Users\<Username>\AppData\Roaming\Vintagestory, (replace <Username> with your username) if you are not sure where yours is type %appdata% into the URL field in the File Explorer and hit ENTER. It will take you to your AppData\Roaming folder where Vintage Story should be installed if you haven't changed the default installation location.

Note:
Do not confuse the AppData\Roaming\VintagestoryData directory with the AppData\Roaming\Vintagestory folder. The VintagestoryData directory only holds your Settings, Logs, Savegames and Mods.
Linux and Mac
To set an environment variable in Linux/Mac you need to add the following to your shells startup file:
export VINTAGE_STORY="$HOME/ApplicationData/vintagestory"
Replace the path with the one where your Vintagestory installation is located. The above path should point to your install when you installed Vintagestory using the install.sh script.
Run echo $SHELL in a terminal to see what shell you are using.
- For Bash place it in:
~/.bashrcor~/.bash_profileat the end - For Zsh place it in:
~/.zshrcor~/.zprofileat the end - If you use another shell see their documentation on how their shell startup file is called
Note: If you are using ~/.bash_profile or ~/.zprofile you will have to Logout and Login again to apply the changes. When using ~/.bashrc or ~/.zshrc you only need to restart the application that needs to use the environment variable (Visual Studio, Rider, Visual Studio Code, Terminal).
Setup a Mod
Mod Template package
The first and recommended option would be to use the template package.
Install the mod Mod template package using the following command on the Terminal:
dotnet new install VintageStory.Mod.Templates
This will download the latest mod template package from nuget.org
Once the template is installed you will see it inside Visual Studio and Rider. From there you can use the templates to create a new Project.
Visual Studio
We advise you to check the option Place solution and project in the same directory for Visual Studio
This will flatten the project tree by one folder and make it easier to navigate.
If you don't want the log output to show up in a separate window you can check the option SuppressWindowsConsoleWindow. When enabled the log output will still be shown inside the Visual Studio Debug Output.
Open Visual Studio and click on Create a new project. If you installed the VintageStory.Mod.Templates you can then select Vintage Story Mod. Your project name must be only lowercase letters for your mod to function correctly. It is recommended to enable the various include options in the setup.
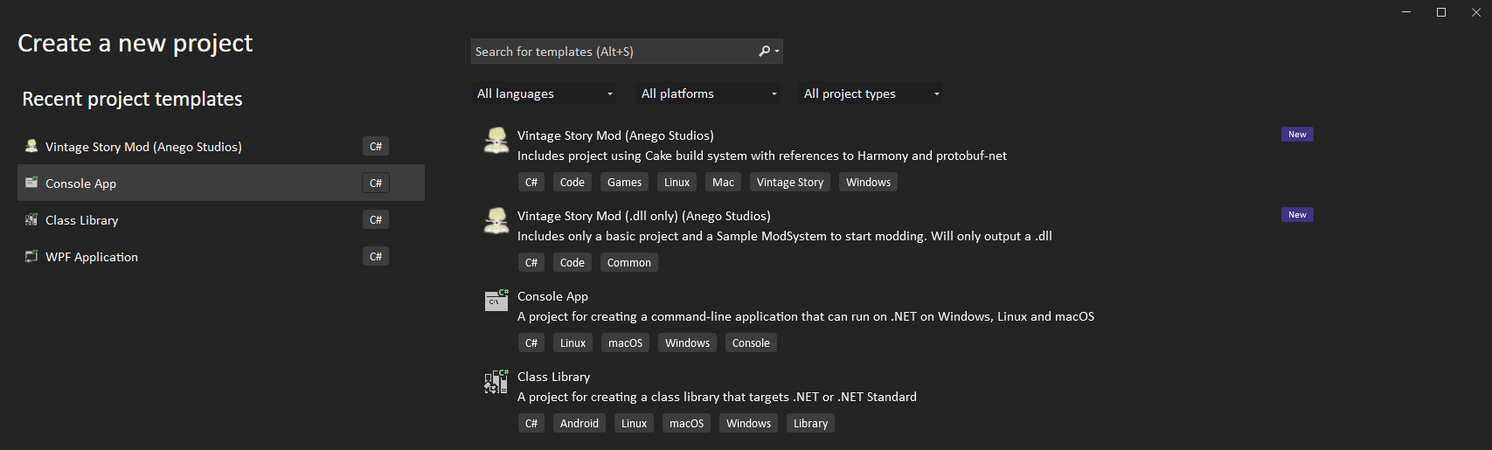
Visual Studio Mod Template

Visual Studio Mod Template setup
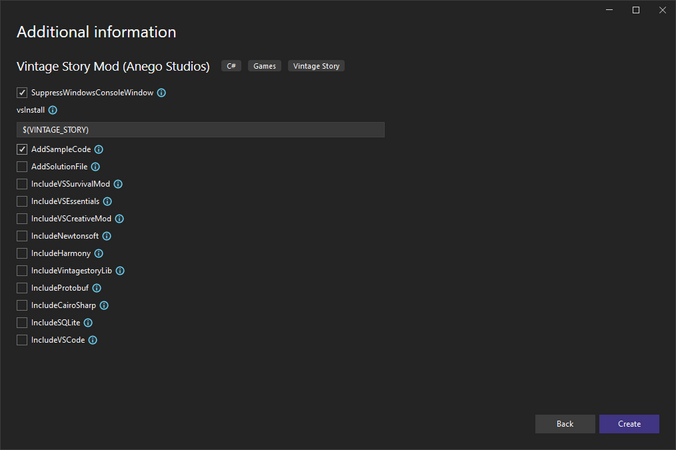
Visual Studio Mod Template options


Rider
We advise you to check the option Put solution and project in the same directory for Rider.
This will flatten the project tree by one folder and make it easier to navigate.
Open Rider and click on New Solution. If you installed the VintageStory.Mod.Templates you can then select Vintage Story Mod.

Note: Unfortunately as of writing this Rider does not support those template options as Visual Studio in the UI yet but you can check this issue for updates.
For now you can make use of those options using the CLI see the Visual Studio Code section for how to use it.
Visual Studio Code
To create a new Mod using the template when using Visual Studio Code you have to resort to using the command line for now since there is no UI that supports the options as well. Open a folder in Visual Studio Code where you want your mod to be. Then open the terminal within Visual Studio code Terminal > New Terminal.
- Create a new Mod Project with launch.json and task.json to easily start it and a Solution file. Other IDE's create that automatically so that is why we have this additional
--AddSolutionFileflag for VS Code.
dotnet new vsmod --IncludeVSCode --AddSolutionFile
For all possible options run the following in the terminal:
dotnet new vsmod --help
Once you opened or created a template Visual Studio will prompt you to install the recommended extension, click on Show Recommendations and install the the pre-release version of the C# Dev Kit extension. This will also install the required C# automatically for you. These two extensions are recommended and will add Syntax highlighting, Autocomlet and many more much-needed features for writing C# code.
Other / Commandline
If want to use the Commandline you can use all template options on the Commandline in any Terminal Application with the help of the dotnet command.
- Create a new VS mod in the folder mytestmod in the current location of the terminal.
dotnet new vsmod --AddSolutionFile -o mytestmod
- or create a dll/code only mod
dotnet new vsmoddll --AddSolutionFile -o mytestmod
For all possible options run the following in the terminal:
dotnet new vsmod --help
When using the Commandline you can specify these options like so:
# Will create a new Mod Project with the dependency for VSSurvivalMod
dotnet new vsmod --AddSolutionFile --IncludeVSSurvivalMod -o mytestmod
Finally in mytestmod\mytestmod\modinfo.json
change the name, modid , authors and description to describe your mod.
Updating the template package
To update all installed templates you can run:
dotnet new update
But this should not be necessary when creating a new mod, since using the dotnet new vsmod will check automatically if a new version of the template is available and install it.
Folder structure
Here is an overview of where what files in your mod are located.
| Name | Description |
|---|---|
mytestmod |
|
.vscode |
If you checked --IncludeVSCode this folder will contain all stuff needed to run, package and debug your mod using Visual Studio Code. |
CakeBuild |
This Project contains the code that builds mytestmod_x.x.x.zip. You can execute it by selecting the Run Configuration CakeBuild. |
mytestmod |
This is your project. It contains all your code as well as the assets and the modinfo.json |
assets |
Contains your assets. See Asset System |
modinfo.json |
Defines your mod. Author, Dependencies, Name and much more. See Modinfo |
Properties |
|
launchSettings.json |
This contains how to launch your mod (Visual Studio, Rider). You may want to add custom startup parameters to launch for example directly into a world when starting. Run Vintagestory.exe -h to see all options from a terminal opened in your Vintagestory install directory. |
mymod.csproj |
Your mods csproj file. Contains information like the .NET version to build against and references to the VintagestoryAPI for example. |
Releases |
Contains your mod release once the CakeBuild Run Configuration was run. |
mytestmod |
Your mod files before getting packaged into a .zip file. |
mytestmod_x.x.x.zip |
Ready to release mod zip. |
Template Mod Project
Use the Github Mod template to create a new mod
The Github Mod template provides an easy way to get the basics for mod setup so you can start directly with adding your modifications to the game.
- Without using git and Github account
To get a copy of the template click the <> Code button on the GitHub repository site. Then download the template as ZIP file and extract it.
- Using Github and or git command
You can directly click on Use this template on the GitHub repository site to create a copy of it to your GitHub account.
After that, you can clone your new repository to your computer.
If you do not use GitHub just clone the repo and upload it to your preferred Git hosting provider (Gitlab, BitBucket, ...)
With a local copy of the template, you can go ahead and open the ModTemplate.sln either in Visual Studio, Rider or Open the folder in Visual Studio Code. The Template is ready to use for any of the aforementioned IDE's. Now you can already start the mod with the game.
When opened you need to change the following to release the mod since a mod has to have a unique modid for the VSModDB:
In modtemplate\resources\modinfo.json
change the name, modid , authors and description to describe your mod.
For a full list of available options see Modinfo.
The modid has to contain only lowercase letters and numbers. No special chars, whitespaces, uppercase letters, etc. are allowed.
Next, rename the folder modtemplate\resources\assets\mymodid to match what your modid is.
Finally change in the file modtemplate\modtemplateModSystem.cs the line
Lang.Get("mymodid:hello")
from mymodid to your new modid.
The file modtemplate\modtemplateModSystem.cs can be called whatever you like.
(Optional) Further, you can change the name ModTemplate to whatever you like as long as you change all of the following:
- Folder
ModTemplate - File
ModTemplate\ModTemplate.csproj - In File
CakeBuild\Program.cson line
ProjectName = "ModTemplate";
If you are on linux and used the Github Template make sure to update in ModTemplate\Properties\launchSettings.json the executablePath. There you need to remove the .exe
Launch the Mod
Visual Studio Launch Mod

Rider Launch Mod

Rider Launch Mod (New UI)

Rider Launch Mod


Visual Studio Code Launch Mod

If you are having trouble, you might be able to learn from the vsmodexamples project
Packaging the Mod
With the new template, we are using the Cake build system. This includes a second Project within the Solution in the template.
In all supported IDE's you can select from the dropdown that you used to launch the mod the CakeBuild option and run it.
When using Visual Studio Code you can also create a package by running the package task. For that got to Terminal > Run Task... and select package.
It will perform a JSON validation on your assets so they are at least parsable by Newtonsoft.Json and then build a Releases/mymodid_1.0.0.zip. The version is taken from the mymod/modinfo.json file.
Congratulations now you have your mod development environment set up and a ready-to-release mod package.
Note: Make sure you use your own unique modid else you won't be able to upload the mod to the VSModDB.
Updating the Mod
If your mod is setup correctly, updating can be done by updating the VINTAGE_STORY envrionment variable to your new path.
Repeat the steps made in Setup the Environment to edit the environment variable, and rebuild your mod. It is likely that mods will break on certain updates, however fixing them is often quite simplistic, and errors are well documented. To check your update has worked, debug your mod and check the game version on the main menu.
Moving Forward
If you've successfully managed to set up your development environment and can run Vintage Story through your Mod project in your IDE then it's time to get started on your first code mod. At this point there are many options you can choose from as code mods can alter almost any aspect of the game. However, the best place to start is likely once again with Blocks and Items (since you should be familiar with making them using JSONS by this point).
Head over to the Advanced Blocks page to make your first advanced code block.
Or head over to the Advanced Items page to make your first advanced code item.
| Code Modding | |
|---|---|
| Advanced | Server-Client Considerations • Setting up your Development Environment • Advanced Blocks • Advanced Items • Block and Item Interactions • Block Behavior • Block Entity • Particle Effects • World Access • Inventory Handling • Commands • GUIs • Network API • Monkey patching (Harmony) |
| Data Management | Savegame Data Storage • ModConfig File • Chunk Data Storage • TreeAttribute |
| Worldgen | WorldGen API • NatFloat • EvolvingNatFloat |
| Rendering | Shaders and Renderers |
Wondering where some links have gone?
The modding navbox is going through some changes! Check out Navigation Box Updates for more info and help finding specific pages.
| Modding | |
|---|---|
| Modding Introduction | Getting Started • Theme Pack |
| Content Modding | Content Mods • Developing a Content Mod • Basic Tutorials • Intermediate Tutorials • Advanced Tutorials • Content Mod Concepts |
| Code Modding | Code Mods • Setting up your Development Environment |
| Property Overview | Item • Entity • Block • Block Behaviors • Block Classes • Block Entities • Block Entity Behaviors • World properties |
| Workflows & Infrastructure | Modding Efficiency Tips • Mod-engine compatibility • Mod Extensibility • VS Engine |
| Additional Resources | Community Resources • Modding API Updates • Programming Languages • List of server commands • List of client commands • Client startup parameters • Server startup parameters Example Mods • API Docs • GitHub Repository |