Modding:Server-Client Considerations: Difference between revisions
(Created page with "__FORCETOC__ {{GameVersion|1.14}} Developing code-based mods for Vintage Story requires an appreciation of the server-client divide, particularly for more advanced applicatio...") |
m (Updated navbox to new code navbox.) |
||
| (5 intermediate revisions by 4 users not shown) | |||
| Line 1: | Line 1: | ||
__FORCETOC__ | __FORCETOC__ | ||
{{GameVersion|1. | {{GameVersion|1.19}} | ||
<languages/> | |||
<translate> | |||
<!--T:1--> | |||
Developing code-based mods for Vintage Story requires an appreciation of the server-client divide, particularly for more advanced applications. | Developing code-based mods for Vintage Story requires an appreciation of the server-client divide, particularly for more advanced applications. | ||
<!--T:2--> | |||
Understanding the division of tasks between server and client threads will make it easier to troubleshoot and to create well-designed mod systems, particularly if you plan for your mod to work on multiplayer servers. | Understanding the division of tasks between server and client threads will make it easier to troubleshoot and to create well-designed mod systems, particularly if you plan for your mod to work on multiplayer servers. | ||
== Basics == | == Basics == <!--T:3--> | ||
The core of a typical mod is the ModSystem, which is introduced in more detail on the [[Modding:Advanced_Blocks#The_Mod_System|Advanced Blocks]] page. | The core of a typical mod is the ModSystem, which is introduced in more detail on the [[Modding:Advanced_Blocks#The_Mod_System|Advanced Blocks]] page. | ||
<!--T:4--> | |||
<syntaxhighlight lang="c#"> | <syntaxhighlight lang="c#"> | ||
public class ExampleMod : ModSystem | public class ExampleMod : ModSystem | ||
</syntaxhighlight> | </syntaxhighlight> | ||
<!--T:5--> | |||
As described in the API docs ([https://apidocs.vintagestory.at/api/Vintagestory.API.Common.ModSystem.html VintageStory.API.Common.ModSystem]), <code>ModSystem</code> includes a number of virtual methods which your mod may override. Perhaps the most commonly used method is <code>ModSystem.Start(ICoreAPI)</code>. You can use this method to define initialization code that should run when the game first loads. However, it is important to realize that, by default, the game creates one instance of your ModSystem on the server, and one additional ModSystem instance on each client. In the case of a single-player game, there will be one server and one client running on the same machine. As a result, any code that you put in <code>ModSystem.Start</code> will be run two or more times - once on the server thread and once on each client thread. | As described in the API docs ([https://apidocs.vintagestory.at/api/Vintagestory.API.Common.ModSystem.html VintageStory.API.Common.ModSystem]), <code>ModSystem</code> includes a number of virtual methods which your mod may override. Perhaps the most commonly used method is <code>ModSystem.Start(ICoreAPI)</code>. You can use this method to define initialization code that should run when the game first loads. However, it is important to realize that, by default, the game creates one instance of your ModSystem on the server, and one additional ModSystem instance on each client. In the case of a single-player game, there will be one server and one client running on the same machine. As a result, any code that you put in <code>ModSystem.Start</code> will be run two or more times - once on the server thread and once on each client thread. | ||
== Is My Mod Server-Side, Client-Side, or Both? == | == Is My Mod Server-Side, Client-Side, or Both? == <!--T:6--> | ||
''TBA'' | ''TBA'' | ||
== Common "Gotchas" == | == Common "Gotchas" == <!--T:7--> | ||
* In a singleplayer session, the server and the client share the same dataPath. This is important to keep in mind particularly if you are saving/reading any mod settings from the game's data path, such as by using the built in [[Modding:ModConfig|ModConfig]] methods. For example, your mod might appear to work fine on singleplayer if the server thread is reading your settings file, but then fail to work as expected on a multiplayer server, where the client thread should have been reading the player's settings. | * In a singleplayer session, the server and the client share the same dataPath. This is important to keep in mind particularly if you are saving/reading any mod settings from the game's data path, such as by using the built in [[Modding:ModConfig|ModConfig]] methods. For example, your mod might appear to work fine on singleplayer if the server thread is reading your settings file, but then fail to work as expected on a multiplayer server, where the client thread should have been reading the player's settings. | ||
== Helpful Tips == | == Helpful Tips == <!--T:8--> | ||
* In most cases, a mod can be designed to work on both singleplayer and multiplayer sessions with no special logic needed. However, if you need to check the state of the session for some reason, you can use the <code>ICoreClientAPI.IsSinglePlayer</code> property to check if the current game is a singleplayer game. | * In most cases, a mod can be designed to work on both singleplayer and multiplayer sessions with no special logic needed. However, if you need to check the state of the session for some reason, you can use the <code>ICoreClientAPI.IsSinglePlayer</code> property to check if the current game is a singleplayer game. | ||
* If you have any doubts or concerns about your mod working on a multiplayer server, consider setting up a local server on your machine to test it out! | * If you have any doubts or concerns about your mod working on a multiplayer server, consider setting up a local server on your machine to test it out! | ||
== Testing a Divided Server and Client == | == Testing a Divided Server and Client == <!--T:9--> | ||
It's easy to test how your mod will work on a multiplayer server, even if you're just working on a single local machine! | It's easy to test how your mod will work on a multiplayer server, even if you're just working on a single local machine! | ||
<!--T:10--> | |||
''The following instructions are for Windows, but other operating systems should work similarly.'' | ''The following instructions are for Windows, but other operating systems should work similarly.'' | ||
# Before getting started, remove any mods that you've put directly in your Vintage Story | <!--T:11--> | ||
#* Instead, move these mods into the data directory (on | # Before getting started, remove any mods that you've put directly in your Vintage Story directory (typically <code>%appdata%/Vintagestory/Mods/</code>). Mods in this directory will be shared by the server and client with the setup described below. | ||
#* Instead, move these mods into the data directory (on Windows, that is <code>%appdata%/VintagestoryData/Mods/</code> by default). | |||
# Set up a shortcut to the game's VintageStoryServer.exe file in your existing Vintage Story program directory. You'll use this shortcut to launch your test server. You will need to give it a custom data path using a run parameter to ensure that the server uses a different data path than the default data path. For example, on Windows your shortcut might have a target of<br><code>C:\Program Files\Vintagestory\VintagestoryServer.exe --dataPath "%appdata%/VintagestoryData_Server"</code><br>[[Image:Local_Server_Example_Shortcut.png]] | # Set up a shortcut to the game's VintageStoryServer.exe file in your existing Vintage Story program directory. You'll use this shortcut to launch your test server. You will need to give it a custom data path using a run parameter to ensure that the server uses a different data path than the default data path. For example, on Windows your shortcut might have a target of<br><code>C:\Program Files\Vintagestory\VintagestoryServer.exe --dataPath "%appdata%/VintagestoryData_Server"</code><br>[[Image:Local_Server_Example_Shortcut.png]] | ||
# Double-click the shortcut to launch the server. | # Double-click the shortcut to launch the server. | ||
# At this point, the server will generate new folders and content in the <code>--dataPath</code> directory you specified. For example, you can now visit that path and add a copy of your mod to the </code>/Mods</code> subdirectory if you'd like the server to load your mod (after which you'd need to restart the server). The server will also output logs to the <code>/Logs</code> subdirectory here. | # At this point, the server will generate new folders and content in the <code>--dataPath</code> directory you specified. For example, you can now visit that path and add a copy of your mod to the </code>/Mods</code> subdirectory if you'd like the server to load your mod (after which you'd need to restart the server). The server will also output logs to the <code>/Logs</code> subdirectory here. | ||
# If you'd like load a copy of your mod on the client side, make sure to add your mod to the normal data path directory (on windows, that is <code>%appdata%/ | # If you'd like load a copy of your mod on the client side, make sure to add your mod to the normal data path directory (on windows, that is <code>%appdata%/VintagestoryData/Mods/</code> by default). | ||
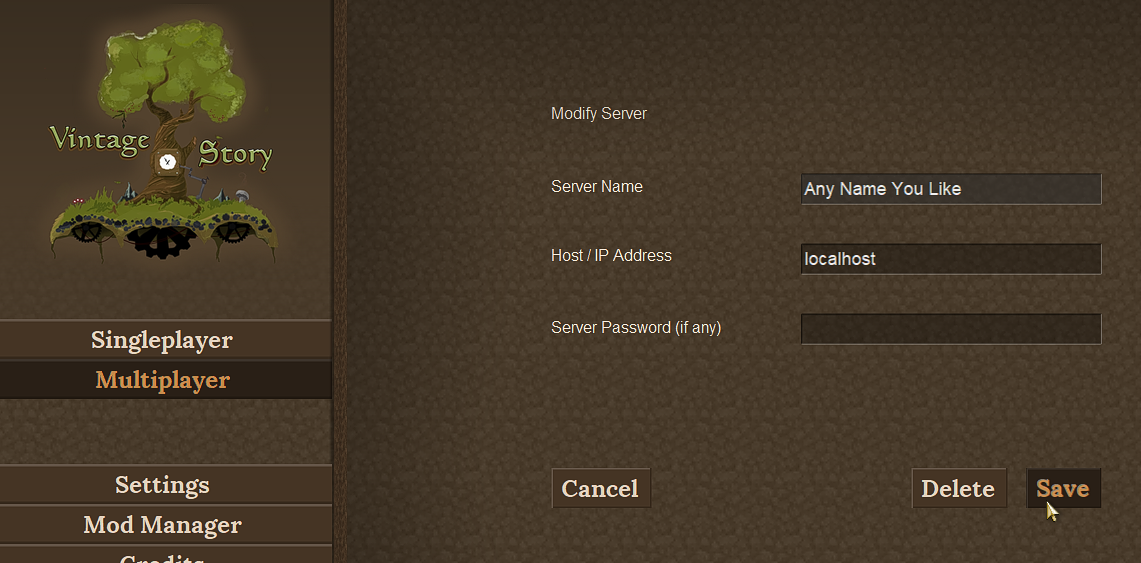
# Launch the normal game client, and select "Multiplayer" from the main menu. Add a new server and configure it with a Host / IP Address value of "localhost". Then click "Save".<br>[[Image:Local_Server_Example_Config.png]] | # Launch the normal game client, and select "Multiplayer" from the main menu. Add a new server and configure it with a Host / IP Address value of "localhost". Then click "Save".<br>[[Image:Local_Server_Example_Config.png]] | ||
# You can now select your server from the Multiplayer menu to connect! All mods, settings, and logs should be separated, and you can test whether the mod will work as expected on a multiplayer server. | # You can now select your server from the Multiplayer menu to connect! All mods, settings, and logs should be separated, and you can test whether the mod will work as expected on a multiplayer server. | ||
=== Notes === | === Notes === <!--T:12--> | ||
* If for some reason you'd like to have a completely separate install for your test server, you can do that too. Either install a full version of the game in a separate directory and run your server from there, or download the "(server only)" TAR file from the Vintage Story download site. Keep in mind that you'll still need to set a custom data path to ensure the server files are separate from the normal game client. | * If for some reason you'd like to have a completely separate install for your test server, you can do that too. Either install a full version of the game in a separate directory and run your server from there, or download the "(server only)" TAR file from the Vintage Story download site. Keep in mind that you'll still need to set a custom data path to ensure the server files are separate from the normal game client. | ||
* You can also configure additional custom path(s) for your server using other run parameters, such as <code>--addModPath</code>. For more info, check out the [[Client startup parameters]] page. | * You can also configure additional custom path(s) for your server using other run parameters, such as <code>--addModPath</code>. For more info, check out the [[Client startup parameters]] page. | ||
* If you're unfamiliar with server setup, you may also want to check out the [[Server Config]] page. For example, you might want to set the <code>"AdvertiseServer"</code> config value to "false" if you're only using this server to test mods locally. | * If you're unfamiliar with server setup, you may also want to check out the [[Server Config]] page. For example, you might want to set the <code>"AdvertiseServer"</code> config value to "false" if you're only using this server to test mods locally. | ||
</translate> | |||
{{Navbox/ | {{Navbox/codemodding}} | ||
Latest revision as of 16:55, 27 March 2024
This page was last verified for Vintage Story version 1.19.
Developing code-based mods for Vintage Story requires an appreciation of the server-client divide, particularly for more advanced applications.
Understanding the division of tasks between server and client threads will make it easier to troubleshoot and to create well-designed mod systems, particularly if you plan for your mod to work on multiplayer servers.
Basics
The core of a typical mod is the ModSystem, which is introduced in more detail on the Advanced Blocks page.
public class ExampleMod : ModSystem
As described in the API docs (VintageStory.API.Common.ModSystem), ModSystem includes a number of virtual methods which your mod may override. Perhaps the most commonly used method is ModSystem.Start(ICoreAPI). You can use this method to define initialization code that should run when the game first loads. However, it is important to realize that, by default, the game creates one instance of your ModSystem on the server, and one additional ModSystem instance on each client. In the case of a single-player game, there will be one server and one client running on the same machine. As a result, any code that you put in ModSystem.Start will be run two or more times - once on the server thread and once on each client thread.
Is My Mod Server-Side, Client-Side, or Both?
TBA
Common "Gotchas"
- In a singleplayer session, the server and the client share the same dataPath. This is important to keep in mind particularly if you are saving/reading any mod settings from the game's data path, such as by using the built in ModConfig methods. For example, your mod might appear to work fine on singleplayer if the server thread is reading your settings file, but then fail to work as expected on a multiplayer server, where the client thread should have been reading the player's settings.
Helpful Tips
- In most cases, a mod can be designed to work on both singleplayer and multiplayer sessions with no special logic needed. However, if you need to check the state of the session for some reason, you can use the
ICoreClientAPI.IsSinglePlayerproperty to check if the current game is a singleplayer game. - If you have any doubts or concerns about your mod working on a multiplayer server, consider setting up a local server on your machine to test it out!
Testing a Divided Server and Client
It's easy to test how your mod will work on a multiplayer server, even if you're just working on a single local machine!
The following instructions are for Windows, but other operating systems should work similarly.
- Before getting started, remove any mods that you've put directly in your Vintage Story directory (typically
%appdata%/Vintagestory/Mods/). Mods in this directory will be shared by the server and client with the setup described below.- Instead, move these mods into the data directory (on Windows, that is
%appdata%/VintagestoryData/Mods/by default).
- Instead, move these mods into the data directory (on Windows, that is
- Set up a shortcut to the game's VintageStoryServer.exe file in your existing Vintage Story program directory. You'll use this shortcut to launch your test server. You will need to give it a custom data path using a run parameter to ensure that the server uses a different data path than the default data path. For example, on Windows your shortcut might have a target of
C:\Program Files\Vintagestory\VintagestoryServer.exe --dataPath "%appdata%/VintagestoryData_Server"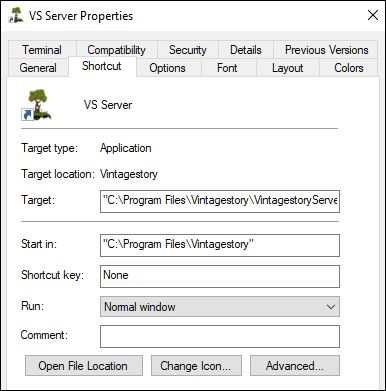
- Double-click the shortcut to launch the server.
- At this point, the server will generate new folders and content in the
--dataPathdirectory you specified. For example, you can now visit that path and add a copy of your mod to the /Mods subdirectory if you'd like the server to load your mod (after which you'd need to restart the server). The server will also output logs to the/Logssubdirectory here. - If you'd like load a copy of your mod on the client side, make sure to add your mod to the normal data path directory (on windows, that is
%appdata%/VintagestoryData/Mods/by default). - Launch the normal game client, and select "Multiplayer" from the main menu. Add a new server and configure it with a Host / IP Address value of "localhost". Then click "Save".
- You can now select your server from the Multiplayer menu to connect! All mods, settings, and logs should be separated, and you can test whether the mod will work as expected on a multiplayer server.


Notes
- If for some reason you'd like to have a completely separate install for your test server, you can do that too. Either install a full version of the game in a separate directory and run your server from there, or download the "(server only)" TAR file from the Vintage Story download site. Keep in mind that you'll still need to set a custom data path to ensure the server files are separate from the normal game client.
- You can also configure additional custom path(s) for your server using other run parameters, such as
--addModPath. For more info, check out the Client startup parameters page. - If you're unfamiliar with server setup, you may also want to check out the Server Config page. For example, you might want to set the
"AdvertiseServer"config value to "false" if you're only using this server to test mods locally.
| Code Modding | |
|---|---|
| Advanced | Server-Client Considerations • Setting up your Development Environment • Advanced Blocks • Advanced Items • Block and Item Interactions • Block Behavior • Block Entity • Particle Effects • World Access • Inventory Handling • Commands • GUIs • Network API • Monkey patching (Harmony) |
| Data Management | Savegame Data Storage • ModConfig File • Chunk Data Storage • TreeAttribute |
| Worldgen | WorldGen API • NatFloat • EvolvingNatFloat |
| Rendering | Shaders and Renderers |
Wondering where some links have gone?
The modding navbox is going through some changes! Check out Navigation Box Updates for more info and help finding specific pages.
| Modding | |
|---|---|
| Modding Introduction | Getting Started • Theme Pack |
| Content Modding | Content Mods • Developing a Content Mod • Basic Tutorials • Intermediate Tutorials • Advanced Tutorials • Content Mod Concepts |
| Code Modding | Code Mods • Setting up your Development Environment |
| Property Overview | Item • Entity • Block • Block Behaviors • Block Classes • Block Entities • Block Entity Behaviors • World properties |
| Workflows & Infrastructure | Modding Efficiency Tips • Mod-engine compatibility • Mod Extensibility • VS Engine |
| Additional Resources | Community Resources • Modding API Updates • Programming Languages • List of server commands • List of client commands • Client startup parameters • Server startup parameters Example Mods • API Docs • GitHub Repository |